Hans Grohe Ecostat S 04232340 Скачать руководство пользователя страница 8

8

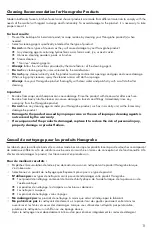
Install the snap connector. Tighten the snap connec-

tor screw.

Install the handle.

Tighten the screw using a 2.5 mm Allen wrench. 

Install the screw cover.

Install the o-rings on the icons. 

Press the icons into the escutcheon.

Installez le connecteur à encliqueter. Serrez la vis du 

connecteur à encliqueter.

Installez la poignée.

Serrez la vis à l’aide d’une clé hexagonale de 2.5 mm. 

Installez la cache-vis.

Installez les jointes sur les icônes.

Installez les icônes sur l’écusson.

Instale el conector a presión. Apriete el tornillo del 

conector a presión.

Instale la manija.

Apriete el tornillo con una llave Allen de 2.5 mm. 

Instale la tapa del tornillo.

Instale las juntas en los iconos.

Instale los iconos en el escudo.

6

2.5 mm

1

3

2

7

1

2

Содержание Ecostat S 04232340

Страница 1: ...EN Installation User Instructions Warranty FR Instructions de montage Mode d emploi Garantie ES Instrucciones de montaje Manejo Garant a S 04232XX0 Square 04880XX0...

Страница 2: ...e receipt is required should it be necessary to request warranty parts prendre en consid ration pour l installation Pour de meilleurs r sultats Hansgrohe recommande que ce produit soit install par un...

Страница 3: ...5930181 Quattro Green 15936181 o Trio 15984181 La pieza interior debe estar instalada y la superficie mural debe estar completamente acabada y estanco antes de la instalaci n de este dispositivo Para...

Страница 4: ...ield order extension 96370000 through your Hansgrohe dealer Si la surface ext rieure du mur fini va au del de la marque maximum du protecteur de pl tre com mandez une rallonge 96370000 aupr s de votre...

Страница 5: ...nada Seal the wall around the plaster shield with waterproof sealant Failure to seal the wall can lead to pos sible water damage Install the slip coupling Scellez le mur autour du protecteur l aide d...

Страница 6: ...urface of the finished wall 04880XX0 only Cut the extension spindle so that t extends 1 29 mm outsde the surface of the finished wall 04232XX0 seulement Coupez la tige d extension de fa on ce qu une p...

Страница 7: ...7 Install the escutcheon Install the nut and o ring Installez l cusson Installez l crou et le joint Instale el escudo Instale la tuerca y la junta 5a 1 2 04232XX0 5b 04880XX0...

Страница 8: ...rrez la vis du connecteur encliqueter Installez la poign e Serrez la vis l aide d une cl hexagonale de 2 5 mm Installez la cache vis Installez les jointes sur les ic nes Installez les ic nes sur l cus...

Страница 9: ...os 00 Chrome 14 Brushed Bronze 34 Brushed Black Chrome 67 Matte Black 70 Matte White 82 Brushed Nickel 96392000 98677XX0 95238XX0 98128000 13x2 94184000 95563XX0 88774XX0 95181000 92851000 96370000 1...

Страница 10: ...00 Chrome 14 Brushed Bronze 67 Matte Black 70 Matte White 82 Brushed Nickel 96392000 95238XX0 94184000 95632XX0 88774XX0 92851000 95181000 57x2 98128000 13x2 96370000 1 25 mm extension not included r...

Страница 11: ...cts are made from different materials to comply with the needs of the market with regard to design and functionality To avoid damage to the product it is necessary to take proper care of it For best r...

Страница 12: ...r tambien los materiales Enjuague el producto con agua limpia despu s de cada uso Los residuos de limpiadores para lavatorios ba eras o azulejos pueden causar da o a los grifos y accesorios Enjuague i...

Страница 13: ...13...

Страница 14: ...14...

Страница 15: ...s warranty Hansgrohe Inc shall not be liable for any damage to the product resulting from reasonable wear and tear outdoor use misuse including use of the product for an unintended application freezin...

Страница 16: ...ty including its limitations are intended to apply to the fullest extent permitted by the laws of the State of New Jersey This warranty gives you specific legal rights and you may also have other righ...

Отзывы: