TP808-i User Manual
118
● After the printer is restarted, short press the power button 3 times, so that the current Wi-Fi
parameter information can be printed.
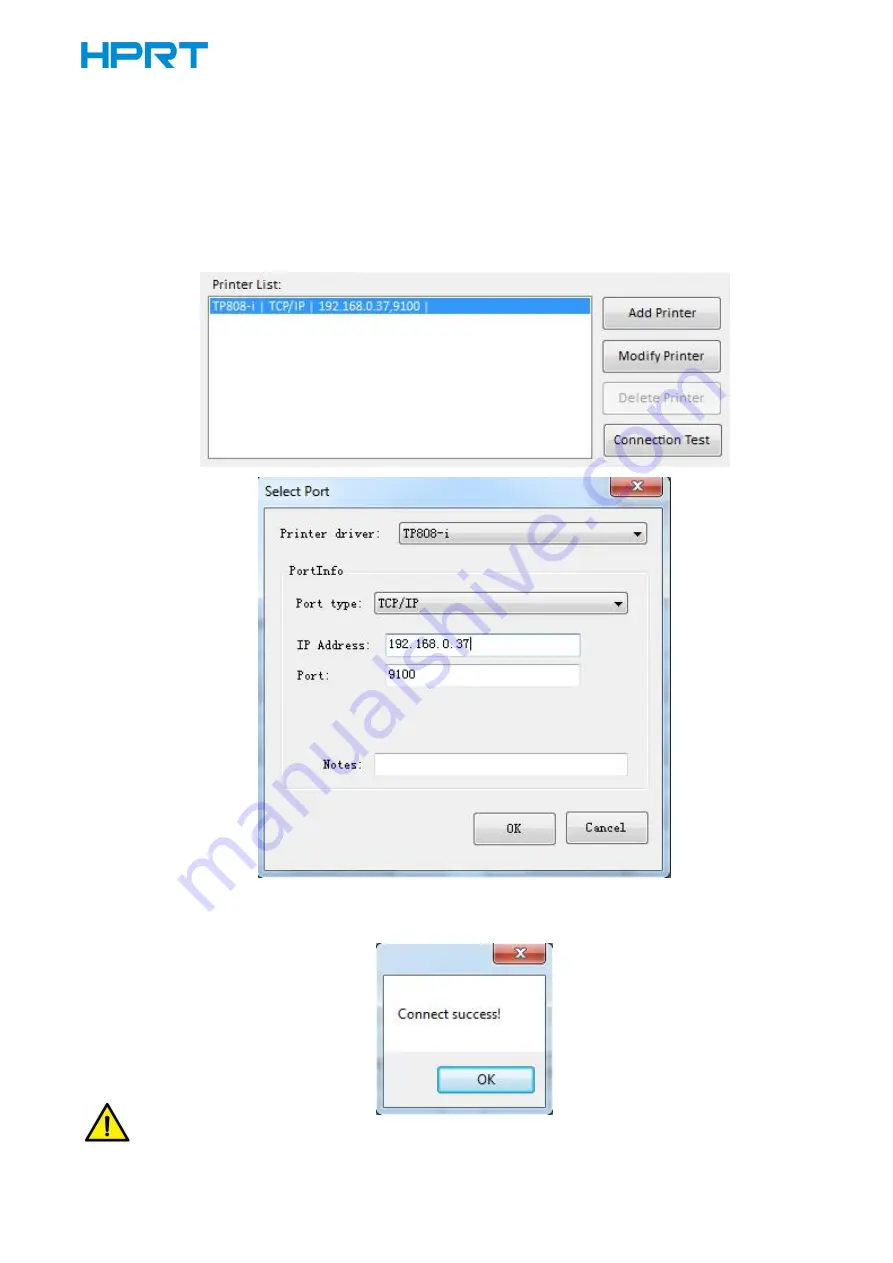
● After completing the setting, connect the computer to the Wi-Fi that the printer connects to,
click “Modify Printer”, choose “TCP/IP”, and set the IP address the same as the printer’s IP
address, then click “OK”.
● Click “Connection Test” to check if the setting is successful.
Note: Shortly press the power button five times, so that the Wi-Fi parameter can be reset.
Содержание TP808-i
Страница 10: ...TP808 i User Manual 6 2 2 Appearance and Components Front Rear Inside Cover Open Deflector Rod...
Страница 34: ...TP808 i User Manual 30 3 Paper 4 Offset Click on Manager add or delete paper...
Страница 36: ...TP808 i User Manual 32 Cut Paper Cut Distance 0 5 10 15 20mm End Document...
Страница 38: ...TP808 i User Manual 34 Cash Drawer...
Страница 39: ...TP808 i User Manual 35 Custom Command...
Страница 40: ...TP808 i User Manual 36 Logo...
Страница 42: ...TP808 i User Manual 38 Click Download Click Add to add a logo BMP format is recommended...
Страница 44: ...TP808 i User Manual 40 Select Printer properties in Devices and Printers then click Preference...
Страница 45: ...TP808 i User Manual 41 Click the Advanced then click Logo...
Страница 47: ...TP808 i User Manual 43 Then click OK...
Страница 48: ...TP808 i User Manual 44 Click Print Test Page to view the printing effect...
Страница 50: ...TP808 i User Manual 46 Code Page 1 Click Watermark Set watermark to print BMP format is recommended...
Страница 51: ...TP808 i User Manual 47 2 Click Halftone to set the halftone...
Страница 52: ...TP808 i User Manual 48...
Страница 55: ...TP808 i User Manual 51 Add Barcode firstly...
Страница 56: ...TP808 i User Manual 52 Set the Font Name and the Barcode Option...
Страница 57: ...TP808 i User Manual 53 Click the Printer Setting Choose the Display Language for Properties...
Страница 59: ...TP808 i User Manual 55...
Страница 60: ...TP808 i User Manual 56...
Страница 61: ...TP808 i User Manual 57...
Страница 64: ...TP808 i User Manual 60 5 Select the System Font for example Arial...
Страница 65: ...TP808 i User Manual 61 6 Select the font to that you went to replace...
Страница 66: ...TP808 i User Manual 62 7 Click Set...
Страница 67: ...TP808 i User Manual 63...
Страница 69: ...TP808 i User Manual 65 3 Set the Ports...
Страница 70: ...TP808 i User Manual 66 4 Click Advanced to set the printing time...
Страница 72: ...TP808 i User Manual 68 3 Choose TP808 i then click Next...
Страница 76: ...TP808 i User Manual 72 6 Click Install 7 Click Finish TP808 i Utility Tool is installed successfully...
Страница 78: ...TP808 i User Manual 74 2 Choose the appropriate printer type and port Then click OK Take TP808 i for example...
Страница 91: ...TP808 i User Manual 87 2 Click Send by Hex input the content Convert text to HEX or send ESC command...
Страница 97: ...TP808 i User Manual 93 9 2 2 6 Parameter Setting You can set Arabic Character Transform for example WPC1256...
Страница 99: ...TP808 i User Manual 95 Function Setting Choose the item and click Setting...
Страница 107: ...TP808 i User Manual 103 Figure Printer IP Address Figure Host IP Address...
Страница 108: ...TP808 i User Manual 104 Figure Host IP Address 2 Set the same network segment Figure Printer IP Address...
Страница 110: ...TP808 i User Manual 106 USB Port Setting Click Virtual serial port setting and restart the printer...
Страница 112: ...TP808 i User Manual 108 3 Return to the printer utility and click Modify Printer...
Страница 113: ...TP808 i User Manual 109 4 Change the port to COM7...


