background image

29


‰

13

L

R

L

R

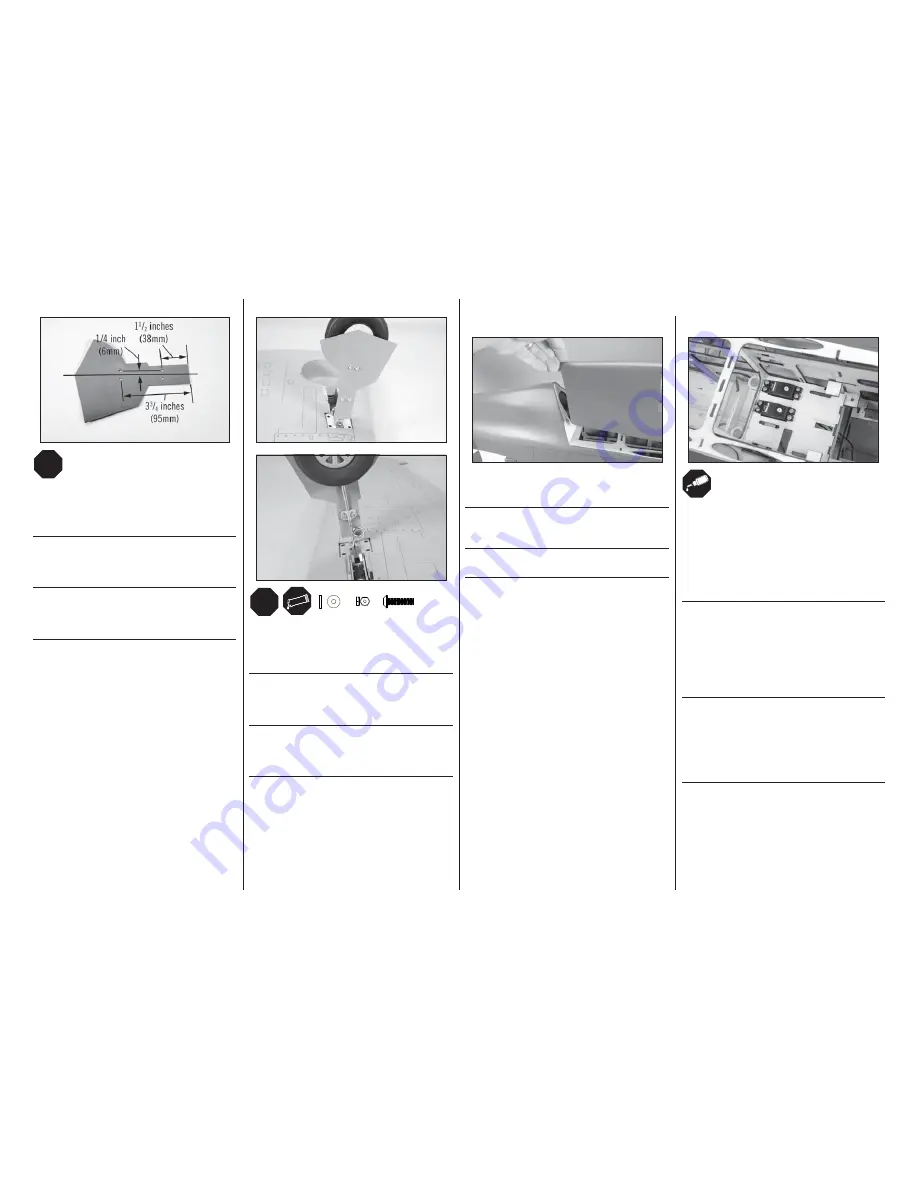
Use a pin vise and 1/8 inch (3mm) drill bit to drill the 
locations for the landing gear door mounting screws. 
The holes are located 1/4 inch (6mm) on each side of the 
centerline and positioned as shown in the above photo.

Bohren Sie mit einem 3mm Handbohrer die Löcher für die 
Fahrwerkshalterschrauben. Die Löcher befi nden sich 6mm 
auf jeder Seite von der Mittelinie entfernt und werden wie 
abgebildet positioniert.

Forare con una punta da 3mm la posizione delle viti per il 
fi ssaggio del portello per il carrello. I fori sono posizionati a 
6mm rispetto alla linea centrale, come si vede nella foto qui 
sopra.


‰

1

Slide the canopy hatch forward then up to release, then aft to 
remove it from the fuselage.

Schieben Sie die Kabinenhaube nach vorne und anschließend 
nach oben, um sie zu lösen. Entfernen Sie sie anschließend 
vom Rumpf, indem Sie sie zurückschieben. 

Far scorrere in avanti il portello a calotta fi no a sbloccarlo, poi 
all’indietro per rimuoverlo dalla fusoliera.


‰

14

L

R

L

R


M3

x2


x2

M3


M3 x 10

x2

Attach the gear door to the landing gear strut using the gear 
door strap and hardware. Use a small amount of silicone 
adhesive between the door and strut to prevent the cover from 
rotating in fl ight.

Montieren Sie die Fahrwerkstür an dem Fahrwerksbein. 
Geben Sie etwas Silikonklebstoff zwischen Fahrwerkstür und 
Fahrwerksbein, damit sich die Abdeckung nicht während des 
Fluges verdrehen kann.

Fissare lo sportello all’asta del carrello di atterraggio, usando 
la cerniera e i pezzi indicati. Usare una piccola quantità di 
adesivo a base di silicone tra lo sportello e l’asta, per evitare 
che la copertura ruoti durante il volo.


‰

2

Use a pin vise and a 1/16-inch (1.5mm) drill bit to drill the 
holes for the servo mounting screws through the backing plate 
of the servo mount. Thread a servo mounting screw into each 
hole to cut threads in the surrounding wood. Apply a small 
amount of thin CA to harden the threads made by the screws. 
Install the grommets and brass eyelets in the servos, then 
secure the rudder and elevator servos in the fuselage using 
the screws provided with the servos.

Bohren Sie mit einem 1,5mm Handbohrer ein Löcher 
in die Servoplatte. Drehen Sie in jedes der Löcher eine 
Servoschraube um ein Gewinde zu schneiden und geben 
Sie einen kleinen Tropfen dünnfl üssigen Sekundenkleber 
in die Gewindelöcher um diese zu härten. Setzen Sie die 
Gummipuffer und Blechösen in die Servos ein und schrauben 
dann das Seitenruder und Höhenruderservo im Rumpf mit den 
Schrauben aus dem Lieferumfang fest.

Praticare i fori per le viti di montaggio dei servi, con una 
punta da 1,5mm sulla piastra di supporto del servo. Avvitare 
una vite di fi ssaggio in ogni foro per fi lettare il legno. Mettere 
una piccola quantità di colla CA nei fori per indurire la 
fi lettatura. Montare nei servi i gommini e i distanziali in 
ottone, poi fi ssare i servi di timone ed elevatore in fusoliera 
con le loro viti.

RADIO INSTALLATION•EINBAU DER FERNSTEUERANALGE•INSTALLAZIONE DELLA RADIO

Содержание P-47D-1 Thunderbolt 60

Страница 1: ...1 P 47D 1 Thunderbolt 60 ARF Instruction Manual Bedienungsanleitung Manuel d utilisation Manuale di Istruzioni ...

Страница 2: ...subject to change at the sole discretion of Horizon Hobby Inc For up to date product literature visit horizonhobby com and click on the support tab for this product Meaning of Special Language The following terms are used throughout the product literature to indicate various levels of potential harm when operating this product NOTICE Procedures which if not properly followed create a possibility o...

Страница 3: ... werden Die aktuelle Produktliteratur finden Sie auf horizonhobby com unter der Registerkarte Support für das betreffende Produkt Spezielle Bedeutungen Die folgenden Begriffe werden in der gesamten Produktliteratur verwendet um auf unterschiedlich hohe Gefahrenrisiken beim Betrieb dieses Produkts hinzuweisen HINWEIS Wenn diese Verfahren nicht korrekt befolgt werden können sich möglicherweise Sachsc...

Страница 4: ... sono soggetti a cambiamenti a totale discrezione di Horizon Hobby Inc Per una documentazione aggiornata sul prodotto visitare il sito www horizonhobby com e fare clic sulla sezione Support per questo prodotto Significato dei termini particolari In tutta la documentazione relativa al prodotto sono utilizzati i seguenti termini per indicare vari livelli di potenziale pericolo durante il funzionamen...

Страница 5: ...digte oder fehlende Teile feststellen kontaktieren Sie bitte den Verkäufer Zum Entfernen von Falten in der Bespannung verwenden Sie den Heißluftfön HAN100 und Bespannhandschuh HAN150 oder das Folienbügeleisen HAN141 Bitte achten Sie bei überlappenden Farben dass Sie diese sich bei dem Bearbeitung nicht trennen Laden des Senders und Empfängers Zentrieren der Trimmungen und Sticks auf dem Sender Sol...

Страница 6: ...ro Antrieb Power Motore elettrico Power 60 Brushless 5 channel or greater with 7 servos 6 for EP 5 Kanal oder größer mit 7 Servos 6 für Elektroantrieb a 5 canali o più con 7 servo 6 per EP Spinner Spinner Ogiva dell elica 1 inch 25mm included inklusive inclusa SPECIFICATIONS SPEZIFIKATIONEN SPECIFICHE LARGE PARTS LAYOUT BAUTEILE OHNE KLEINTEILE SCHEMA DEI COMPONENTI GRANDI 5 4 4 1 8 7 15 10 2 12 1...

Страница 7: ...16 x 24 Dado ogiva 25mm 5 16 x 24 10 HAN279013 Plastic Parts Kunststoffteile Componenti in plastica 11 HAN279014 4 inch Wheels 2 102mm Reifen 2 Ruote da 102mm 2 12 HAN279017 EP Mount and Tray Set EP Motorhalter Set supporto motore EP 13 HAN279018 Fixed Landing Gear Set Starres Fahrwerk Set del carrello di atterraggio fisso 14 HAN279019 Wing Tube Tragflächenverbinder Tubo dell ala 15 HAN2790021 Fue...

Страница 8: ... Motore a benzina 15cc EVO13080 Evolution 13 x 8 Propeller Evolution 13 x 8 Propeller Evolution 13 x 8 Elica EVO14060 Evolution 14 x 6 Propeller Evolution 14 x 6 Propeller Evolution 14 x 6 Elica DUB400 Gas Conversion Stopper Tankverschluss Benzin Tappo conversione benzina DUB697 Exhaust Deflector Abgasumlenkung Deflettore scarico BIS04093 Bisson Muffler Bisson Schalldämpfer Silenziatore Bisson EVO...

Страница 9: ...MX Full Range Aircraft Telemetry Module Spektrum DSM Telemetriemodul TM1000 modulo telemetria per aereo a piena portata EVOA107 Ignition Telemetry Adapter Evolution Telemetrieadapter Zündung Adattatore accensione telemetria EFLA110 Power Meter E flite Lastmessgerät Misuratore di potenza EFLC3020 Celectra 200W DC Charger E flite 200W DC Multi Akku Ladegerät Celectra 200W DC Caricabatterie LOSA99201...

Страница 10: ...ein gross Cacciavite a lama piatta Piccolo grande Flat file Flachfeile Lima piatta Foam rubber 1 4 inch Moosgummi Gommapiuma 6 5mm Hemostat Klemme Pinzetta Hex wrench 1 5mm 2mm 2 5mm 3mm 7 64 inch Inbusschlüssel 1 5mm 2mm 2 5mm 3mm 7 64 inch Chiave esag 1 5mm 2mm 2 5mm 3mm 7 64 inch Hobby knife 11 blade Hobbymesser mit 11 Klinge Taglierino 11 lama Isopropyl alcohol Isopropyl Alkohol Alcol isopropi...

Страница 11: ...otante Ruler Lineal Righello Sanding drum Schleiftrommel Levigatore Sandpaper Schleifpapier Carta vetrata Scissors Schere Forbici Side cutters Seitenschneider Lama laterale Spray bottle Sprayflasche Bottiglia spray Hobby and craft square Rechteck Riga a squadra Tie wraps Kabelbinder Fascette avvolgenti Toothpicks Zahnstocher Stuzzicadenti T pins T Nadeln Spilli a T Vise grips Klemmen Pinze bloccan...

Страница 12: ... drücken Spingere forte Apply oil Öl verwenden Applicare olio Attach temporarily Vorübergehend anbringen Attaccare temporaneamente Apply threadlock Schraubensicherungslack verwenden Applicare fuido threadlock Assemble right and left Links und rechts montieren Assemblare destra e sinistra Repeat multiple times as indicated Vorgang wiederholen wie angezeigt Ripetere piu volte come indicato Ensure pr...

Страница 13: ...l perno a T appoggiato contro il bordo della superficie di controllo 4 L R L R Fit the aileron to the wing Make sure the gap at each end of the aileron is equal so the aileron can move freely Passen Sie das Querruder an die Tragfläche an Stellen Sie sicher dass der Spalt gleichmäßig ist und sich das Ruder frei bewegen kann Fissare l alettone all ala Accertarsi che lo spazio alla fine dell alettone...

Страница 14: ...e Gewindelöcher um diese zu härten Mettere una piccola quantità di colla CA nei fori per indurire il filetto fatto nel passaggio precedente 4 L R L R Secure the servo to the cover using the screws provided with the servo Befestigen Sie das Servo mit den mitgelieferten Schrauben an der Abdeckung Fissare il servo alla copertura usando le viti fornite insieme al servo stesso 5 L R L R Center the aile...

Страница 15: ...Togliere le viti prima di procedere 8 L R L R Apply a small amount of thin CA to harden the threads made in the previous step Geben Sie einen kleinen Tropfen dünnflüssigen Sekundenkleber in die Gewindelöcher um diese zu härten Mettere una piccola quantità di colla CA nei fori per indurire il filetto fatto nel passaggio precedente 9 L R L R Secure a 9 inch 228mm extension to the servo lead using st...

Страница 16: ...ro alla ruota dentata Segnare le posizioni per le viti di montaggio della squadretta di controllo 14 L R L R Use a pin vise and 1 16 inch 1 5mm drill bit to drill the holes for the control horn mounting screws Use care not to accidentally drill through the top of the aileron Bohren Sie mit dem Handbohrer 1 5mm die Befestigungslöcher für das Ruderhorn Bitte achten Sie darauf nicht versehentlich dur...

Страница 17: ... squadretta dell alettone Con il radiocomando acceso e il servo alettone centrato regolare la lunghezza del comando in modo da centrare l alettone Fatto questo far scorrere il tubetto sulla forcella per impedire che si apra 1 L R L R Remove the outer hole of the flap control horn using side cutters Use sandpaper to round the corners to prevent the clevis from catching on the horn during operation ...

Страница 18: ...uro all ala e all alettone Questo permetterà anche un facile riposizionamento dei flap durante l installazione 4 x6 OIL Once the technique for positioning the flap has been reviewed remove the hinges from the flaps Apply a small amount of petroleum jelly to the flex point of the hinge to prevent epoxy from entering the hinge Haben Sie die Technik zur Positionierung probiert nehmen Sie die Scharnie...

Страница 19: ...amente Usare nastro a bassa aderenza per tenere in posizione il flap fino al completo essiccamento della resina epossidica 2 L R L R Fit the linkage in the wing Connect the clevis to the outer hole on the flap control horn Slide the silicone tubing over the forks of the clevis to prevent it from opening accidentally Führen Sie die Anlenkung in die Tragfläche Schließen Sie den Gabelkopf an das äuße...

Страница 20: ...p con il radiocomando Montare la squadretta del servo in modo che sia spostata due dentini verso il bordo di entrata dell ala Togliere gli altri bracci delle squadrette Con una punta da 2mm allargare i fori sulle squadrette distanti 13mm dal centro 4 L R L R Connect the flap linkage to the servo arm To provide good linkage geometry adjust the linkage so the flap is deflected 19 16 inches 40mm as s...

Страница 21: ...uota può girare meglio 4 x2 Remove the spoked hub cap from the wheel Use a drill and 11 64 inch 4mm drill bit to drill a hole through the solid hub cap Remove the hub cap and enlarge the hole using a 7 16 inch 4 5mm drill bit Snap the solid hub cap back into position on the wheel Nehmen Sie die Radkappe mit den Speichen ab und bohren mit einem 4mm Bohrer durch die Felge Vergrößern Sie das Loch in ...

Страница 22: ... punta da 3mm la posizione delle viti per il fissaggio del portello per il carrello I fori sono posizionati a 6mm rispetto alla linea centrale come si vede nella foto qui sopra 6 L R L R Slide the wheel collar into position and tighten the setscrew on the flat area on the axle Make sure the wheel can rotate freely on the axle Schieben Sie den Stellring in Position und ziehen die Madenschraube auf ...

Страница 23: ...t Fissare una prolunga da 76mm sul cavetto del servo usando uno spago o un sistema commerciale Legare lo spago posizionato all interno dell ala al connettore della prolunga e tirarla attraverso l ala Il connettore viene poi inserito nel foro quadrato sull ala per evitare che cada all interno dell ala durante il trasporto 2 L R L R Slide the landing gear door mounts on the strut They will be correc...

Страница 24: ...ing a 7 32 inch 5 5mm drill bit Snap the solid hub cap back into position on the wheel Nehmen Sie die Speichenradkappe vom Rad Vergrößern Sie mit einem 5mm Bohrer das Loch in der Achse Bohren Sie durch die Felge und die feste Radkappe Nehmen Sie die Radkappe ab und vergrößern das Loch mit einem 5 5mm Bohrer Setzen die Radkappe wieder auf Rimuovere il coprimozzo del cerchio a raggi della ruota Fora...

Страница 25: ...ontrario regolare la gamba per ottenere il giusto allineamento 12 L R L R Use low tack tape to secure a piece of paper to the bottom of the wing over the opening for the retract Puncture the paper in the locations for the landing gear door mounting screws Kleben Sie mit Klebeband mit geringer Klebekraft ein Stück Papier wie abgebildet auf die Unterseite der Tragfläche über die Fahrwerksöffnung Pun...

Страница 26: ... ein Bügeln Sie mit einem kleinem Folienbügeleisen die Folie in der Fahrwerksöffnung fest Rifinire il rivestimento di 3 mm all interno dell apertura per l elemento retrattile Usare un taglierino per tagliare il sostegno vicino al supporto dell elemento retrattile Con uno strumento di tenuta delle rifiniture spianare il rivestimento nell alloggiamento della ruota 16 L R L R Secure the landing gear ...

Страница 27: ...im the axle Nehmen Sie das Rad und Distanzstück von der Achse Trennen Sie mit der Trennscheibe das markierte Stück von der Achse Togliere la ruota e i distanziali dall asse per poterlo tagliare a misura con un disco da taglio 7 L R L R OIL Slide the two nylon spacers on the axle Apply a drop of oil on the axle so the wheel will roll smoothly Schieben Sie die beiden Kunstoffdistanzstücke von der Ac...

Страница 28: ...gen Halter damit es beim Transport nicht in die Tragfläche fällt Fissare una prolunga da 76mm sul cavetto del servo usando uno spago o un sistema commerciale Legare lo spago posizionato all interno dell ala al connettore della prolunga e tirarla attraverso l ala Il connettore viene poi inserito nel foro quadrato sull ala per evitare che cada all interno dell ala durante il trasporto 12 L R L R Che...

Страница 29: ...es verdrehen kann Fissare lo sportello all asta del carrello di atterraggio usando la cerniera e i pezzi indicati Usare una piccola quantità di adesivo a base di silicone tra lo sportello e l asta per evitare che la copertura ruoti durante il volo 2 Use a pin vise and a 1 16 inch 1 5mm drill bit to drill the holes for the servo mounting screws through the backing plate of the servo mount Thread a ...

Страница 30: ...inghia di nastro a strappo Fissare i cavi tra la batteria e il collegamento dell interruttore usando un cordino o del filo interdentale 6 Connect the leads and extensions to the receiver Schließen Sie die Kabel und die Verlängerungen an den Empfänger an Collegare i cavi e le prolunghe al ricevitore 7 Use hook and loop tape to attach the receiver to the receiver tray Befestigen Sie den Empfänger au...

Страница 31: ...izzatore si sovrapponga ai suoi bordi per non lasciare il legno visibile Bisogna anche lasciare 6mm di rivestimento dietro al bordo di entrata dello stabilizzatore per evitare un divario tra lo stabilizzatore e la fusoliera 2 Remove the tail cover from the fuselage and set it aside Nehmen Sie die Heckabdeckung ab und legen sie zur Seite Togliere dalla fusoliera la copertura della coda e metterla d...

Страница 32: ...ow tack tape to hold the stabilizer halves tightly against the fin until the epoxy fully cures Make sure the stabilizer is aligned with the wing as shown The wing can be removed from the fuselage once the epoxy has fully cured Schieben Sie das Höhenruder zurück in Position Wischen Sie mit einem Papiertuch und Ispropylalkohol überflüssiges Epoxy ab Fixieren Sie die Höhenleitwerkshälften bis das Epo...

Страница 33: ... carefully bend the joiner wire so both elevators are in alignment to avoid the use of excessive trim to correct for poor alignment Setzen Sie den Verbinderdraht in die Höhenruderhälften Bitte achten Sie dabei darauf dass die Höhenruder gerade auf der Unterlage liegen Falls nicht biegen Sie vorsichtig den Draht so dass beide Ruder gerade sind Damit vermeiden Sie unnötig Trimmungen Mettere il filo ...

Страница 34: ...rk und Verbinderdraht bei dem Aufsetzen und dann mit eingeschalteter Anlage Justieren Sie falls notwendig die Gabelköpfe bis das Höhenruder neutral steht Entfernen Sie nach der Einrichtung die Höhenruder vom Leitwerk Praticare un foro da 1 5mm nel centro di ciascuna fessura delle cerniere per consentire alla colla CA di colare nella cerniera A questo punto praticare i fori nello stabilizzatore e n...

Страница 35: ...kt verklebt sind Kleben sie falls notwendig nach Mettere della colla CA liquida su entrambi i lati di ciascuna cerniera Quando la colla è asciutta tirare delicatamente le superfici di controllo per essere sicuri che la cerniere siano incollate bene In caso contrario mettere dell altra colla CA 3 Prepare the rudder servo arm by installing the pushrod connector in the hole that is 7 16 inch 11mm fro...

Страница 36: ...Silikonschlauchstück ab und schieben es über den Gabelkopf Drehen Sie den Gabelkopf auf das Gestänge und setzen den Gabekopf in das innere Loch des Ruderhorn Setzen Sie das Ruderhorn auf das Ruder auf so dass die Vorderkante bündig zur Schrägung ist Markieren Sie dann die Position der Befestigungsschrauben Tagliare un pezzo da 5mm di tubetto di silicone e infilarlo sulla forcella Avvitare la force...

Страница 37: ...de the pushrod through the connector on the rudder servo arm Schieben Sie die Spornradanlenkung in das Röhrchen im Rumpf und durch den Gestängeanschluss am Seitenruderservoarm Inserire il comando di direzione nel suo tubetto all interno della fusoliera Guidarlo poi attraverso il nottolino che si trova sulla squadretta del servo 4 Remove the tail wheel from the tail gear wire Use a flat file to fil...

Страница 38: ...adretta dello sterzo all interno della fusoliera inserirvi la gamba del carrello di coda Usare una chiave esagonale da 1 5mm per stringere il grano 7 M3 x 3 x1 M3 x1 Secure the wheel collar on the tail gear wire by tightening the setscrew on the flat closest to the tail wheel then slide the wire into the tail wheel bushing guiding the wire into the steering arm Schrauben Sie den Stellring auf dem ...

Страница 39: ... Setzen Sie die Abdeckung auf und markieren Sie mit dem 1 5mm Handbohrer das Loch für die Befestigungsschraube Nehmen Sie die Abdeckung ab bohren das Loch Mettere in posizione il coperchio di coda e usare una punta da 1 5mm per fare i fori per la vite Togliere il coperchio e terminare praticando il foro per la vite EP MOTOR INSTALLATION E MOTOR EINBAU INSTALLAZIONE DEL MOTORE ELETTRICO 1 Place the...

Страница 40: ...selage Schrauben Sie die Motorbox an den Rumpf Fissare la scatola del motore alla fusoliera 7 Secure the motor to the motor box using the hardware included with the motor Sichern Sie den Motor an der Motorträgerbox mit dem im Lieferumfang des Motors enthaltenen Befestigungen Fissare il motore al suo supporto con le viti fornite insieme al motore 6 The motor shaft must be repositioned to allow the ...

Страница 41: ...attery tray in the fuselage using the hardware listed Tighten the screws using a 2mm hex wrench Schrauben Sie den Träger mit den aufgeführten Schrauben fest Ziehen Sie die Schrauben mit einem 2mm Inbusschlüssel an Fissare il supporto batteria in fusoliera usando le viti elencate stringendole con una chiave esagonale da 2mm Î Place a drop of canopy glue on the threads of the screws before installin...

Страница 42: ...tubetto guida per il comando motore Carteggiare i primi 10mm di questo tubetto 6 Slide the pushrod tube into the hole drilled in the firewall Use medium CA to glue the pushrod to the firewall Schieben Sie das Röhrchen in das Loch im Motorspant und kleben es mit mittleren Sekundenkleber fest Far scorrere il tubo dell asta di spinta nel foro eseguito nella paratia parafiamma Usare una colla CA media...

Страница 43: ... gommini e i distanziali in ottone poi fissare il servo del motore in fusoliera con le sue viti 9 x1 x1 N Use side cutters to remove the Z bend from the 2mm x 280 throuttle pushrod Prepare the clevis by cutting a 3 16 inch 5mm piece of silicone tubing then slide the tubing onto the clevis Thread the clevis on the pushrod then insert the pushrod into the pushrod tube Attach the clevis to the carbur...

Страница 44: ...zin geeigneten Verschluss DUB400 ersetzen Sichern Sie die Schläuche mit etwas JB Weld und nach trocknen des Klebers mit einer Drahtschlaufe Quando si monta un motore a benzina è necessario sostituire il tappo serbatoio fornito con uno adatto DUB400 Preparare l insieme del tappo mettendo una piccola quantità di JB Weld all estremità dei tubi Questo aiuta a fissare con sicurezza i tubetti del carbur...

Страница 45: ...liera il rinforzo per il serbatoio 4 Slide the tank in the fuselage making sure the vent line inside the tank is facing toward the top of the fuselage The neck of the tank fits into the hole in the firewall Secure the tank using the hook and loop strap Schieben Sie den Tank in den Rumpf und achten bitte darauf dass die Entlüftungsleitung nach oben zeigt Inserire il serbatoio in fusoliera accertand...

Страница 46: ... with the operation of the engine Secure all connections using tie wraps or wire ties to prevent the fuel lines from disconnecting inside the cowling Schließen Sie die Kraftstoffleitung an Vergaser an Wir haben hier einen Kraftstofffilter montiert um zu verhindern dass der Motor verschmutzten Sprit ansagt Sichern Sie alle Verbindungen mit Kabelbinder damit sich keine Leitung in der Motorhaube löse...

Страница 47: ...tatura Ora si può fissare la capottina alla fusoliera 6 Secure the propeller to the engine using the included spinner nut Slide a 3 32 inch 2 5mm hex wrench through the hole in the spinner nut to use as leverage when tightening the nut Sichern Sie den Propeller mit der Spinnermutter aus dem Lieferumfang Stecken Sie einen 2 5mm Inbusschlüssel durch das Loch und ziehen die Mutter mit diesem Hebel an...

Страница 48: ... to glue the guns into the leading edge of the wing Prüfen Sie zum Schluss darauf dass die MGs von oben in einer Linie parallel zu einander ausgerichtet sind Kleben Sie die MG s mit etwas mitterem Sekundenkleber ein Verificare infine che le armi siano parallele quando vengono guardate dall alto e in linea le une con le altre quando vengono guardate di fronte Per fissare le armi nel bordo di entrat...

Страница 49: ...ssare lo scarico inferiore sotto alla fusoliera Tenere fermo lo scarico inferiore con nastro a bassa adesività mentre la colla si asciuga 1 Remove the instrument panel decal from the decal sheet Apply the instrument panel to the cockpit Nehmen Sie den Instrumentenaufkleber vom Dekorbogen und kleben ihn in das Cockpit Rimuovere la decalcomania del pannello strumenti dal foglio delle decalcomanie Ap...

Страница 50: ...iera 5 Position the canopy so the rear frame on the canopy is aligned with the rear edge of the cockpit opening Use canopy glue to secure the canopy to the canopy hatch Use low tack tape to hold the canopy in position until the glue fully cures Wrap the tape completely around the canopy hatch as the tape does not stick well to the covering We used balsa sticks to hold the lower edges of the canopy...

Страница 51: ...w into each hole then applying a drop of CA in each hole to harden the surrounding wood before attaching the pylons to the wing Richten Sie den Träger wie abgebildet an der Kante der Querruderabdeckung aus Die vordere Befestigungsschraube befindet sich 51mm vor dem vorderen Ende der Querruderservoabdeckung Achten Sie darauf dass der Träger parallel zur Flächenwurzel ausgerichtet ist Bohren Sie mit...

Страница 52: ...ung abgebildet Verwenden Sie dazu eine Sprühflasche mit Wasser und einem Tropfen Geschirrspülmittel um die Aufkleber falls notwendig zu positionieren Wischen Sie überschüssiges Wasser mit einem Handtuch unter dem Aufkleber weg und lassen das Modell über Nacht trocknen Applicare gli adesivi seguendo le immagini di questo manuale e della scatola Usare una bottiglia con spray e una goccia di detersiv...

Страница 53: ...dell befindet sich in 92 108mm Entfernung zur Flügelvorderkante wie abgebildet Markieren Sie den Schwerpunkt an der Oberseite des Flügels 3 Das Modell sollte vor dem Ausbalancieren flugfertig ausgerüstet sein Stellen Sie das ungedrehte Flugzeug mit den Markierungen auf dem Flügel auf Ihre Fingerspitzen oder einen im Handel erhältlichen Balancierständer Dies ist der richtige Balancepunkt für Ihr Mo...

Страница 54: ...to elevator mix refers to the transmitter program values RUDERAUSSCHLÄGE 1 Schalten Sie den Sender und Empfänger ihres Modells ein Prüfen Sie die Seitenruderaussschläge mit dem Sender Bewegen Sie den Seitenruderstick nach rechts sollte sich das Ruder auch nach rechts bewegen Reversieren Sie falls notwendig die Funktion am Sender 2 Prüfen Sie die Höhenruderfunktion am Sender Ziehen Sie den Höhenrud...

Страница 55: ...Esponenziale Elevatore Tasso Basso 20 Esponenziale su 20mm su 14mm giù 20mm giù 14mm Timone Tasso Elevato 25 Esponenziale Timone Tasso Basso 20 Esponenziale destra 30mm destra 20mm sinistra 30mm sinistra 20mm Flaps Medio 32mm Atterraggio 60mm Elevatore Compensazione Flap Flap medio 5 7mm in giù Atterraggio 13 2mm in giù Queste misure sono indicazioni generali misurate nelle nostre prove in volo Si...

Страница 56: ...e il motore e con il modello assicurato saldamente al suolo ripetere la prova di portata del radiocomando che non dovrebbe sostanzialmente differire da quella precedente Se così non fosse evitare di andare in volo Fare le opportune verifiche sull impianto radio ed eventualmente inviare il tutto al servizio assistenza DAILY FLIGHT CHECKS Check the battery voltage of the transmitter battery Do not fly...

Страница 57: ...ce For questions or assistance please visit our website at www horizonhobby com submit a Product Support Inquiry or call the toll free telephone number referenced in the Warranty and Service Contact Information section to speak with a Product Support representative Inspection or Services If this Product needs to be inspected or serviced and is compliant in the country you live and use the Product ...

Страница 58: ...ohne Einschränkungen und Vorbehalte Wenn Sie als Käufer nicht bereit sind diese Bestimmungen im Zusammenhang mit der Benutzung des Produktes zu akzeptieren werden Sie gebeten dass Produkt in unbenutztem Zustand in der Originalverpackung vollständig bei dem Verkäufer zurückzugeben Sicherheitshinweise Dieses ist ein hochwertiges Hobby Produkt und kein Spielzeug Es muss mit Vorsicht und Umsicht einge...

Страница 59: ...rsi tale responsabilità associata all uso del prodotto si suggerisce di restituire il prodotto intatto mai usato e immediatamente presso il venditore Indicazioni di sicurezza Questo è un prodotto sofisticato di hobbistica e non è un giocattolo Esso deve essere manipolato con cautela con giudizio e richiede delle conoscenze basilari di meccanica e delle facoltà mentali di base Se il prodotto non ver...

Страница 60: ...n Ämtern bei der Müllabfuhr für Haushaltsmüll sowie dort wo Sie das Produkt gekauft haben ISTRUZIONI PER LO SMALTIMENTO DI RAEE DA PARTE DI UTENTI DELL UNIONE EUROPEA Questo prodotto non deve essere smaltito assieme ai rifiuti domestici È responsabilità dell utente lo smaltimento di tali rifiuti che devono essere portati in un centro di raccolta predisposto per il riciclaggio di rifiuti elettrici e a...

Страница 61: ...An inexperienced pilot is assisted by an experienced pilot 4 When and where required by rule helmets must be properly worn and fastened They must be OSHA DOT ANSI SNELL or NOCSAE approved or comply with comparable standards B RADIO CONTROL RC 1 All pilots shall avoid flying directly over unprotected people vessels vehicles or structures and shall avoid endangerment of life and property of others 2 ...

Страница 62: ...62 ...

Страница 63: ...63 ...

Страница 64: ... Celectra are trademarks or registered trademarks of Horizon Hobby Inc The Spektrum trademark is used with permission of Bachmann Industries Inc All other trademarks service marks and logos are the property of their respective owners Job 35349 Created 02 2013 ...

Отзывы: