background image

www.HandiQuilter.com/ProStitcher

07/23/12

Design Menu 5.19

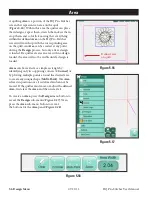
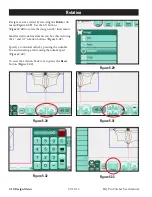
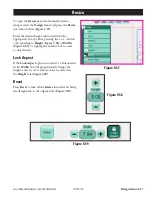
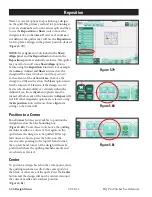
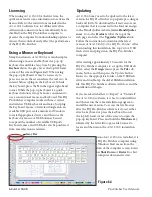
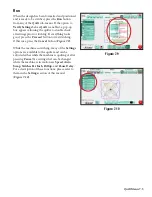
Horizontal Alignment

Align Left: 

(

Figure 5.63

The left side of the design’s 

bounding box (the light blue box) aligns with the 

left-most point of the 

Area


(represented by the 

purple lines)

.


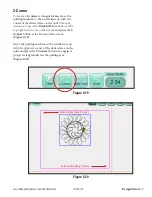
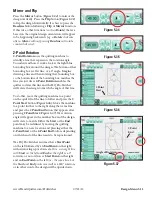
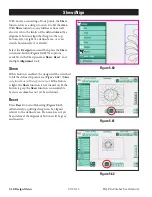
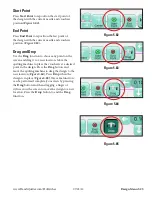
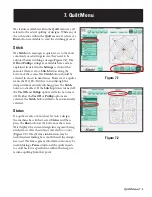
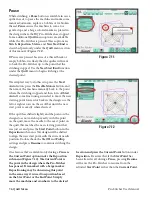
Align Horizontal Center:


(

Figure 5.64

)

 The 

horizontal center of the design’s bounding box  

aligns with the horizontal center of the 

Area

.

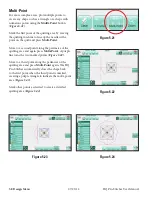
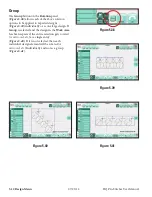
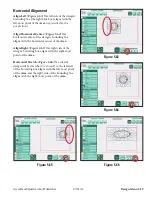
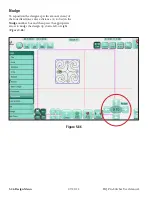
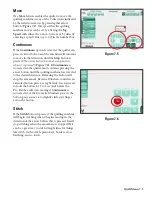
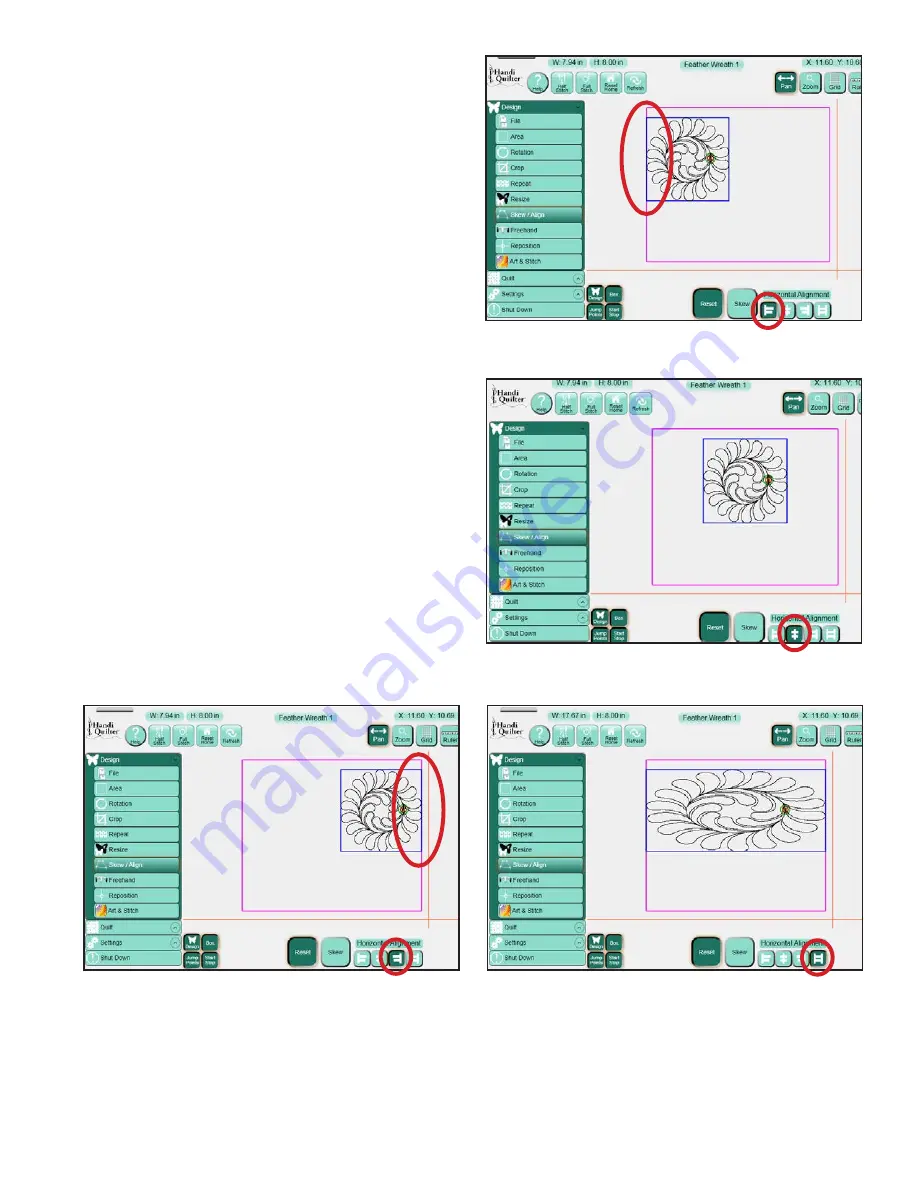
 Align  Right:


(

Figure 5.65

The right side of the 

design’s bounding box aligns with the right-most 

point of the 

Area

.


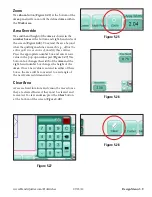
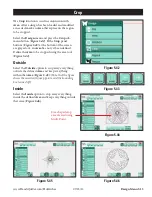
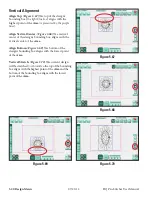
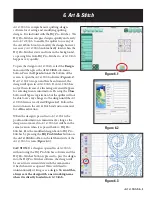
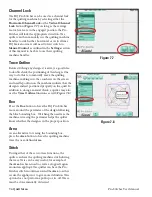
Horizontal Stretch:


(

Figure 5.66

)

 The current 

design will be stretched 

(or shrunk)

 so the left side 

of the bounding box aligns with the left-most point 

of the 

Area

 and the right side of the bounding box 

aligns with the right-most point of the 

Area

.

Figure 5.63

Figure 5.64

Figure 5.65

Figure 5.66

Содержание HQ Pro-Stitcher

Страница 1: ...HQ Pro Stitcher The Future of Quilting Possibilities is Here 2012 Handi Quilter Inc All rights reserved Printed in the USA 07 23 12 USER MANUAL ...

Страница 2: ...ted Setting Up the HQ Pro Stitcher 3 32 USB Flash Drive 3 32 Keyboard Docking Station 3 32 4 HQ Pro Stitcher Overview 4 1 HQ Pro Stitcher Operating System 4 1 Handlebar Control 4 1 Enable Disable Motors 4 2 Screen Overview 4 3 Top Toolbar Buttons 4 3 Menu Selections 4 3 Panel Buttons 4 4 Work Area 4 4 Selected vs Non Selected Buttons 4 5 Gray Buttons 4 5 Toolbar 4 6 Help 4 6 1 Table of Contents Ha...

Страница 3: ... Stitch 7 1 Status 7 1 New Start End 7 2 Start Stop Auto 7 2 Scroll Bar 7 2 Jump Points 7 2 Move 7 3 Continuous 7 3 Stitch 7 3 Channel Lock 7 4 Trace Outline 7 4 Box 7 4 Area 7 4 Stitch 7 4 Run 7 5 Pause 7 6 Emergency Stop 7 7 8 Settings Menu 8 1 Speed 8 1 Auto Jump 8 1 Stitches Per Inch 8 2 Tie Off 8 3 Tie Off Start 8 3 Tie Off End 8 3 Tie Off 8 3 Distance 8 3 Tack 8 3 Micro 8 3 Pullup 8 4 Pull U...

Страница 4: ... or near children Use this quilting machine only for its intended use as described in this manual Use only attachments recommended by the manufacturer as contained in this manual 2 Important Safety Instructions Never operate this quilting machine if it has a damaged cord or plug if it is not working properly if it has been dropped or damaged or dropped into water Return the quilting machine to the...

Страница 5: ...our machine 1 Do not store this machine in areas exposed to direct sunlight or high humidity Never use or store the machine near a heater an iron a halogen lamp or other hot things 2 Clean the computer monitor with a soft lint free rag If necessary dampen the rag with a small amount of isopropyl alcohol Do not use any other cleaners on the computer monitor 3 Use only neutral soaps or detergents to...

Страница 6: ...tutorials to help you learn how to use the HQ Pro Stitcher 5 FREE design downloads 6 News about hardware upgrades or new machines 7 Links to HQU Pro Stitcher Retreat in Utah information 8 FREE STUFF Want to be in the Know Sign up to join the Handi Quilter e mail Newsletter list to receive notice of updates upgrades special offers contests new products and free stuff at www HandiQuilter com newslet...

Страница 7: ... C may be used to connect this plug to a 2 pole receptacle as shown in sketch B if a properly grounded outlet is not available The temporary adapter should be used only until a properly grounded outlet can be installed by a qualified electrician The green colored rigid ear lug and the like extending from the adapter must be connected to a permanent ground such as a properly grounded outlet box cov...

Страница 8: ...crews C 3 32 Drill Bit D Emergency Base Plate Repair Kit E Carriage Assembly F Computer Bracket G Y Encoder Circuit Board H Y axis Mounting Bracket Assembly I Y Power Cord 10 foot J Adhesive Cable Mounting Clips K USB Flash Drive Lanyard L Art Stitch Software M Alignment Block N USB Cable O Computer Power Cord P HQ Pro Stitcher Computer Q USB Extension Cable Item may not be included or needed Quan...

Страница 9: ...ective layer of the tape Position the blue rack using the wooden alignment block M as a guide The wood block should be laid flat on the black plastic table top butted against the inside edge of the front aluminium track extru sion see Figure 3 3 The blue rack then butts against the opposite side of the block so the blue rack is mounted 2 away from the front track The block should be flat on the ta...

Страница 10: ...ng a knife or wire cut ters if necessary the blue rack does not necessarily need to extend the full width of the table and can actually be a couple of inches shorter on either end if desired 7 At the ends of the blue rack use the four small metal clamps Page 3 3 B to hold the ends firmly in place Figure 3 5 The clamps have a hole through the center and a lip on one end The lip should be on the sid...

Страница 11: ...the bolt holes should be toward the outside Use the screws that were removed from the front and rear base plates or use the two smallest screws in the Base Plate Repair Kit Page 3 D if your machine had no screws here to mount the Y Rack to the bottom of the front and rear base plates Be careful not to over tighten the screws as the base plate holes will strip easily In case of accidentally cross t...

Страница 12: ...Unplug the stitch regulator cable from the Y encoder 2 Remove the Phillips screw that holds the circuit board in place with a small Phillips screwdriver Figure 3 11 3 Gently pull the circuit board outward toward the front of the quilting machine the same direction the screw came out 4 Align the new Y Encoder circuit board Page 3 3 C so the five pins on the encoder fit into the 5 pin connector on t...

Страница 13: ...fted into the lowest position verify that the white gear at the front of the carriage fully engages with the blue rack that was previously installed a If the white gear fails to lower enough with the front disengagement lever in its lowest position you will need to adjust the black X axis lever bracket to allow the X axis engagement lever to drop a little lower To do this loosen the two 4mm Allen ...

Страница 14: ...ure not to set the wheels on top of the stitch regulator cable this is easier to do with two people one at each end of the quilting machine 4 With one end of the stitch regulator cable plugged into the machine s C Pod and the middle connector plugged into the quilting machine s Y encoder plug the other end of the cable into the carriage X encoder Figure 3 16 Figure 3 16 Stitch regulator cable ...

Страница 15: ...to the HQ Pro Stitcher carriage should be routed up between the rear handles and the quilting machine toward the right hand side of the machine looking at the machine from the back Place the black cable clips Page 3 3 J as shown in Figures 3 17 3 18 3 19 and route the cable accordingly Figure 3 18 Figure 3 19 ...

Страница 16: ...ilting machine and the top of the carriage If the white gear is not high enough to engage the blue rack above it Page 3 3 H adjust the lever on the side of the carriage closest to the back of the carriage the Y axis disengagement lever into the lowest position the teeth of the gear and the teeth of the rack should engage b If horizontal adjustment is needed to ensure that at least half the white g...

Страница 17: ...e HQ quilting machine first remove two of the hex head bolts and then loosen the third Next rotate the handlebar slightly to allow easier access to the handlebar cable 2 Make sure the three handlebar bolts are in the front handlebar and protruding out the bottom of the handlebar Figure 3 22 3 Position the handlebar over the computer bracket such that the screws go through the three holes in the br...

Страница 18: ...barrel connector for power Figure 3 24 Insert the barrel connector into the center jack B located on the bottom edge of the black box that is mounted to the back of the computer bracket Figure 3 25 Attach the two 9 pin serial cables to the appropriate ports on the back of the same box making sure cable connectors are plugged into their corresponding ports on the black box ...

Страница 19: ...acket connect the USB short cable Page 3 3 N between the bottom center USB port Figure 3 27 position B and the black box on the back of the bracket Figure 3 28 position C Also connect the computer power cord Page 3 3 O between the computer Figure 3 27 position C and the black box Figure3 28 position A The open USB port Figure 3 27 position A may be used to plug in the USB Flash drive for loading d...

Страница 20: ...uld only be used if the Shut Down button cannot be accessed or does not work 4 Leaving the HQ Pro Stitcher computer powered on with the power cord unplugged will result in the battery discharging and the computer eventually shutting itself down 5 If the HQ Pro Stitcher computer is left on for a long period of time the screen may turn black and enter a sleep mode It can be revived by tapping on the...

Страница 21: ...esive Cable Mounting Clips K USB Flash Drive Lanyard L Art Stitch Software M Alignment Block N HQ Pro Stitcher Computer O HQ Sixteen Y Encoder Version 2 P Power Cord Retaining Clamp Q Stitch Regulator Adapter Board R USB Cable S Computer Power Cord T USB Extension cable U 3 M Command Adhesive Strips Item may not be included or needed HQ Pro Stitcher Parts List for HQ Sixteen HQ18 Avanté 4 wheel ca...

Страница 22: ...ss freely under the idler bar while keeping the quilt as close as possible to the arm Use the 7 16 wrench to adjust the height if necessary The ideal height allows just the tip of a finger between the idler pole and the machine HQ Studio Frame 1 The HQ Studio Frame may already be adjusted to the ideal height for the HQ Pro Stitcher carriage After following the assembly instructions below if the id...

Страница 23: ...hes of the protective layer of the tape Position the blue rack using the wooden alignment block M as a guide The wood block should be laid flat on the table top butted against the inside edge of the front track Figure 3 33 The blue rack then butts against the opposite side of the block so the blue rack is mounted 2 away from the front track The block should be flat on the table and not on top of t...

Страница 24: ...h using a knife or wire cutters if necessary the blue rack does not necessarily need to extend from end to end and can actually be a couple of inches shorter if desired 8 At the ends of the blue rack use the four small metal clamps Page 16 B to hold the ends firmly in place see Figure 3 35 The clamps have a hole through the center and a lip on one end The lip should be on the side opposite the blu...

Страница 25: ...hould be toward the outside Use the screws that were removed from the front and rear base plates or use the two smallest screws in the Base Plate Repair Kit Page 3 16 D if your machine had no screws here to mount the Y Rack to the bottom of the front and rear base plates Be careful not to over tighten the screws as the base plate holes will strip easily In case of accidentally cross threading or s...

Страница 26: ...e Version 2 encoders which is provided with the HQ Pro Stitcher Page 13 6 O making sure to put the wheel back in place between the nut and the base plate 3 Tighten the bolt in place with the 7 16 wrench Use the nut to tighten the wheel to the base plate and then while holding the nut in position with the wrench tighten the bolt head with another 7 16 wrench or nut driver to the point that the enco...

Страница 27: ...teps apply to the P Pod that was just removed 5 Loosen the two screws that mount the power cord receptacle to the plastic P Pod using a Philips screwdriver and if the screws include nuts on the opposite end a wrench or small pliers to hold the nut the two Phillips head screws are accessible from the exterior of the pod while the nuts are on the interior 6 Slide the retaining clamp Page 3 16 P over...

Страница 28: ...rom the HQ Sixteen head by removing the four mounting screws with a Phillips screwdriver 3 Carefully disconnect all cables from the C Pod taking care not to touch the bare circuit board 4 If the new C Pod includes a Lock Board as shown in Figures 3 42 and 3 43 skip ahead to step 8 5 Remove the black Phillips screw that holds the Lock Board in place on the old C Pod circuit board Figure 3 42 6 On t...

Страница 29: ...ripe on the gray cable is facing up for the HQ Sixteen Figure 3 44 and the left power cord side for the HQ18 Avanté Figure 3 45 b Route the cable around the X axis motor bracket as shown in Figure 3 44 and through the black motor cable loop to keep the gray cable from interfering with the machine or carriage 3 The Y end of the power cord that is not attached to the P Pod should be attached to the ...

Страница 30: ...ard the front of the carriage engages with the blue rack that was installed previously If the teeth of the white gear do not fully engage the blue rack teeth be sure the X axis release mechanism is set in its lowest position and that the blue rack was set the appropriate distance from the front white table track some minor adjustments to the blue rack may be necessary for proper alignment It may b...

Страница 31: ... and rear wheels of the quilting machine when it is placed on the carriage 8 For HQ Sixteen only Plug the Stitch Regulator Adapter Board Page 16 Q into the Y axis stitch regulator encoder Figure 3 49 9 Plug the middle connector on the gray stitch regulator cable into the Y axis stitch regulator encoder the stitch regulator encoder mounted to the rear machine wheel 10 To prevent the stitch regulato...

Страница 32: ...look from the back of the machine between the bottom of the quilting machine and the top of the carriage If the white gear is not high enough to engage the blue rack above it H adjust the lever on the side of the carriage closest to the back of the carriage the Y axis disengagement lever into the lowest position the teeth of the gear and the teeth of the rack should engage b If horizontal adjustme...

Страница 33: ...F on the head so the three holes of the bracket line up with the three holes in the head 4 For HQ Sixteen Tilt screen Handlebars Secure the bracket in place by placing the adapter plate on top of the bracket and securing with the short bolt through the hole on the left Figure 3 53 a Put the two long bolts in position without the handlebar in place just to ensure that when tightening the short bolt...

Страница 34: ...barrel connector for power Figure 3 55 Insert the barrel connector into the center jack B located on the bottom edge of the black box that is mounted to the back of the computer bracket Figure 3 56 Attach the two 9 pin serial cables to the appropriate ports on the back of the same box making sure cable connectors are plugged into their corresponding ports on the black box ...

Страница 35: ...connect the short USB cable Page 3 3 N between the bottom center USB port Figure 3 58 position B and the black box on the back of the bracket Figure 3 59 position C Also connect the computer power cord Page 3 3 O between the computer Figure 3 58 position C and the black box Figure 3 59 position A The open USB port Figure 3 58 position A may be used to plug in the USB Flash drive for loading design...

Страница 36: ... down sequence This should only be used if the Shut Down button cannot be accessed or does not work 4 Leaving the HQ Pro Stitcher computer powered on with the power cord unplugged will result in the battery discharging and the computer eventually shutting itself down 5 If the HQ Pro Stitcher computer is left on for a long period of time the screen may turn black and enter a sleep mode It can be re...

Страница 37: ... or remove the USB flash drive but care should be taken not to remove the flash drive while the system is saving to or loading from the drive USB Flash Drive The keyboard docking station included with each Acer Iconia tablet computer may be connected to the Pro Stitcher computer using the 3 foot USB extension cable T Figure 3 63 The keyboard docking station includes two USB ports one on each side ...

Страница 38: ...s that may not be covered by the warranty To get the most of your HQ Pro Stitcher system Handi Quilter recommends using the Pro Stitcher computer only as directed to run the Pro Stitcher software the Art Stitch software and other software provided by or recommended by Handi Quilter Handlebar Control The HQ Pro Stitcher computer communicates with two pieces of equipment the quilting machine and the...

Страница 39: ... the levers on the carriage are engaged in the lower position Press the button to toggle between locking the machine in place and allowing the machine to be moved around If this button ever becomes gray with a lightning bolt Figure 4 5 the HQ Pro Stitcher cannot communicate with the carriage motors Press the button to reestablish communications with the Pro Stitcher motors Refer to the Troubleshoo...

Страница 40: ... the screen are the name of the current design file the size of the design and the position of the crosshairs Figure 4 7 Menu Selections The left hand side of the screen shows the available menus Design Quilt Settings and Shut Down Figure 4 8 The sub menus within these options are described in detail later in this manual Press any of these sub menu headings to reveal the functions available for th...

Страница 41: ... for repeating vertically are on the right Work Area The central part of the screen is the Work Area where the current design is shown Figure 4 11 The Crosshairs represent the position of the quilting machine needle relative to the current design and will move as the quilting machine is moved if the quick release levers on the carriage are engaged The light blue box around the current design is th...

Страница 42: ...ttons are either or buttons and can only be turned off by selecting another button with the opposite action such as Pan and Zoom Gray Buttons Depending on the menu or sub menu item selected there may be certain buttons that are grayed out Figure 4 13 A gray button indicates that this function is not currently available This typically happens because the user has started another function that must ...

Страница 43: ...e blue bounding box To the right of the file name is the current location of the needle and crosshairs relative to the Home position or the number of inches away from the X 0 Y 0 point in the design Help Press the Help button to activate the Help Mode for the Pro Stitcher Figure 4 15 In Help Mode most buttons and information boxes can be pressed to display a pop up box containing information about...

Страница 44: ... Sometimes that is the start of a design other times it may be in the middle or any other point in the design or around the design Some digital designers intentionally use the Home location for positioning purposes If this is the case the quilter can move the needle to the location on the quilt indicated by the pattern designer and press the Reset Home button to position the design relative to the...

Страница 45: ...dragging a finger in either a downward or right to left motion will zoom the current view outward so the view of the design becomes smaller Figure 4 22 Dragging a finger in either an upward or left to right motion will zoom the view inward to magnify the design As with Pan and Refresh Zoom does not reposition or resize the design Grid Turn the grid on or off by pressing the Grid button Figure 4 23...

Страница 46: ... ruler starting point press the Ruler button to turn off the ruler and then turn it back on when the crosshairs are located at the desired starting position to begin measuring Follow The Follow button changes the way the design is viewed relative to the crosshairs Figure 4 26 In the standard view where the Follow button is not selected the design remains stationary in the background but the crossh...

Страница 47: ...on displays the design when selected and hides the design when turned off Box The Box button displays the blue bounding box to show the X and Y extents of the current design when selected The Box button turns off the bounding box when deselected Jump Points Red dots appear within a design to mark the start of a jump or no stitch line The quilting machine will stop stitching at that point The jump ...

Страница 48: ...n be rotated and as it rotates it continues to skew to keep it within the area This is because each function that is performed is reprocessed and reapplied when the next function is performed If there comes a point in the design process that the quilter wants to freeze the design as it is and have the software treat it as a new design simply press the Baseline button All rotations repeats resizing...

Страница 49: ...stored either on the C drive or on a removable disk The different design file types have color coded backgrounds as follows hqf Beige qli Light blue txt Lavender tap Pink Loading the thumbnails may take a few moments depending on how many designs are stored in the selected directory and how intricate those designs are While the thumbnails are being loaded a colored block with the name of the file ...

Страница 50: ...he design that was originally loaded and use the same file name press the Save button To rename the edited design begin typing using the pop up keyboard to replace the current name with the new name Press Save to complete the save process or press Cancel to exit the Save window without saving To save the design in a new folder browse to the desired folder using the folder tabs on the left hand sid...

Страница 51: ...e top of the page Follow the instructions for downloading the latest update save the update file to a USB flash drive and plug the USB flash drive into a USB port on the Pro Stitcher computer Wait for approximately 10 seconds while the Pro Stitcher computer accesses the USB flash drive Figure 5 14 Follow the instructions included on the website for installing the update Reset All Many settings in ...

Страница 52: ... loaded If a quilter creates an area with no design loaded the area will not be visible until a design is loaded Areas can be created as a simple rectangle by identifying only two opposing corners 2 Corner or by plotting multiple points around the desired area to create any unique shape Multi Point The Area is fixed in position once it is defined and cannot be moved If the quilter must move or adj...

Страница 53: ...o press the Disable Motors button at the top right hand corner of the screen and press the 2 Corner button at the bottom of the screen Figure 5 19 Move the quilting machine so the needle lines up with the opposite corner of the desired area on the quilt and press the 2 Corner button once again A purple rectangle indicates the quilting area Figure 5 20 Figure 5 19 Figure 5 20 Selected Starting Corn...

Страница 54: ...s Multi Point Move to a second point along the perimeter of the quilting area and again press Multi Point A purple line joins the two marked points Figure 5 22 Move to a third point along the perimeter of the quilting area and press Multi Point again The HQ Pro Stitcher automatically closes the shape back to the first point when the third point is marked creating a purple triangle to indicate the ...

Страница 55: ...ze as an Area modify these values Press the appropriate number box and enter a new value in the pop up number pad Figure 5 27 The bottom box changes the width of the Area and the right hand number box changes the height of the Area Once a new value is entered in either of these boxes the area will be converted to a rectangle of the newly entered dimension s Clear Area Areas are fixed locations and...

Страница 56: ...rotate the design in 45 increments Smaller rotational increments can be achieved using the 1 and 0 1 rotation buttons Figure 5 31 Specify a rotational value by pressing the number box and entering a value using the number pad Figure 5 32 To reset the rotation back to zero press the Reset button Figure 5 33 Figure 5 29 Figure 5 30 Figure 5 32 Figure 5 31 Figure 5 33 ...

Страница 57: ... Stitcher will rotate the design to match the angle of that line To do this move the quilting machine to a point on the quilt left of the line to follow and press the 2 Point Start button Figure 5 36 Move the machine to a point further to the right along that same line and press the 2 Point End button that appears after pressing 2 Point Start Figure 5 37 The rotation angle will appear in the numbe...

Страница 58: ...gns Figure 5 39 individually or as one large design If Group is selected and the design in the Work Area has been repeated the entire selection gets rotated or mirrored etc as a single entity Figure 5 40 If it is not selected then each individual design element will be rotated or mirrored etc Individually and not as a group Figure 5 41 Figure 5 39 Figure 5 40 Figure 5 38 Figure 5 41 ...

Страница 59: ... grayed out an Area has not yet been defined Define the Area to be cropped using the area tool Figure 5 44 Outside Select the Outside option to crop away everything outside the defined Area and keep everything within that Area Figure 5 45 Note that the figure shows the result with jump points and the bounding box turned off Inside Select the Inside option to crop away everything inside the defined...

Страница 60: ...e Tie Off options are selected in the Settings menu the Pro Stitcher will perform a tie off at each of the jump points Closed Each loose end created after a Crop will be tied to the next end point by stitching along the border of the Area to get to the next point Figure 5 48 Reset At any time turn off the Crop options by pressing the Reset button in the Crop panel Hint Because the Closed option ma...

Страница 61: ... If an Area has not been defined the options to stretch and fit will be disabled because there is not an area to stretch or fit to Repeats Enter the number of repeats either on the right hand side of the screen for vertical repeats Figure 5 50 circled buttons or at the bottom of the screen for horizontal repeats Figure 5 51 circled buttons Either use the and buttons or tap directly on the number b...

Страница 62: ...me designs are intended to be linked together horizontally but must be overlapped for the start and end points to match up Figure 5 55 Using the Point 2 Point button causes the designs to link automatically For this function to be successful the design start and end points should be at the same height or vertical coordinate Press the Point 2 Point button to align the designs such that the end poin...

Страница 63: ...ressing the or button corresponding to Height Figure 5 58 or Width Figure 5 59 or tapping the number box to enter a value directly Lock Aspect If the Lock Aspect option is selected a value entered in the Width box will proportionally change the height and vice versa when a value is entered in the Height box Figure 5 59 Reset Press Reset to turn off the Resize function and bring the design back to ...

Страница 64: ...button Figure 5 60 The options available in the Skew panel are Skew Reset and multiple Alignment tools Skew If this button is enabled the design will be stretched to fill the defined 4 point area Figure 5 61 Skew only functions with a 4 point area If the button is light the Skew function is not turned on If the button is gray the Skew function is unavailable because an Area has not yet been define...

Страница 65: ...tal center of the design s bounding box aligns with the horizontal center of the Area Align Right Figure 5 65 The right side of the design s bounding box aligns with the right most point of the Area Horizontal Stretch Figure 5 66 The current design will be stretched or shrunk so the left side of the bounding box aligns with the left most point of the Area and the right side of the bounding box ali...

Страница 66: ...ertical center of the design s bounding box aligns with the vertical center of the Area Align Bottom Figure 5 69 The bottom of the design s bounding box aligns with the lowest point of the Area Vertical Stretch Figure 5 70 The current design will be stretched or shrunk so the top of the bounding box aligns with the highest point of the Area and the bottom of the bounding box aligns with the lowest...

Страница 67: ...om the Work Area Figure 5 72 This also clears anything that has been recorded with the Record button When adding to an existing design using Freehand rather than clearing the screen the Pro Stitcher will first Baseline the design to treat the current state of the design as a single design Record Press the Record button to start recording the motion of the quilting machine Figure 5 73 If a design w...

Страница 68: ... line between each Mark point This can be very useful for recording a stitch in the ditch line or for creating geometric designs directly on the quilt think of stitching in the ditch along sashing seamlines and filling cornerstones with an X for example Simply move the quilting machine to the beginning point of the quilt ditch and press the Mark button to record the first point of the line Then mo...

Страница 69: ...ing Record or Mark as long as the button is selected dark no stitch lines will be recorded while the quilting machine is moving Figure 5 77 When the Jump button is turned off light there will be a jump recorded between the previous end point and the current position of the crosshairs Figure 5 78 Figure 5 77 Figure 5 78 ...

Страница 70: ...off Likewise if the design is set to be stretched horizontally or vertically within the defined Area those alignment options must be turned off before any of the functions in Repeat will work If other alignment options are selected using the Reposition tools will cause those alignment settings to be turned off Position to a Corner Four Corner buttons are available to position the design based on t...

Страница 71: ...ose any point on the screen and drag it to a new location Move the quilting machine to place the crosshairs at a desired point in the design Press the Drag button and move the quilting machine to drag the design to the new location Figure 5 84 Press Drop when the design is in place Figure 5 85 The same function can be performed completely onscreen by pressing the Drag button and then dragging a fi...

Страница 72: ...Design Menu Nudge To reposition the design a specific amount in any of the four directions enter a distance in inches in the Nudge number box and then press the appropriate arrow to nudge the design up down left or right Figure 5 86 Figure 5 86 ...

Страница 73: ...he Close button will bypass registration but the quilter will not be able to save any changes to the design until the Art Stitch license is activated Figure 6 2 Follow the instructions in the Art Stitch instruction manual for offline activation When the design is passed into Art Stitch the position information is maintained as long as the design is not moved in Art Stitch it will be in the same lo...

Страница 74: ... may need to be updated to the latest version for HQ Pro Stitcher to properly pass designs back and forth To download the latest version use a computer that is connected to the Internet and go to the Handi Quilter website www HandiQuilter com Go to the Products tab at the top of the web page and select the Upgrades Updates link Follow the instructions to download the latest version of Art Stitch f...

Страница 75: ... to run through the design without actually stitching press the Stitch button to disable it If the Stitch option is turned off the Tie Off and Pullup options will also be turned off If either the Tie Off or Pullup options are selected the Stitch button will also be automatically selected Status If a quilter wants to know how far into a design the machine has stitched select Status and then press t...

Страница 76: ...is selected further in the design than the current stop point the stop point will be automatically adjusted so it comes after the start point Similarly if a stop point is chosen earlier in the design than the current start point the start point will be adjusted so it comes before the stop point As long as the Start Auto or Stop Auto button is pressed the start point or stop point will continue adj...

Страница 77: ...lected the quilter must continue pressing the arrow button until the quilting machine has traveled to the desired distance Releasing the button will stop the movement Because Windows considers an extended button press as a right click it is necessary to hold the button for 3 to 5 seconds before the Pro Stitcher will start moving if Continuous is not selected A trick to make Windows process the but...

Страница 78: ... needle position on the machine indicate that the design is indeed positioned properly on the quilt In addition to doing a manual check a quilter may also use the Trace Outline functions as well Figure 7 8 Box Press the Box button to have the HQ Pro Stitcher move around the perimeter of the design following the blue bounding box Watching the needle as the machine is tracing the perimeter helps the...

Страница 79: ...ood press the Proceed button to start stitching Otherwise press the Cancel button Figure 7 9 While the machine is stitching many of the Settings options are available to the quilter and can be adjusted either while the machine is quilting or after pressing Pause The settings that can be changed while the machine is in motion are Speed Auto Jump Stitches Per Inch Pullup and Pause Delay For a descri...

Страница 80: ...rting point forward or back in the design use the left or right arrows on the scroll bar until the new start point is exactly where desired If the quilt has shifted slightly and the point on the design does not match up exactly with the point on the quilt move the needle to the exact point on the quilt that matches the new starting point that was just set and press the Start Point button in the Re...

Страница 81: ... Emergency Stop button Unlike the Pause button which causes the HQ Pro Stitcher to come to a gentle stop the Emergency Stop button causes the Pro Stitcher to come to an immediate stop It also disables the motors in case the needle is stuck in the quilt to reduce the risk of a torn quilt Figure 7 13 Figure 7 13 ...

Страница 82: ...y other speed within the limits of the Pro Stitcher Figure 8 1 Auto Jump If a quilt design contains jumps or gaps in the design path that are not stitched the HQ Pro Stitcher handles those jumps in one of two ways It can either move automatically without stitching through the jump point and begin stitching at the end of the jump with no user intervention or it can pause before the jump so the quil...

Страница 83: ...t the jump start and end points regardless of which jump method is performed If the Pullup feature is turned on the Pro Stitcher will perform a pull up at the end of the jumps that exceed the Auto Jump threshold Stitches Per Inch Change the value in the Stitches Per Inch box to set the desired stitch length Figure 8 3 Figure 8 3 ...

Страница 84: ...s 5 times to form two stitches forward and two stitches back Figure 8 5 Figure 8 4 Figure 8 5 Distance This box represents the length of each tie off stitch in inches Enter a value in this box using either the or buttons or entering the value directly into the number box Tack The Tack tie off method forms the selected number of stitches forward into the design and then back to the start point befo...

Страница 85: ... beginning of each segment following a jump that exceeds the Auto Jump threshold Pull Up Auto Select the Pull Up Auto button for the quilting machine to shift to the right a few inches after pulling up the bobbin thread to allow the quilter to grab both threads The quilter should then press the Resume button to continue quilting the design If Pull Up Auto is not selected but Pull Up On is selected...

Страница 86: ...afely trim the thread tails Press the Resume button for the Pro Stitcher to continue Figure 8 8 Off On Press Off to disable or On to enable the Pause Delay option Inches Seconds Adjust the amount of time or distance the Pro Stitcher travels before pausing using the and buttons or directly entering a value in the number box Choose whether this value is in seconds or inches by selecting either the S...

Страница 87: ...s stitching Figure 8 9 Show Hide Design While Panning or Zooming If this button is not selected the design will be temporarily hidden while panning and zooming This minimizes the amount of delay that occurs while zooming or panning with large designs If it is selected the design remains on the screen during zooming and panning Figure 8 10 Figure 8 10 ADVANCED MENU Verify Settings Before Quilting I...

Страница 88: ...té and HQ24 Fusion quilting machines handlebar control is always available so this button simply prevents any communication from the Pro Stitcher computer from being processed by the quilting machine To return to normal Pro Stitcher control press the button which has now become a Connect Pro Stitcher button again to reestablish communication between the Pro Stitcher and the quilting machine Reconn...

Страница 89: ...by recalibrating the touch screen Press the Calibrate button and follow the onscreen calibration instructions If calibration is so far off that the Calibrate button cannot be pressed plug the Acer keyboard mouse into a USB port on the computer using the provided USB extension cable and use the mouse controller built into the keyboard to click on the Calibrate button Most other USB mice will also w...

Страница 90: ...t hand side of the monitor The Windows button is Orange or Blue The computer may be in a standby or screen saver mode Tap the display to wake the system up If that does not work press the Windows button to wake it up Touch Screen is not calibrated Touching the monitor in one place on the monitor puts the cursor in a place other than where the monitor was touched Recalibrate the touch screen by goi...

Страница 91: ... the carriage Make sure the encoder wheels roll on the tracks when moving the quilting machine and also that the gray stitch regulator cable is plugged in securely to the encoders HQ Sixteen owners The C Pod screen is blank or scrambled and the handlebar screens are stuck on a screen that says Handlebars Version X X The gray flat stitch regulator cable is plugged in upside down to one or both of t...

Страница 92: ...locked in position pressing the machine side to side or front to back allows a little motion and the white gear does rotate Monitor the motor assembly while engaged and enabled to determine which gear pulley is slipping It will most likely be either the gear mounted directly to the motor shaft or the gear mounted to the shaft that drives the white gear Use the appropriate Allen wrench to tighten b...

Страница 93: ...igns on the USB flash drive usually drive D or E From the Open window select a drive letter by pressing on the arrow button next to the drive you wish to browse If there is a circle with a symbol on the right hand side of the button it means there are more folders in that particular path If there continues to be nothing showing up on the USB flash drive plug it into a desktop or laptop computer an...

Страница 94: ...etting to the motors quickly enough This may be due to something in the computer tying up the CPU Although it may be possible to resume quilting by simply pressing red X box to close the error message and then pressing the Motor Error lightning bolt button at the top right hand corner of the screen it is best to cancel the current design stitch out save the pattern and re boot the computer Use the...

Отзывы: