


Page 28
HQ
18
Avanté User Manual
Thread Requirements
Threads have a tendency to dry rot over a period of
time. Be sure to choose high quality threads for your
valuable heirloom quilts. Most machine quilting
threads on the market today are acceptable.
Needle Requirements
For general quilting, a size 16/100 needle will
accommodate most threads and fabrics.
Heavier threads, such as top stitch and some
decorative threads, require a larger needle such as
18/110 or 20/120. Lofty batts and heavier fabrics
such as denim, canvas or densely woven fabric may
also require a larger needle.
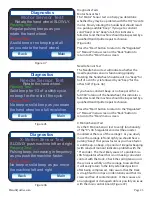
To Prepare for Quilting
With any quilting machine, it is important to
understand the basics of free motion quilting. The
HQ
18
Avanté Quilting Machine does not have feed
dogs like domestic machines; therefore, the fabric
does not automatically feed under the hopping foot.
The operator should synchronize the speed as well
as the movement of the machine to get an even,
consistent stitch.
In order to become comfortable with the free motion
of the HQ
18
Avanté, users can begin with a few
“beginner” techniques.
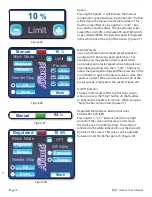
In Manual Mode: Set the machine at a medium
speed and begin moving it until you become
accustomed to the resistance. By moving the
machine faster, the stitches begin to elongate. The
stitch speed can either be increased or the machine
can be moved slower to get the stitches back to the
desired length. By moving the machine slower, the
stitches get shorter and can build up on top of each
other, breaking the thread or making it extremely
difficult to unpick. The stitch speed can be decreased,
while maintaining a constant motion with the
machine to bring the stitches back to the desired
length.
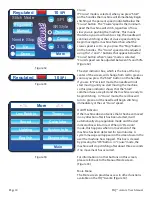
Getting Started Quilting
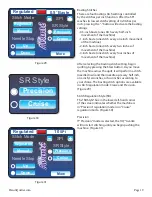
In Stitch Regulator Mode: Set the machine to
desired stitch length. Begin moving the machine to
become accustomed to the resistance. The machine
motor will slow down or speed up to maintain a
consistent stitch length according to how quickly or
slowly you move the machine. Moving the machine
too fast or in radical or jerky movements will defeat
the stitch regulator function.
In MANUAL or CRUISE REGULATION mode, when
pressing the “Start/Stop” key on the front or rear
handle bars to begin quilting make certain to begin
moving the machine immediately. If the needle
stitches in one place too long, the stitches build up
on top of each other causing a build-up of thread or
thread breakage. When bringing the machine to a
complete stop press the “Start/Stop” key at the same
moment the machine stops moving. If the machine
is still moving when the “Start/Stop” key is pressed,
it can cause deflection in the needle, possibly causing
it to bend or break.
In PRECISION REGULATION mode, the needle will
not begin moving when you press the “Start/Stop”
key until you begin moving the machine.
When quilting, relax your hands and maintain a light
touch on the handlebars. Gripping the handlebars
too tightly may cause body tension resulting in poor
quilting quality. The HQ
18
Avanté, combined with the
Avanté Frame system will give you a smooth even
glide.
HQ 18 Avanté
™
User Manual 1.0
Page 21
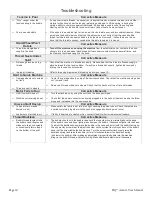
Troubleshooting
Stitches are Skipping
Corrective Measure
The needle is damaged, dull,
bent, or installed improperly
Incorrect needle size
The needle has not been
positioned properly
Fabric is too tight on the
frame
Thread tension too tight
Improper threading
Replace the needle often, normally once or twice per day for continuous quilting or at least once
per quilt. Use HQ 18 Avanté
recommended needles.
Always change the needle if the needle has struck any hard object such as a straight pin, etc.
The tip of the needle can become damaged or burred, resulting in fabric damage as well as
skipped stitches, thread breakage or shredding.
Always change the needle if it has been hit, bumped or pulled off center while maneuvering the
machine about the quilt. A slightly bent needle can be a major cause of skipped stitches.
Check for the proper size of needle for the work and thread
being applied to the quilting operation. Some battings and
fabrics used in quilting may constrict or impede the thread
passing through the front groove of the needle. This
diminishes the loop lift required for stitch formation. Typically,
a larger needle will solve the problem; however, it has been
found that certain smaller sizes of needles as well as the use
of ball pointed needles solve some specific problems.
Position the needle properly to the needle bar. Inspect the
position of the needle to make sure the needle is at the 6
o’clock position (see Photo 16)—If you stand directly in front
of the needle (facing the bobbin case side of the machine),
you will see the entire needle eye directly facing you. This is
6 o’clock position.
Make sure (1) the needle is installed all the way into the
needle bar to the needle stop hole in the needle bar, (2) the
long groove in the needle is toward the front (bobbin case
side), and (3) the scarf/scooped out part of the needle is
toward the handwheel.
The needle can sometimes be rotated to 5 o’clock (slightly right) or 7 o’clock (slightly left) in
order to adjust for a more positive thread loop pickup by the hook point.
Loosen pole tension on the frame. Fabric that is rolled too tight causes the fibers to separate.
This reduces the needle friction on the thread resulting in a smaller thread loop.
Loosen top tension. Re-check top and bobbin tension (see pages 12-13).
Inspect that the thread take-up lever, thread stirrup or tension spring are all threaded correctly.
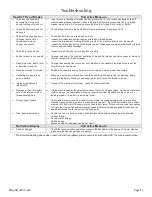
The Needle Breaks
Corrective Measure
The needle is bent or not
installed properly
The needle hits the throat
plate
Replace or correctly change the needle. Make sure that the needle is pushed up into the needle
bar clamp until it can go no farther (visually check that it is up to the top of the stop/sight hole
above the needle bar clamp screw). Failure to do so can cause damage in the bobbin area and
throat plate.
Correctly position the needle, throat plate or hopping foot. Replace with a new needle.
Stitches are Puckered
Corrective Measure
The tension is not balanced
Needle too large for material
Balance the tension of the needle thread after ensuring the bobbin tension is adjusted correctly
(see page 12).
Replace the needle with a size better suited for the fabric.
Stitch Quality is Poor
Corrective Measure
The tension is not balanced
Bobbin case is damaged,
corroded, dirty, etc
Moving the machine too fast
for needle speed selected
Encoder wheels do not
consistently touch the track
Adjust the tension of the needle thread after ensuring the bobbin tension is adjusted correctly
(see page 12).
Since thread slides over the surface of the bobbin case at a high speed, make sure the case is
free of any lint or foreign matter that could impede thread passage through the machine.
Synchronize machine movement and needle speed to get roughly 8-10 stitches per inch.
Elongated stitches are an indication of moving the machine too fast for the current speed.
Clean the track and the rubber wheel on each encoder. Even a tiny speck on the wheel can
cause problems with regulation. Check the spring tension on the encoder assemblies. If the
retaining nut is even slightly too tight it can prevent the wheel from properly pressing against the
track.
Photo 16
Содержание Avante QM30235
Страница 1: ...USER MANUAL 04 18 14 2014 Handi Quilter Inc Avanté 18 QM30235 version 2 0 ...
Страница 32: ......
Страница 36: ...Page 36 HQ18 Avanté User Manual This page was intentionally left blank ...
Страница 38: ...Page 38 HQ18 Avanté User Manual This page was intentionally left blank ...
Страница 39: ...Page 38 HQ18 Avanté User Manual This page was intentionally left blank ...


