background image

10

Setting the fan speed

Turn the fan speed knob to the 
desired setting. To increase the 
humidity in a room more quickly, set
the knob to 

HI

. For normal operation,

set the knob to 

MED

. For quiet, 

nighttime operation or for a more 
gradual increase, set the knob to
Quietmist™

.

Setting the electronic humidistat

The electronic humidistat allows you to
set the humidity within a range from
20% to 90%, in 5% increments. The
current room humidity level is displayed
in large numbers, while the desired
humidity level is displayed in smaller
numbers. If the current room humidity
level drops below 20%, the display will
show 

LO

. If it is higher than 90%, 

HI

will be displayed. Press the 

and 

buttons to adjust the humidity level. The
humidifier will then turn on automatically
whenever the current room humidity
drops more than 2% below the desired
humidity. Once the desired humidity is
reached, the fan will turn off and the
unit will go into stand-by mode.

Indicator lights

The power on indicator will light to 
indicate that the humidifier is on.

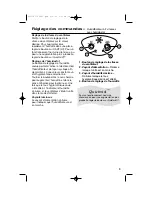
1. Fan Speed Knob
2. Humidity Setting Buttons

(

/

)

3. Power On Indicator –

lights when

unit is on

Digital Display
4.

Current Room Humidity Percentage

5.

Desired Humidity Percentage

Setting the Controls – 

3-Speed Humidifier with 
Electronic Humidistat

Quietmist

For quiet, nighttime operation or 
for a more gradual increase in the 
humidity level, set the knob to 
Quietmist.™

840115700 Ev00.qxd  6/6/03  8:59 AM  Page 10

Содержание 05518C

Страница 1: ...0 Humidifier Safety 2 Know Your Humidifier 4 How to Assemble and Use 5 How to Clean 11 Troubleshooting Guide 14 Customer Service 16 In USA 1 800 851 8900 In Canada 1 800 267 2826 840115700 Ev00 qxd 6...

Страница 2: ...idifier and tank when it is not in use 11 Never tilt or attempt to move the humidifier or supporting surface while it is operating or full of water Turn off and unplug the humidifier before removing t...

Страница 3: ...er the coun tertop or tabletop where it can be pulled on by children or accidentally tripped over Do Not Over humidify Do not over humidify The suggested level for the best health benefit is 50 Some u...

Страница 4: ...sure 1 Control Panel 2 Exhaust Grille 3 Cord Wrap see page 6 4 Air Intake Grilles Water Tank Assembly 5 Carrying Handle 6 Water Tank 7 Gasket 8 Filler Cap Base Assembly 9 Filter 10 Water Tray 11 Humid...

Страница 5: ...e Make sure that the water tray and filter are properly installed before filling the tank and operating the humidifier DO NOT USE THE HUMIDIFIER WITHOUT THE FILTER IN PLACE Selecting the Proper Locati...

Страница 6: ...closure onto the humidifier base Make sure that the filter lines up with the fan cover 2 Place the filter on the water tray as shown 3 Slide the cord through the notch at the bottom of the cord wrap c...

Страница 7: ...and turn clockwise until the LOCK arrows line up with the ridges on the tank opening Return the tank to an upright position When carrying the tank use the carry handle and support the tank from the o...

Страница 8: ...the humidifier make sure it is unplugged and remove the water tank first Plugging in the Humidifier WARNING To reduce the risk of electrical shock never plug in the humidifier while your hands are we...

Страница 9: ...r is on Setting the fan speed Turn the fan speed knob to the desired setting To increase the humidity in a room more quickly set the knob to HI For quiet nighttime operation or for a more gradual incr...

Страница 10: ...f it is higher than 90 HI will be displayed Press the and buttons to adjust the humidity level The humidifier will then turn on automatically whenever the current room humidity drops more than 2 below...

Страница 11: ...aintenance procedures must be followed Failure to follow the recommended care and maintenance instructions could lead to a buildup of micro organisms including algae bacteria and mildew which may lead...

Страница 12: ...ore placing the tank in the dishwasher 1 Place the filler cap in the dishwasher s silverware basket This small part must be secured in the silverware basket to prevent it from being damaged by the dis...

Страница 13: ...faces 3 Empty the tank rinse tank and filler cap thoroughly with water until no bleach smell is noticeable Dry with a clean cloth or paper towel Storing the Humidifier 1 Unplug the humidifier 2 Empty...

Страница 14: ...on the fill neck Is something trapped under the edge of the rubber seal in the center of the filler cap Check for debris under the edge of the seal or for damage to the seal If the seal is damaged a...

Страница 15: ...eated on the base for a long period of time Press the button in the center of the filler cap to relieve the vacuum Apply 100 pure petroleum jelly to the filler cap gasket Wipe off any excess Press her...

Страница 16: ...N OR ORAL INCLUDING ANY WARRANTY OF MERCHANTABILITY OR FITNESS FOR A PARTICULAR PURPOSE ANY LIABILITY IS EXPRESSLY LIMITED TO AN AMOUNT EQUAL TO THE PURCHASE PRICE PAID AND ALL CLAIMS FOR SPECIAL INCI...

Страница 17: ...it de l humidificateur 2 Connaissez votre humidificateur 4 M thode d utilisation 5 M thode de nettoyage 11 D pannage 14 Service aux clients 16 Aux U 1 800 851 8900 Au Canada 1 800 267 2826 840115700 F...

Страница 18: ...r toujours l humidificateur le vider ainsi que son r servoir lorsqu il n est pas utilis 11 Ne jamais incliner ni essayer de d placer l humidificateur ou la surface d appui lorsqu il est en service ou...

Страница 19: ...e pas tr bucher dessus Comment viter un taux hygrom trique excessif Il faut viter les taux hygrom triques excessifs Le point de consigne hygrom trique optimal que l on recommande pour la sant des pers...

Страница 20: ...neau de commande 2 Grille d chappement 3 Emballage du cordon voir page 6 4 Grilles d admission d air R servoir d eau 5 Poign e de transport 6 R servoir d eau 7 Joint 8 Bouchon de remplissage Base 9 Fi...

Страница 21: ...m e peut produire une humidit excessive Pour r duire les parasites et les interf rences d origine lectrique ne pas placer l humidificateur sur ou proximit des postes de t l vision des moniteurs pour e...

Страница 22: ...r que le filtre s aligne avec le couvercle du ventila teur 2 Placer le filtre sur le plateau eau conform ment l illustration 3 Enfiler en le faisant glisser le cordon dans l encoche l extr mit inf rie...

Страница 23: ...is le tourner dans le sens horaire jusqu ce que les fl ches VERR s alignent sur les ar tes de l orifice du r servoir Remettre le r servoir en position verticale Pendant le transport de ce dernier util...

Страница 24: ...s grilles d admission et d chappement d air ni permettre qu elles en soient clabouss es REMARQUE Un peu d eau est ject e du r servoir et dans le plateau eau lorsque le r servoir est mis en position MI...

Страница 25: ...ur augmenter l humidit et dans le sens antihoraire pour la diminuer Une fois que le taux hygrom trique voulu a t atteint l indicateur d humidit s allume et le ventilateur s teint unit dans le mode d a...

Страница 26: ...S il d passe 90 il affiche HAUT HI Appuyer sur les boutons et pour r gler le point de consigne hygrom trique L humidificateur s allume alors automatiquement quand que le degr hygrom trique r el baisse...

Страница 27: ...de nettoyage Les humidificateurs par vaporation m che permettent d augmenter l humidit de l air sous forme de vapeur d eau au moyen d un ventilateur qui force l air dans un m dia filtrant humect Pour...

Страница 28: ...enlever le filtre 3 Enlever le r servoir d eau et le plateau eau puis les porter l vier Verser toute eau r siduelle dans l vier 4 Pour extraire le tartre provoqu par les d p ts d eau dure et pour nett...

Страница 29: ...eau ainsi que le bouchon jusqu ce qu aucune odeur d eau de Javel ne soit perceptible S cher avec un chiffon propre ou un essuie tout Entreposage de l humidificateur Si l humidificateur n est pas utili...

Страница 30: ...t e L humidificateur est il allum Le r glage de l humidit voulue est il plus bas que le taux d humidit courant de la pi ce L humidificateur se met en marche automatiquement lorsque le r glage de l hum...

Страница 31: ...bo tier du ventilateur ou le r servoir Le cordon d alimentation est il achemin correctement Le cordon devrait tre press compl te ment dans l orifice de sortie du cordon Tout exc dent du cordon devrai...

Страница 32: ...NDE OU DE CONFORMIT UNE FIN PARTICULI RE TOUTE RESPONSABILIT EST EXPRESS MENT LIMIT E UN MONTANT GAL AU PRIX D ACHAT PAY ET TOUTES LES R CLAMATIONS POUR DOMMAGES SP CIAUX ET INDIRECTS SONT PAR LES PR...

Отзывы: