background image

3

For assistance or replacement parts, call our 

Technical Service number: 

+ + 910-693-4277

8 a.m. – 5:00 p.m. GMT-5 Monday – Friday

www.commercial.hamiltonbeach.com

Technical Service

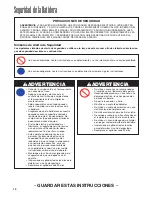
Your safety and the safety of others is very important. 
We have provided many important safety messages in 
this manual and on your appliance. Always read and obey
all safety messages. Read thoroughly and understand 
the instructions within this manual before operating or 
performing any maintenance on the appliance. Before 
allowing operation of this appliance, the operator must 
be trained and approved by management staff.

The spindle mixer you have purchased is intended for use 
in commercial and professional environments requiring
trained operators. Such environments may include, but not
be limited to, restaurants, bars, fast-food outlets, hospitals,
catering businesses, etc.

The spindle mixer is designed to mix drinks made from
yogurt, frozen custard, granita, hard or soft ice cream. 
A basic milkshake recipe is 355 ml of ice cream, 120 ml 
of cold milk, and 44 ml of syrup. 

Use of this appliance outside of this scope may result in fire,
electric shock, severe personal injury, or equipment damage.

This Operation Manual must be read and fully understood
before operating or performing any maintenance on your
appliance.

The appliance motor is provided with a thermal protective
device to automatically turn off the motor in extreme 
temperature conditions that may occur due to excessive
loads. When this occurs, unplug the unit, allow to cool for
30 minutes, reconnect power supply, and turn unit ON (I).

If the supply cord of this appliance is damaged, it must be
replaced by the manufacturer or its service agent or a 
similar qualified person. 

UK ONLY:

If fitted with a non-rewirable U.K. plug, the 13-

amp fuse approved by ASTA to be B.S. 1362 must be used.
If you need a replacement fuse carrier, it must be replaced
with the same color-coded carrier with the same markings.
Fuse covers and carriers can be obtained from approved
service agents.

To the Operator

– SAVE THESE  IN STRUC TIONS –

Mixer Safety

Unpacking

Carefully remove the mixer from the packaging and take out
all boxes or packets containing attachments or specific items.
Check that all of the parts have been delivered, that the mixer
operates as intended, and that nothing has been damaged in
transit. Contact the mixer supplier to remedy any findings.
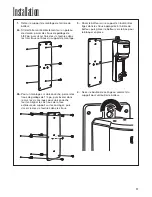
Installation

Mount the mixer according to provided instructions and in an
open, well-lighted environment that provides easy access to
all controls, front and side. We recommend that you position
the mixer so that the working height of the agitator and 
controls are appropriate for the intended operator(s). 

Noise Level

The equivalent continuous sound level when the mixer is 
operating on no-load is less than 70dB(A).

Connection

Observe all electrical governing codes and ordinances. 
A 220–240V AC-only, 50–60 Hz, fused electrical supply 
is required. (A time-delay fuse is recommended.) It is 
recommended that a separate circuit serving only this 
appliance be provided.
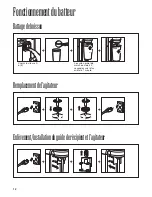
Maintenance

Check the agitator daily for wear or damage. Replace the 
agitator every 90 days. 

Standard Conformity

The mixer is in compliance with the following European
Directives and related national legislation:

Machinery Directive 2006/42/EC

Low Voltage Directive 73/23/EEC

EMC Directive 2004/108/EEC

The wheeled bin symbol marked on this mixer signifies compliance with the EU Directive as well as other
similar legislation in effect after August 13, 2005. Therefore, it must be collected separately after its use 
is completed and cannot be disposed of as unsorted municipal waste. The user is responsible for 
returning the product to the appropriate collection facility, as specified by your local code. For additional
information regarding applicable local laws, please contact the municipal facility and/or local distributor. 

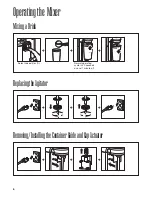
For best results, use the Hamilton Beach Universal
Container (#110E).

1.

Fill the container with sanitizing solution (1 tablespoon
[15 ml] of household bleach per 1 gallon [3.8 L] of
water at 50°–70°F [10°–21°C]) to 

3

4

full. Position the

container under the mixing spindle and run on low
speed (I) for 1 minute.

2.

Remove container. Empty sanitizing solution and rinse
container.

3.

To dry, run the mixer on low speed (I) for 30 seconds
with empty container in place. 

DO NOT RINSE

after

sanitizing is completed.

NOTE:

If preferred, the container and agitator may be

cleaned in a dishwasher.

Sanitizing

Model Number

Serial Number

Purchase Date

Dealer Name

Dealer Address

Dealer Phone

Содержание GM30

Страница 1: ...rink Mixer Operation Manual Page 2 Batidora de Bebidas Manual de Uso P gina 14 Frullatore Manuale per il funzionamento Pagina 20 Dranken mixer Gebruiksaanwijzing Pagina 26 Mixerst tzen Bedienungsanlei...

Страница 2: ...re the mixer is mounted on the wall according to provided instructions Failure to comply may result in personal injury or equipment damage If the supply cord is damaged it must be replaced by the manu...

Страница 3: ...attachments or specific items Check that all of the parts have been delivered that the mixer operates as intended and that nothing has been damaged in transit Contact the mixer supplier to remedy any...

Страница 4: ...amiliar with all parts and features before using the mixer Speed Selector Switch LOW I HIGH II Agitator Container Rest 2 positions Mounting Bracket Mixing Spindle Container Guide Cup Actuator START ST...

Страница 5: ...and then insert the six drywall anchors provided into the wall Align the six holes on the outside of the mounting bracket with the drywall anchors and then screw six of the screws provided through th...

Страница 6: ...6 MixingaDrink Operatingthe Mixer Select speed I or II Normal operating cycle is 30 seconds on and 1 minute off ReplacingtheAgitator Removing InstallingtheContainerGuideandCupActuator...

Страница 7: ...60 Hz This warranty extends only to the original purchaser Keep the original sales receipt as proof of purchase is required to make a warranty claim or the warranty term will be based on the date of...

Страница 8: ...rizontale pendant l emploi Ne pas respecter ces instructions peut entra ner des blessures ou des dommages de l appareil Si le cordon d alimentation est endommag il doit tre remplac par le fabricant so...

Страница 9: ...ion Monter le m langeur conform ment aux instructions fournies et dans un environnement ouvert et bien clair permettant un acc s facile toutes les commandes l avant et sur les c t s Nous recommandons...

Страница 10: ...les pi ces et les caract ristiques avant d utiliser le batteur Commutateur de s lection vitesses BASSE I HAUTE II Agitateur Support du r cipient 2 positions Support de montage Axe de battage Guide de...

Страница 11: ...ercer des trous de guidage de 1 4 po puis ins rer dans le mur les six ancrages pour cloison s che fournis Aligner les six trous de la face ext rieure du support sur les ancrages puis visser six des vi...

Страница 12: ...boisson Fonctionnementdubatteur Choisir la vitesse I o II Le cycle normal de marche est de 30 secondes suivi d un arr t de 1 minute Remplacementdel agitateur Enl vement installationduguideder cipiente...

Страница 13: ...que seulement au premier acheteur La pr sentation du re u de vente d origine comme preuve d achat est n cessaire pour faire une r clamation au titre de cette garantie ou la garantie de un 1 an suivant...

Страница 14: ...que la batidora se encuentre apoyada sobre una superficie nivelada y resistente durante el funcionamiento No cumplir con esto puede provocar lesiones personales o da os al equipo Si el cable el ctrico...

Страница 15: ...la batidora para solucionar cualquier problema Instalaci n Arme la batidora de acuerdo con las instrucciones provistas y en un medio abierto y bien iluminado que brinde acceso sencillo a todos los con...

Страница 16: ...caracter sticas antes de utilizar la batidora Interruptor Selector de Velocidades BAJA I ALTO II Mezclador Soporte del Recipiente 2 posiciones Soporte de Montaje Varilla Batidora Gu a del Recipiente...

Страница 17: ...ra construcci n en seco provistas dentro de la pared Alinee los seis orificios de la parte exterior del soporte de montaje con las sujeciones para construcci n en seco y luego atornille seis de los to...

Страница 18: ...ida C moOperarlaBatidora Seleccione velocidad I o II El ciclo de operaci n normal es de 30 segundos accionado y 1 minuto apagado C moReemplazarelMezclador C moQuitar InstalarlaGu adelRecipienteyAccion...

Страница 19: ...se extiende s lo al comprador original Guarde el recibo original de venta ya que se requiere una prueba de compra para hacer una reclamaci n de garant a o el periodo de garant a se basar en la fecha d...

Страница 20: ...stabile durante il funzionamento La mancata osservanza di queste norme pu causare lesioni personali o il danneggiamento dell apparecchio Se il cavo di alimentazione danneggiato deve essere sostituito...

Страница 21: ...e del frullatore per risolvere qualsiasi problema Installazione Installare il frullatore seguendo le istruzioni fornite e in un ambiente aperto e luminoso che consenta un accesso e un controllo sempli...

Страница 22: ...it con tutte le parti e caratteristiche Interruttore controllo velocit BASSA I ALTA II Agitatore Base di appoggio del contenitore 2 posizioni Pannello per installazione Albero frullino Regolatore flus...

Страница 23: ...ota di 4 mm e poi inserire i sei ganci forniti nel muro Fare in modo che i sei fori del pannello coincidano con i ganci del cartongesso e poi avvitare sei delle viti fornite attraverso i fori 3 Posizi...

Страница 24: ...lato Messainfunzionedelfrullatore Selezionare la velocit I o II Un ciclo normale prevede dai 30 secondi al minuto Sostituireilgruppoagitatore Rimuovere Installareilregolatorediflussodelcontenitoreel a...

Страница 25: ...120V 60Hz Questa garazia valida solo per l acquirente originario Conservate lo scontrino perch vi verr chiesta una prova dell acquito in caso di richiesta di garanzia altrimenti l anno verr calcolato...

Страница 26: ...eer deze in werking is Als dit niet het geval is kan dat persoonlijk letsel of schade aan het apparaat tot gevolg hebben Om gevaar te voorkomen moeten beschadigde voedingskabels vervangen worden door...

Страница 27: ...r van de mixer als u een probleem vindt Installeren Plaats de mixer volgens de instructies die daarvoor gegeven zijn en in een open goed verlichte omgeving zodat alle bedieningsknoppen en de voor en z...

Страница 28: ...t met alle onderdelen en mogelijkheden voordat u de mixer gebruikt Snelheidsschakelaar LAAG I HOOG II Roerelement Bekersteun 2 posities Bevestigingssteun Mixstaaf Bekergeleider Bekerbedieningsmechanis...

Страница 29: ...0 6 cm en steek de zes bijgeleverde gipsplaatpluggen in de muur Plaats de zes gaten aan de buitenkant van de bevestigingssteun over de gipsplaat pluggen en schroef zes van de bijgeleverde schroeven d...

Страница 30: ...drankjemixen Demixerbedienen Stel de snelheid in op I of II Een normale cyclus is 30 seconden aan en 1 minuut uit Hetroerelementvervangen Debekergeleiderenhetbekerbedieningsmechanismeverwijderen insta...

Страница 31: ...aatje bijvoorbeeld 120V 60 Hz Deze garantie geldt alleen voor de oorspronkelijke aankoper Bewaar de originele aankoopbon omdat een bewijs van aankoop vereist is om aanspraak te kunnen maken op deze ga...

Страница 32: ...xergeh use ffnen Vergewissern Sie sich dass der Mixer w hrend der Inbetriebnahme auf einem stabilen Untergrund steht Bei Nichtbeachtung kann dies zu Verletzungen oder Materialsch den f hren Wenn das N...

Страница 33: ...end der Anlieferung besch digt wurde Kontaktieren Sie den Lieferanten des Mixers um Probleme zu beheben Aufstellen Mixer gem beiliegender Anleitung montieren in einer ger u migen gut beleuchteten Umge...

Страница 34: ...n Sie sich vor Anwendung mit den Komponenten und Funktionen des Mixers Geschwindigkeitswahlschalter LANGSAM I SCHNELL II R hrstab Beh lterst tze 2 positionen Montagekonsole Mixspindel Beh lterf hrung...

Страница 35: ...llten D bel in die Wand hineinstecken Die sechs L cher auf der Au enseite der Montagekonsole entsprechend den D beln ausrichten und sechs der beigestellten Schrauben in die L cher stecken und festschr...

Страница 36: ...xen InbetriebnahmedesMixers Geschwindigkeit I oder II ausw hlen Der normale Mixvorgang betr gt 30 Sekunden Mixzeit und 1 Minute Stehzeit R hrstabAuswechseln Entfernen InstallierenderBeh lterf hrungund...

Страница 37: ...vom Originalk ufer beansprucht werden Behalten Sie immer die Originalrechnung Ihres Einkaufs auf da diese zur Geltendmachung eines Garantieanspruchs notwendig ist Anderenfalls wird die Garantiefrist...

Страница 38: ...38...

Страница 39: ...39...

Страница 40: ...261 Yadkin Road Southern Pines NC 28387 840210400 1 12 www commercial hamiltonbeach com...

Отзывы: