background image

56

Maintenance and Care

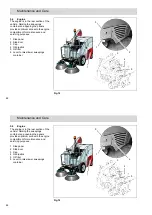
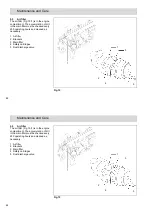
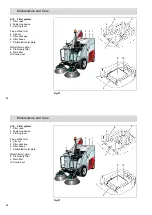
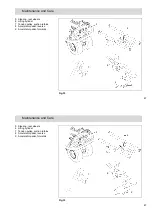
5.8.4

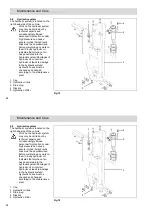
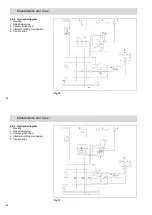
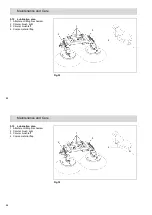
Hydraulic diagram

1 Steering
2 Raised emptying
3 Circular brush drive
4 Attachment lifting mechanism
5 Traction drive

Fig.19

1

5

4

3

2

56

Maintenance and Care

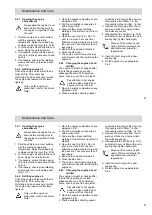
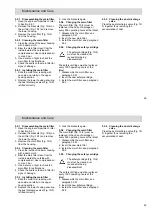
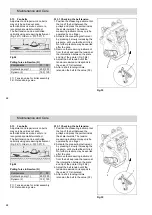
5.8.4

Hydraulic diagram

1 Steering
2 Raised emptying
3 Circular brush drive
4 Attachment lifting mechanism
5 Traction drive

Fig.19

1

5

4

3

2

Содержание Citymaster 90

Страница 1: ...Instruction Manual Hako Citymaster 90 1142 Instruction Manual Hako Citymaster 90 1142...

Страница 2: ...latter cannot be held liable for damage resulting from such unauthorized modification Introduction 2 Introduction Preface Dear customer It is our desire that the good characteristics of the Hako City...

Страница 3: ...equired for driving the Hako Citymaster 90 automotive machine up to a speed of 25 km h Introduction 3 Notes on warranty The terms of the sales contract apply Damages are not subject to warranty if the...

Страница 4: ...60 5 9 8 Changing the circular brushes 60 5 9 9 Cleaning the suction nozzle and suction turbine 60 4 Table of Content Introduction 2 Preface 2 Proper use 2 Notes on warranty 3 Acceptance of the machi...

Страница 5: ...5 14 3 Operating hour counter 71 5 14 4 Relays 71 5 14 5 Battery 71 EC Declaration of Conformity 72 5 Table of Content 5 9 10 Adjusting the suction nozzle 61 5 9 11 Changing the seal 61 5 9 12 Solutio...

Страница 6: ...d the environment due to use of substances representing an inherent danger to health of environment 6 Safety information 1 Safety information 1 1 Safety and Warning Symbols All paragraphs in this manu...

Страница 7: ...st only be started put into motion and stopped from the se at Do not allow the engine to run in clo 7 Safety information 1 2 General Provisions Apart from the provisions contained in this instruction...

Страница 8: ...ns may be on the Hako Citymaster 90 when it is jacked or raised Do not remove or change tires or re 8 Safety information sed rooms Risk of poisoning It is forbidden to transport people on the vehicle...

Страница 9: ...anten na and vehicle ground 1 5 Particular risks Safety equipment Never operate the Hako Citymaster 9 Safety information pair one on a rim Always go to a pro per workshop for work on tires and rims be...

Страница 10: ...it Ensure sufficient ventilation in the charging area when charging the batteries Risk of explosion 10 Safety information 90 without the appropriate effective safety equipment This includes all the pa...

Страница 11: ...te Provide for agreement with the Hako contract dealer on return and disposal accor ding to 8 BattV 11 Safety information 1 6 Information for Protection of Environment For safe use of substances inher...

Страница 12: ...1 8 Observe operating manual Fig 1 9 Engine emergency steering properties Fig 1 10 1142xxxxxxxx USA 12 Safety information 1 7 Labels on the vehicle The following safety and warning labels are attached...

Страница 13: ...des Risk of crushing by sweepings container Fig 3 1 Ignition starter switch Fig 3 2 8 2 bar 1 5 bar 13 Safety information Raise sweepings container at max 2 gradient Fig 2 1 Engine speed adjustment Fi...

Страница 14: ...g 3 7 Fill fuel Fig 3 8 Fill hydraulic oil Fig 3 9 Machine model Fig 3 10 Diesel Hako Citymaster 90 14 Safety information Indicators horn and agitating device Fig 3 3 Company logo Fig 3 4 Risk of burn...

Страница 15: ...15 Safety information Fig 1 7 2 1 5 6 3 4 8 9 10 15 Safety information Fig 1 7 2 1 5 6 3 4 8 9 10...

Страница 16: ...16 Safety information Fig 2 1 2 3 6 4 5 7 8 16 Safety information Fig 2 1 2 3 6 4 5 7 8...

Страница 17: ...17 Safety information Fig 3 1 2 3 4 4 5 6 7 8 10 9 17 Safety information Fig 3 1 2 3 4 4 5 6 7 8 10 9...

Страница 18: ...5 Release parking brake 6 Slowly depress pedal of desired di rection and the vehicle starts rolling 18 First Operation 2 First Operation 2 1 Instruction Instruction is required before first operation...

Страница 19: ...ponents concerned e g clear water tank hoses pump filter sieve and spray nozzles see paragraph 5 10 19 First Operation 2 4 Operation 1 Check the machine before taking into operating see paragraph 2 2...

Страница 20: ...nctions After breakdown on public road secure by placing the warning triangle and by a warning lamp 20 First Operation 2 5 Machine stopping and parking At the end of work Let the engine idle for 1 to...

Страница 21: ...towing speed may be maximally 2 kph and the towing time 30 minutes Towing distance 1 km Fig 4 1 1 2 21 First Operation 2 6 Transporting and towing Transporting the vehicle When the vehicle is to be tr...

Страница 22: ...2 The vacuum nozzle runs flexibly attached on shockproof rollers between the front wheels Fig 5 2 1 22 Operation 3 Operation 3 1 Method of operation General information The Hako Citymaster 90 is a swe...

Страница 23: ...dust optimally solution from the solution system is also supplied to the vacuum nozzle Fig 6 2 1 3 23 Operation 3 1 2 Solution system The solution system is comprised of a tank pump valve and spray j...

Страница 24: ...es the functions for the sweepings container suction turbine sweeping unit and steering Fig 7 3 1 2 24 Operation 3 1 4 Steering and brake The vehicle is equipped with hydraulically operated steering F...

Страница 25: ...iew 1 Operating panel 2 Operating console 3 Pedals 4 Driver s seat 5 Auxiliary tool Fig 8 1 4 2 3 5 25 Operation 3 2 Operating elements overview 1 Operating panel 2 Operating console 3 Pedals 4 Driver...

Страница 26: ...tion quantity regulator for vac uum nozzle spray jets option Fig 9 1 2 3 4 11 5 6 7 8 9 10 12 13 14 26 Operation 3 2 1 Operating panel 1 Switch for suction turbine and solu tion pump 2 Switch for work...

Страница 27: ...ntact switch The engine can only be started when the driver is seated on the driver s seat II I 0 P 27 Operation Switch for suction turbine and solu tion pump Fig 9 1 The first stage serves to switch...

Страница 28: ...a seat contact switch The engine can only be started when the driver is seated on the driver s seat 28 Operation Control lamp for drive direction indi cator Fig 9 6 It lights up when the indicator is...

Страница 29: ...is bound properly In the case of damp working conditions do not use the solution quantity regulator 29 Operation Combination switch Fig 9 12 It controls the following functions Switch direction 1 indi...

Страница 30: ...ves to actuate the parking brake The lever locks when pulled up Press the knob to release the lever 30 Operation 3 2 2 Operating console Fig 10 1 Speed adjustor for circular brush drive 2 Speed adjust...

Страница 31: ...pedal does not engage in the latch When locked the coarse particle flap is continually open 1 3 2 4 31 Operation 3 2 3 Pedals Fig 11 1 Accelerator pedal forwards 2 Accelerator pedal reverse 3 Coarse p...

Страница 32: ...ve coarse dirt from the vacuum nozzle suction nozzle path filter system and sweepings container 4 1 32 Operation 3 2 4 Driver s seat Fig 12 1 Hand lever for driver s weight 2 Handwheel for seat height...

Страница 33: ...Gross total weight kg 1300 Permissible axle load front rear kg 850 450 Curb climbing ability mm 130 33 Technical Data 4 Technical Data Performance Driving and sweeping speeds forwards reverse kph 0 8...

Страница 34: ...fabric filling packing density Main filter fine fabric filling packing density kg m3 kg m3 220 220 34 Technical Data Chassis Brakes Tires front rear 23x8 50 12 4PR Rims front rear 7 00 JAx12 Tire pre...

Страница 35: ...n Battery low maintenance V Ah Type 12 74 57412 Three phase generator V A 14 45 Starter V kW 12 1 6 35 Technical Data Spraying equipment Tank volume l 100 Spray jets circular brushes suction pipe vacu...

Страница 36: ...operation l h 1 9 Air filter insert Order no 68 243 Safety cartridge for air filter Order no 68 242 36 Technical Data Engine Manufacturer Model Lombardini LDW 702 Volume cm3 686 No of cylinders Pieces...

Страница 37: ...cordance with DIN EN 1032 to which the body feet or seat surface is exposed does not exceed m s 0 5 37 Technical Data Noise emission values Max sound power level LwA measured at extreme working condit...

Страница 38: ...kit Execution of all safety relevant inspections according to UVV BGV T V VDE as prescribed by law 38 Maintenance and Care 5 Maintenance and Care General Before proceeding to maintenance and care wor...

Страница 39: ...ntenance III 2500 operating hours Workshop stamp carried out on at _________________ operatin hours 39 Maintenance and Care 5 2 Maintenance document Handing over Upgrade Test drive Handing over to the...

Страница 40: ...eepings container o Check lighting system o Clean vehicle complete a test drive and function test o 40 Maintenance and Care 5 3 Maintenance Plan Hako system maintenance custo mer The following mainten...

Страница 41: ...Clean metallic filters shake and clean fine particle filter option o Test drive and function test o 41 Maintenance and Care Hako system maintenance custo mer The following maintenance work must be com...

Страница 42: ...brake o Checking steering o Check visual appearance of the vehicle o Test drive and function test o 42 Maintenance and Care Hako system maintenance I The following maintenance work must be completed b...

Страница 43: ...cessary o Engine and hydraulic system visual check for loss of oil o Test drive and function test o 43 Maintenance and Care Hako system maintenance II The following maintenance work must be completed...

Страница 44: ...e valve cover seal o Change hydraulic oil and hydraulic oil filter o Test drive and function test o 44 Maintenance and Care Hako system maintenance III The following maintenance work must be completed...

Страница 45: ...c pump o Change suction turbine and fan belt o Test drive and test all safety relevant components o 45 Maintenance and Care Hako system maintenance S safety check The following maintenance work must b...

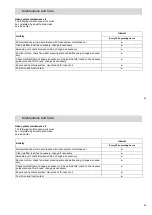
Страница 46: ...r 3 Cap 4 Oil dipstick 5 Oil filter 6 Lever to raise lower sweepings container Fig 14 2 3 4 5 1 5 1 46 Maintenance and Care 5 4 Engine The engine is in the rear section of the vehicle Raising the swee...

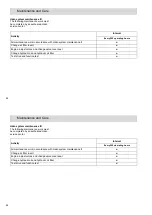
Страница 47: ...gulations 5 Insert the drain plug with a new sealing ring 6 Fill the engine oil see paragraph 5 4 2 47 Maintenance and Care 5 4 1 Opening the engine compartment Always allow the engine to cool down be...

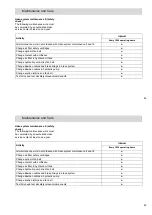
Страница 48: ...1 Air filter 2 Brackets 3 Main filter 4 Safety cartridges 5 Dust discharge valve Fig 15 2 4 3 1 5 1 48 Maintenance and Care 5 5 Air filter The air filter Fig 15 1 is in the engine compartment The accu...

Страница 49: ...harge valve Press the dust discharge valve Fig 15 5 together thus removing the accumulation of dust 49 Maintenance and Care 5 5 1 Disassembling the main filter 1 Open the engine compartment refer to S...

Страница 50: ...ator for the hydraulic system 1 Cap 2 Fluid reservoir 3 Radiator 4 Draining hose Fig 16 3 2 1 4 B A 50 Maintenance and Care 5 6 Cooling system The hydraulic system and engine are protected from overhe...

Страница 51: ...Turn the engine off and allow to cool down 9 Check the coolant level again and refill if necessary 51 Maintenance and Care 5 6 1 Cleaning the radiator Check the air vents and ribs of the radiator Fig...

Страница 52: ...Fuel filter cartridge 2 Cap 3 Fuel tank 4 Preliminary filter between tank and engine Fig 17 1 2 3 4 52 Maintenance and Care 5 7 Fuel system Take the utmost care when handling fuel increased risk of fi...

Страница 53: ...t Insert the new preliminary filter The fuel pump vents automatically if the fuel tank is run empty 53 Maintenance and Care 5 7 1 Filling fuel Only use the fuel prescribed refer to Technical Data 1 Sw...

Страница 54: ...nce plan 1 Cap 2 Hydraulic oil tank 3 Drain plug 4 Dipstick 5 Hydraulic oil filter Fig 18 5 2 3 1 4 54 Maintenance and Care 5 8 Hydraulic system The hydraulic system is located on the right hand side...

Страница 55: ...tighten hand tight 4 Start the engine and switch it off again Check the hydraulic system for leaks 55 Maintenance and Care 5 8 1 Filling hydraulic oil Only use the hydraulic oil prescribed refer to T...

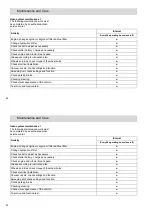
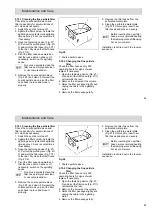
Страница 56: ...ed emptying 3 Circular brush drive 4 Attachment lifting mechanism 5 Traction drive Fig 19 1 5 4 3 2 56 Maintenance and Care 5 8 4 Hydraulic diagram 1 Steering 2 Raised emptying 3 Circular brush drive...

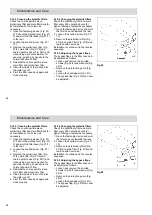
Страница 57: ...suction turbine 8 Return air flow section 9 Sweepings container Fig 20 1A 2 1A 4 5 6 3 7 8 9 1b 1c 57 Maintenance and Care 5 9 Sweeping unit 1 Spray jets 1a circular brushes 1b suction turbine 1c suc...

Страница 58: ...nk daily If necessary open the tank cap Fig 22 1 and fill with solution using a hose Fig 22 1 2 1 1 58 Maintenance and Care 5 9 1 Cleaning the spray jets Check the spray jets Fig 20 1 on the circular...

Страница 59: ...ction turbine Close the cleaning flap 7 If necessary clean the return air flow section Fig 20 8 1 2 59 Maintenance and Care 5 9 5 Sweeping pattern Check the sweeping pattern weekly The contact surface...

Страница 60: ...3 Ball cock 4 Spray jets suction pipe 5 Solution pump 6 Filter 7 Solution tank Fig 25 1 2 4 3 5 6 7 60 Maintenance and Care 5 9 10 Adjusting the suction nozzle Check the suction nozzle weekly readjust...

Страница 61: ...on as illustrated in the diagram The default setting of the slider is open Fig 26 1 2 3 4 5 6 7 8 9 61 Maintenance and Care 5 9 13 Sweepings container Checking the fill level sweepings container Unloc...

Страница 62: ...Metal filters option 8 Preliminary filter 9 Main filter 10 Knurled nut Fig 27 1 2 5 10 4 7 6 9 8 3 62 Maintenance and Care 5 10 Filter system 1 Filter case 2 Fastening device 3 Pivoting lever Fine pa...

Страница 63: ...ing piece a little using hot air or hot water Installation is carried out in the reverse sequence 1 63 Maintenance and Care 5 10 1 Cleaning the fine particle filter Check the coarse particle sieve and...

Страница 64: ...9 2 Loosen the handwheel Fig 29 1 The bypass flap Fig 29 5 can now be adjusted Fig 29 1 2 3 3 4 4 5 64 Maintenance and Care 5 10 3 Cleaning the metallic filters Check the coarse particle sieve prelimi...

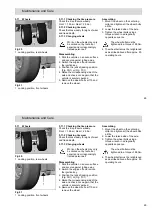
Страница 65: ...86 Nm 4 The wheel bolts must be retightened as described above after approx 50 operating hours 1 1 65 Maintenance and Care 5 11 Wheels Fig 30 1 Jacking position rear wheels Fig 31 1 Jacking position...

Страница 66: ...ifting mechanism 2 Circular brush right 3 Circular brush left 4 Coarse material flap Fig 32 2 3 4 1 66 Maintenance and Care 5 12 Lubrication plan 1 Attachment lifting mechanism 2 Circular brush right...

Страница 67: ...on pulley suction turbine 8 Accelerator pedal reverse 9 Accelerator pedal forwards Fig 33 5 6 9 8 7 67 Maintenance and Care 5 Steering rear wheels 6 Lifting cylinder 7 Tension pulley suction turbine 8...

Страница 68: ...the belt to the value F2 Fig 35 Components F1 F2 Hydraulic pump 1 450 350 Dynamo 2 100 100 2 1 2 1 68 Maintenance and Care 5 13 Fan belts Adjustment and repair work on belts may only be carried out a...

Страница 69: ...n V7 time relay agitating motor Fig 36 Fx V7 V4 V5 V6 F1 F2 F3 F4 F5 F6 F7 F8 F9 F10 F11 F12 V3 F20 69 Maintenance and Care 5 14 Electrical installation The electrics box is located in the engine comp...

Страница 70: ...battery 12V 44 Ah type 57412 is located in the engine compartment Fig 37 1 K2 K3 K4 K5 K13 K12 K11 70 Maintenance and Care 5 14 3 Operating hour counter The operating hour counter Fig 37 1 is located...

Страница 71: ...to which the upper parts of the body feet seat are exposed under normal working conditions 0 5 m s Hako Citymaster 90 Changes Due to Machine Directive 2006 42 EC Clean ahead Preface Modified text in...

Страница 72: ...ocuments for Hako Ludger L ttel EC Declaration of Conformity corresponds to EC Directive 2006 42 EC Hako Werke GmbH Hamburger Stra e 209 239 D 23843 Bad Oldesloe declares that the products Hako Cityma...

Страница 73: ......
Страница 74: ...Str 209 239 D 23843 Bad Oldesloe 04531 806 0 Fax 04531 806 338 88 2618 11 2010 Printed in Germany Spitzentechnik f r eine saubere und sch nere Umwelt Superior technology for a cleaner and better envi...

Отзывы: