49
Maintenance and Care
5.5.1 Disassembling the main filter
1. Open the engine compartment, refer
to Section 5.4.1.
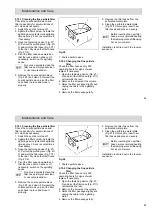
2. Release the brackets (Fig. 15/2) on
the air filter (Fig. 15/1) and remove
the lower housing.
3. Remove the main filter (Fig. 15/3)
from the housing.
5.5.2 Cleaning the main filter
1. Clean the inside of the lower housing
with a damp cloth.
2. Blow the main filter clean from the
inside towards the outside with
compressed air. Use compressed air
to max. 3 bar.
3. Use a source of light to check the
main filter for perforations.
4. Check the seals on the main filter for
signs of damage.
5.5.3 Installing the main filter
1. Slide the main filter, leading with
open side, carefully in the upper
housing section.
2. Replace the lower housing ensuring
the dust discharge valve (Fig. 15/5)
is fitted correctly.
3. Lock the brackets again.
5.5.4 Changing the main filter
The main filter (Fig. 15/3) must be
replaced in the case of damage or
every 500 operating hours at the latest.
1. Disassemble the main filter, see
paragraph 5.5.1.
2. Insert the new main filter.
3. Install the main filter, see paragraph
5.5.3.
5.5.5 Changing the safety cartridge
The safety cartridge (Fig. 15/4)
must not be cleaned nor
reused after being
disassembled!
The safety cartridge must be replaced
every 1000 operating hours at the
latest.
1. Disassemble the main filter, see
paragraph 5.5.1.
2. Insert the new safety cartridge.
3. Install the main filter, see paragraph
5.5.3.
5.5.6
Cleaning the dust discharge
valve
Press the dust discharge valve (Fig. 15/
5) together thus removing the
accumulation of dust.
Содержание Citymaster 90
Страница 1: ...Instruction Manual Hako Citymaster 90 1142 Instruction Manual Hako Citymaster 90 1142...
Страница 15: ...15 Safety information Fig 1 7 2 1 5 6 3 4 8 9 10 15 Safety information Fig 1 7 2 1 5 6 3 4 8 9 10...
Страница 16: ...16 Safety information Fig 2 1 2 3 6 4 5 7 8 16 Safety information Fig 2 1 2 3 6 4 5 7 8...
Страница 17: ...17 Safety information Fig 3 1 2 3 4 4 5 6 7 8 10 9 17 Safety information Fig 3 1 2 3 4 4 5 6 7 8 10 9...
Страница 73: ......

