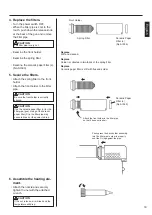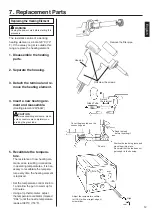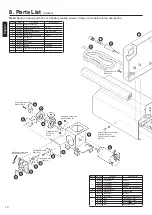
6. Maintenance
9
Properly maintained, the HAKKO 474 desoldering gun should provide years of good service.
Efficient desoldering depends upon the temperature, and the quality and quantity of the solder and flux. Per-
form the following service procedures as dictated by the conditions of the gun’s usage.
WARNING : Since the desoldering gun can reach a very high temperature, please work carefully.
Except when cleaning the nozzle and heating element, always turn the power switch off and discon-
nect the power plug before performing any maintenance procedure.
Servicing the Desoldering Gun
CAUTION
The desoldering gun will be extremely hot.
During maintenance, please wear gloves and
work carefully.
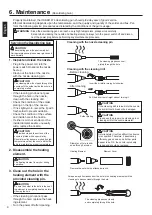
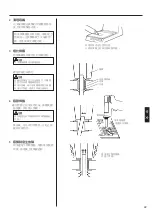
1. Inspect and clean the nozzle.
• Plug in the power cord, turn the
power switch On and let the nozzle
heat up.
• Clean out the hole of the nozzle
with the nozzle cleaning pin.
CAUTION
The cleaning pin will not pass through the
nozzle until the solder inside the nozzle is
completely melted.
• If the cleaning pin does not pass
through the hole in the nozzle,
clean with the cleaning drill.
• Check the condition of the solder
plating on the tip of the nozzle.
• If it is slightly worn, recoat the tip with
fresh solder to prevent oxidation.
• Check the condition of the surface
and inside hole of the nozzle.
• If either is worn or eroded, or the
inside diameter seems unusually
wide, replace the nozzle.
CAUTION
The inside hole and the surface of the
nozzle is plated with a special alloy.
Should this alloy become eroded by high-
temperature solder, the nozzle will not be
able to maintain the proper temperature.
2. Disassemble the heating
element.
CAUTION
The heating element is very hot during
operation.
3. Clean out the hole in the
heating element with the
provided cleaning pin.
CAUTION
Be sure the solder in the hole in the heat-
ing element is completely heated, before
cleaning the hole.
• If the cleaning pin cannot pass
through the hole, replace the heat-
ing element.
• Turn the power off after cleaning.
Cleaning with the nozzle cleaning pin
Cleaning with the cleaning drill
• Before cleaning
• After cleaning
Solder plating
Diameter of hole is wid-
ened through erosion.
(Desoldering Gun)
The cleaning pin passes com-
pletely through the hole.
Insert the bit while turning it clockwise.
Pull the drill bit out straight without turning it.
CAUTION
If the cleaning drill is forced into the nozzle,
the drill bit could break or be damaged.
CAUTION
Please use the proper size cleaning pin or
cleaning drill for the nozzle diameter.
CAUTION
Unfortunately, it is often difficult to observe
this condition. Therefore, if desoldering
efficiency goes down and all other parts
appear to be OK, the nozzle is probably
eroded and should be replaced.
Heating Element
Element Cover
Nozzle
Nut
Remove the nut with the attached wrench.
Scrape away all oxidation from the hole in the heating element until the
cleaning pin passes cleanly through the hole.
The cleaning pin passes cleanly
and completely through the hole.
English
Содержание 474
Страница 19: ...3 18 1 2 M4 25 380 480 HAKKO...
Страница 20: ...4 19 29 30 31 A1033 23 21 21 A1009 100V 110V 125V 2A 120V 250V 2A U 220V 230V 250V 1A 240V 250V 1A S...
Страница 21: ...20 5 B1094 B1095 HAKKO 474 1 M4 25 2 3 4 IRON VACUUM...
Страница 22: ...21 1 2 1 2 5 6 3 5 3 1 HAKKO 191 HAKKO 192 HAKKO 474 380 480 1 2 3 4 5 6...
Страница 23: ...22 2 3 4 5...
Страница 24: ...23 1 HAKKO 475 HAKKO 475 HAKKO 475 2 1 3 3 2 1 A B A 70 80 25 25 5 25...
Страница 25: ...24 HAKKO 474 B 25_26 20 25 26 24 20 28 a b c d e f...
Страница 26: ...6 25 HAKKO 474 1 2 3...
Страница 27: ...26 6 A1033 A1033 4 A1033 5...
Страница 28: ...27 1 A1009 2 1 2 3 A1009 S20 6 VACUUM...
Страница 29: ...28 7 23 2 4 1 2 3 4 24V 50W 5 1 3 CAL 380 CAL...


