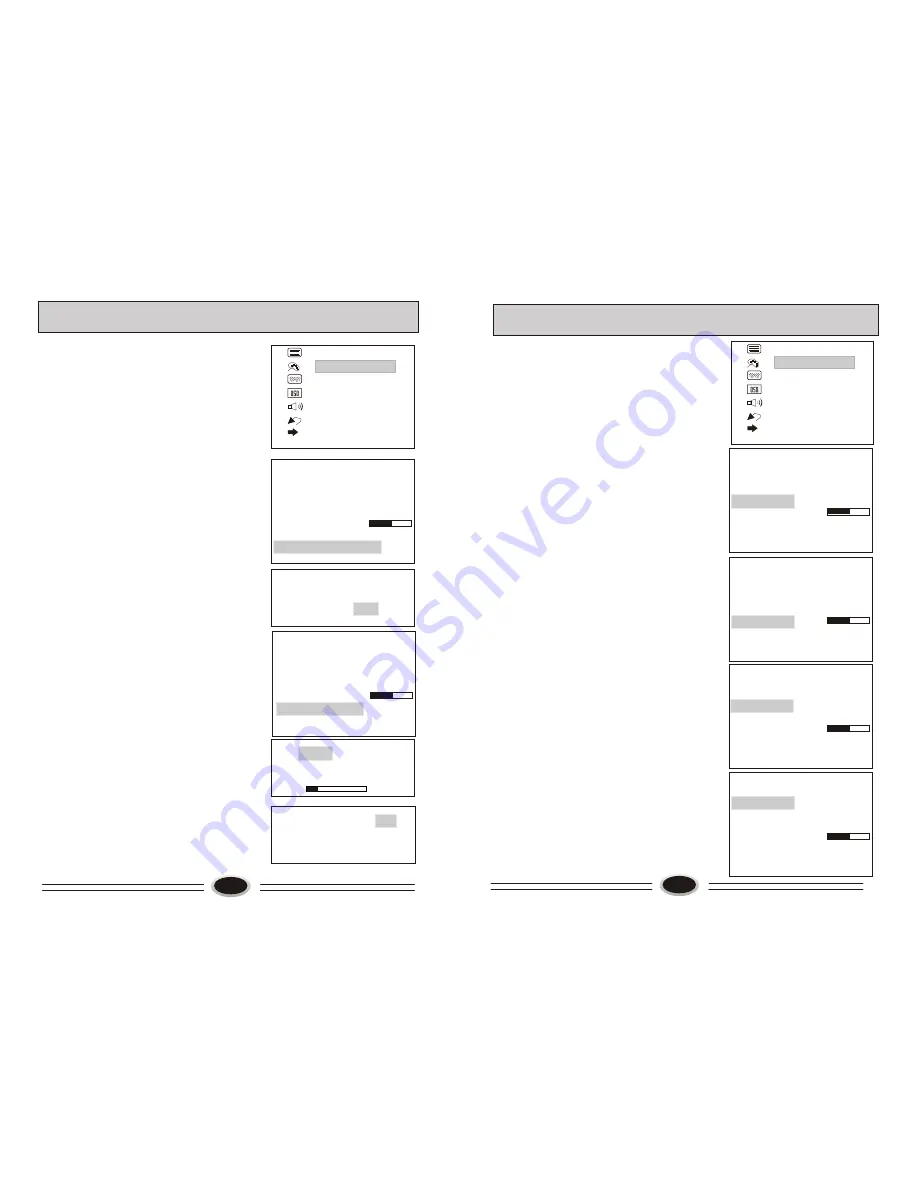
manualshive.com logo in svg
background image

720X576


50HZ

IMAGE SETTING

TV SETTING

VIDEO ADVANCE

OSD SETTING

SOUND SETTING

RESET

INPUT SOURCE

TV PROGRAM SETTING

TV PROGRAM SET                                                                                                                    
The TV set can store 200 TV programs.  You can 
use CH+/- button or one digit selection button to
watch the programs you set after presetting TV 
programs. You can use AUTO SEARCH or
MANUAL SEARCH to search programs.

AUTO SEARCH
You can search all the receiving programs with 
this method. We advise searching with automatic 
search for the first time when you use this TV set.
1. Press MENU button, then press CH+/- button to
     select TV SETTING.
2. Press MENU button, then press CH+/- button to
     select AUTO SEARCH.
3. Press MENU button to enter auto search, use 
    VOL+/- button to select YES, press MENU 
     button to start searching automatically, then
     press EXIT button to finish searching.
Note: the programs that is preset by AUTO SEARCH 
is arranged as frequency of signal, in general situation, 
it is only used in the first time you preset the program, 
it is no need to use AUTO SEARCH function after
you arrange the program as you like, or the program 
order you arranged will be changed.

MANUAL SEARCH
Manual search can do program search and program
order.
1.Press MENU button, then press CH+/- button to
   select TV SETTING.
2.Press MENU button, then press CH+/- button to 
   select MANUAL SEARCH.
3.Press MENU button to enter MANUAL SEARCH,
   use VOL+/- button to select search up or search 
   down, press MENU button to start searching. After 
   you searched a program , the search will stop 
   automatically. You can press MENU button to go
   on searching, or press EXIT button to exit.
Note: during searching, it will appear black screen,
blue screen because of change of signal, it is normal,
it will recover after finishing searching.

SWAP
1.Press MENU button, then press CH+/- button to
   select TV SETTING.
2.Press MENU button, then press CH+/- button to 
   select SWAP.
3.Press MENU button to enter swap menu. Press 
   CH+/-button to select the item.
4.Press VOL+/- button to exchange the program.

8

The following adjustment is no need to carry
through in normal situation, but it needs to adjust
in abnormal receiving status, please use FINE
TUNE to adjust in order to receive the best picture.

AUTO FINE
1. Press MENU button , then press CH+/- button to
     select TV SETTING.
2.Press MENU button, then press CH+/- button to
   select AUTO FINE.
3.Press MENU button to enter AUTO FINE, and 
   select ON, press EXIT button to exit the menu,
   at this time when switching the channel, auto fine
   will gain best picture and sound automatically.

FINE TUNE
1. Press MENU button , then press CH+/- button to
     select TV SETTING.
2.Press MENU button, then press CH+/- button to
    select FINE TUNE.
3.Press MENU button to confirm, then press 
    VOL+/- button to start fine tune until you receive
     the best picture and sound, then loose the button, 
     press EXIT button to exit.

SKIP THIS
1. Press MENU button , then press CH+/- button to
     select TV SETTING.
2.Select the program you need to skip, press MENU
    button, then press CH+/- button to select TV 
    SETTING agian. 
3.Press MENU button, then press CH+/- button to 
   select SKIP THIS.
4.Press MENU button to confirm, then press 
   VOL+/- button to select ON.
5.Press EXIT button to exit the menu. When you use 
   CH+/- button to select the channel, this channel 
   number will be skipped. But you can directly use
   digital selection button to select the channel
    number you skipped.

RECOVER THE CHANNEL NUMBER SKIPPED
1.Use one digital selection button to select the channel
    number that needs recover.
2.Press CH+/- button to select SKIP THIS.
3.Press MENU button to confirm, press VOL+/- button
   to select OFF.

SOUND
1.Press MENU button, then press CH+/- button to 
   select TV SETTING.
2.Press MENU button, then press CH+/- button to
   select SOUND.

9

TV PROGRAM SETTING

CHANNEL                         4
COLOR                             AUTO
SOUND                             BG
SKIP THIS                        ON
AUTO FINE                     OFF
FINE TUNE

 168   MHZ

MANUAL SEARCH      
AUTO SEARCH
SWAP

AUTO SEARCH

NO                  YES

DOWN                UP                 

         63MHZ

720X576


50HZ

IMAGE SETTING

TV SETTING

VIDEO ADVANCE

OSD SETTING

SOUND SETTING

RESET

INPUT SOURCE

CHANNEL               26
TO:                            27

CHANNEL                         4
COLOR                             AUTO
SOUND                             BG
SKIP THIS                        ON
AUTO FINE                     OFF
FINE TUNE

 168   MHZ

MANUAL SEARCH      
AUTO SEARCH
SWAP

CHANNEL                         4
COLOR                             AUTO
SOUND                             BG
SKIP THIS                        ON
AUTO FINE                     OFF
FINE TUNE

 168   MHZ

MANUAL SEARCH      
AUTO SEARCH
SWAP

CHANNEL                         4
COLOR                             AUTO
SOUND                             BG
SKIP THIS                        ON
AUTO FINE                     OFF
FINE TUNE

 168   MHZ

MANUAL SEARCH      
AUTO SEARCH
SWAP

CHANNEL                         4
COLOR                             AUTO
SOUND                             BG
SKIP THIS                        ON
AUTO FINE                     OFF
FINE TUNE

 168   MHZ

MANUAL SEARCH      
AUTO SEARCH
SWAP

CHANNEL                         4
COLOR                             AUTO
SOUND                             BG
SKIP THIS                        ON
AUTO FINE                     OFF
FINE TUNE

 168   MHZ

MANUAL SEARCH      
AUTO SEARCH
SWAP

Содержание L20AV6A-A0

Страница 1: ...AV6A A0 LCD COLOR TELEVISION OPERATING INSTRUCTIONS LCD Display Free From Flicker and Radiation Wide View angle Display Hi Fi and Stereo Earphone Output Multi Input Port Multi Image Mode Option Channel Sort and Swap ...

Страница 2: ... on screen display Note This product is not forbidden to change or modify without any authorization POWER SUPPLY The TV set uses direct current power supply by converting alternating current to direct current to input Please see the supply voltage value instruction in the rating plate of the back cover This TV set only can use this kind of power supply It is not forbidden to input alternating curr...

Страница 3: ...elative Humidity 20 80 Pressure 601hPa 1040hPa WARNING AND CAUTION 6 3 Two M4 8 screw Rational axis subassembly Woofer plug Woofer connecting wire Base subassembly Figure1 Figure2 Three M4 8 screw Assembly steps 1 Take out the rational axis subassembly and cover board from accessory box and separate them 2 The woofer connecting wire and plug are through square slot of rational axis and use two M4 ...

Страница 4: ... 1 Don t drop or wet or dismantle the unit 2 If you don t intend to use the unit for a long period or the electricity of the batteries is used up remove the batteries to prevent batteries acid from leaking into the battery compartment 3 Replace the two old batteries at the same time 4 Don t use charge battery Ni cd and don t mix battery type 5 Don t throw your batteries into a fire Dispose of your...

Страница 5: ...e in the loudspeaker ON SCREEN DISPLAY When you press DISPLAY button as usual the present channel number will display on the screen if you press it again the channel number will disappear 6 7 SCREEN DISPLAY 63 EXIT 19 14 56 21 13 07 08 09 15 00 34 04 05 06 03 02 01 11 18 17 10 12 16 SLEEP P STD MUTE CCD TV AV 0 RECALL 9 8 7 3 2 1 6 5 4 CH VOL VOL CH MENU DISPLAY 1 Press MENU button to select the m...

Страница 6: ...receive the best picture AUTO FINE 1 Press MENU button then press CH button to select TV SETTING 2 Press MENU button then press CH button to select AUTO FINE 3 Press MENU button to enter AUTO FINE and select ON press EXIT button to exit the menu at this time when switching the channel auto fine will gain best picture and sound automatically FINE TUNE 1 Press MENU button then press CH button to sel...

Страница 7: ...utton to adjust AUTOMATIC IMAGE CONTROL P STD image mode selection button Press P STD repeatedly the following four image modes can be selected in turn VIVID suitable for bright image NAUTRE common mode MILD the image effect is soft USER set the image effect you like ITEM CONTRAST BRIGHTNESS COLOR SHARPNESS TINT VOL VOL POOR STRONG DIM BRIGHT LIGHT DARK FAINT SHARP GREEN RED NATURE VIVID USER MILD...

Страница 8: ...ON 1 Press MENU button then press CH button to select OSD SETTING 2 Press MENU button to enter OSD SETTING 3 Press CH button to select LANGUAGE item 4 Press MENU button to confirm press VOL button to select the on screen display language you need OSD HORIZONTAL VERTICAL POSITION ADJUSTMENT 1 Press MENU button then press CH button to select OSD SETTING 2 Press MENU button to enter OSD SETTING then ...

Страница 9: ...ition of image RESET make the image reset to the factory ex work status Note some image input signal can not auto adjust exactly it needs manual set 50 50 50 NATIVE 9300K 6500K USER 14 USING YOUR TV AS A COMPUTER DISPLAY VGA input 1 Connect the VGA output port in the computer to the PC port in the TV set 2 Connect the audio cable in computer to PC AUDIO IN port in TV set 3 Press TV AV button to se...

Страница 10: ...remove the back cover by yourself 2 A snapping sound from the cabinet of the TV set can be heard occasionally This is normal and is caused by temperature changes of the operating environment and does not affect the operation of the set TROUBLE SHOOTING GUIDE BREAKDOWN PHENOMENON PICTURE SOUND CHECK FOR The direction and connection of the antenna Direction station and connection of the antenna Inte...

Отзывы: