background image

15

MODELS WITH TOUCH CONTROL CLOCK

USING THE ELECTRONIC TIMER

To change the Timer Volume

You may choose from three volume levels.

To select a volume

1

  Touch and hold the 

and 

controls together for 3 seconds.

2

  Touch the Mode control 

 .


the display will show the current volume (

ton1

ton2

 or 

ton3

3

 Touch the 

control. 


the oven will beep at the level displayed

4

  Repeat until you have chosen a volume

5

  After 8 seconds the oven will beep confirming the new volume setting and the display 

will return to the time of day.

Содержание HWO60S4

Страница 1: ...Built in oven HWO60S4 single models NZ AU USER GUIDE ...

Страница 2: ......

Страница 3: ...with six button clock 13 Using the electronic timer models with touch control clock 14 Automatic cooking models with touch control clock 16 Care and cleaning 18 Troubleshooting 25 Warranty and service 26 IMPORTANT SAVE THESE INSTRUCTIONS The models shown in this user guide may not be available in all markets and are subject to change at any time For current details about model and specification av...

Страница 4: ... away Use oven mitts or other protection when handling hot surfaces such as oven shelves or dishes Use care when opening the oven door Let hot air or steam escape before removing or replacing food Do not touch heating elements or interior surfaces of the oven Heating elements may be hot even though they are dark in colour Interior surfaces of an oven become hot enough to cause burns During and aft...

Страница 5: ...se your appliance for warming or heating the room Do not place heavy objects on the oven door Wear proper apparel Do not wear loose fitting or hanging garments when using the appliance They could ignite or melt if they touch an element or hot surface and you could be burned User servicing do not repair or replace any part of the appliance unless specifically recommended in the manual All other ser...

Страница 6: ...t any time even when the oven is not in use IMPORTANT The timer does NOT turn the oven off To set the timer 1 Turn the timer knob clockwise all the way around to the 0 mark 120 minute countdown When the timer is set The timer will immediately start counting down you will see the knob slowly rotating anti clockwise towards the O mark To cancel the setting turn the knob anti clockwise back to the O ...

Страница 7: ...d beep volume increases time Illuminated symbols To set the clock When the power to the oven is turned on or restored after a power failure 0 00 and AUTO will flash in the display 1 Press 2 Press and until you have the correct time of day IF THE DISPLAY SHOWS IT MEANS THAT FOR MORE INFORMATION A U T O Flashing with 0 00 The clock needs to be set See instructions below Steadily lit The oven is set ...

Страница 8: ... Temperature knob Touch controls Function knob Temperature indicator light Clock Display Function indicator light Fig 5 Control panel Four function models with touch control clock Cooking indicator Automatic Cooking indicator Timer indicator control control Mode control ...

Страница 9: ...y touching the and controls 3 After 8 seconds the oven will beep confirming the time is set 4 The cooking indicator will show in the display To change the time 1 Touch and hold the and controls together for 3 seconds 2 Set the new time by touching the and controls 3 After 8 seconds the oven will beep confirming the new time is set IMPORTANT Changing the time will delete any automatic functions tha...

Страница 10: ...eping it out of reach of children 3 Models with six button or touch control electronic clock only set the clock The oven will not work until this has been done see Oven controls and setting the clock for instructions 4 Slide in the shelf and grill tray as shown in Using your oven 5 Condition the oven Heat it on maximum temperature for the times below 30 minutes using Fan Forced 15 minutes using Gr...

Страница 11: ...n has reached the set temperature During cooking The temperature indicator light may come on and go out again as the oven maintains the temperature A cooling fan may automatically come on at different times and blow out warm air below the control panel It may continue to run even after the oven has been turned off This is normal Set the temperature back to off O before changing functions When you ...

Страница 12: ...ously browned and sizzling while remaining juicy and tender FAN GRILL Use with the oven door closed and the temperature set no higher than 220 C Ideal for roasting tender cuts of meat and poultry Use the lower shelf positions for larger items eg a whole chicken GRILL Use with the oven door closed and the temperature set no higher than 225 C For best results use the shelf position 4 when you want q...

Страница 13: ...mperature indicator light goes out The oven is ideal for multi shelf baking or larger items Settings in bold indicate the recommended oven function The shelf positions recommended below use the flat oven shelf FOOD FAN FORCED Shelf position Temperature O C Time mins Small cakes single shelf 2 150 170 13 17 multi shelf 1 150 170 15 20 Scones single shelf 2 210 230 8 12 multi shelf 1 210 230 10 14 S...

Страница 14: ...ck will show the time of day with the symbol steadily lit The timer is now counting down To check the remaining time Press To cancel the timer 1 Press 2 Press until the time is reset to 0 00 After a few seconds the clock will show the time of day When the set time is up The timer will beep and the symbol will flash Press to stop the beeping and turn the timer off After a few seconds the clock will...

Страница 15: ...the stop time step 3 above When automatic cooking is set If there is time before cooking starts the oven will turn off and the current time of day and AUTO will show in the clock display indicating that the oven is set for automatic cooking Note the cooling fan may stay on The oven will automatically turn on at the required time eg 12 50 and turn off at the set stop time eg 13 30 To see the remain...

Страница 16: ...is greater than one minute it will show in hours and minutes If the time remaining is less than one minute it will show in seconds After 8 seconds the display will return to the time of day To change or cancel the timer 1 Touch and hold the mode control for 3 seconds The time remaining will be displayed 2 Set the new time by touching the and controls 3 After 8 seconds the oven will beep to indicat...

Страница 17: ...ch and hold the and controls together for 3 seconds 2 Touch the Mode control the display will show the current volume ton1 ton2 or ton3 3 Touch the control the oven will beep at the level displayed 4 Repeat until you have chosen a volume 5 After 8 seconds the oven will beep confirming the new volume setting and the display will return to the time of day ...

Страница 18: ...le dur is being displayed you can change to End by touching the mode control once Use the and controls to set the time of day you wish to turn the oven off The AUTO indicator and the cooking indicator will flash After 8 seconds the time will be set and the AUTO indicator remains on You can turn the oven on manually and just set it to turn off automatically by setting the end time 4 When automatic ...

Страница 19: ... mode control for 3 seconds to return the oven to manual mode The cooking indicator will glow steadily Turn the temperature and function knobs to O off To Cancel Auto off Touch and hold the and controls together for 3 seconds Turn the oven temperature and function knobs to O off IMPORTANT If you have a power interruption it will cause any automatic cooking functions to be cancelled Turn off the ov...

Страница 20: ... surfaces 1 Wipe the soiling off with a cloth using a mild household detergent or stainless steel cleaner 2 Wipe the surface dry 3 Use a suitable stainless steel polish Immediately wipe off any caustic cleaners if they are spilled onto the oven door handle or the knobs External glass surfaces Wipe with a damp cloth or use a glass cleaner Do not use harsh abrasive cleaners or sharp metal scrapers s...

Страница 21: ...unhook and displace the rubber seal while cleaning it Take care not to spray any oven cleaner or other caustic cleaner on the rubber seal as doing so may damage the rubber Knobs 1 Wipe with a damp cloth and mild detergent 2 Dry thoroughly with a soft cloth Do not use stainless steel or oven cleaner on the knobs as doing so may damage their coating ...

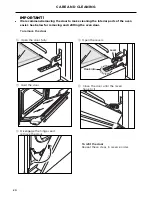
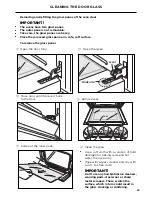
Страница 22: ... the oven easier See below for removing and refitting the oven door To remove the door 1 Open the door fully 3 Hold the door 5 Disengage the hinges and remove the door 2 Open the levers 4 Close the door until the levers hook to it To refit the door Repeat these steps in reverse order Hook into Lever C ...

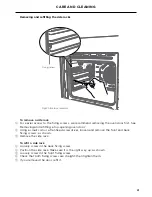
Страница 23: ...small coin or a flat head screwdriver loosen and remove the front and back fixing screws as shown 3 Remove the side rack To refit a side rack 1 Loosely screw in the back fixing screw 2 Position the side rack Make sure it is the right way up as shown 3 Loosely screw in the front fixing screw 4 Check that both fixing screws are straight then tighten them 5 If you removed the door refit it Fixing scr...

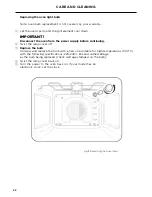
Страница 24: ...efore continuing 2 Twist the lamp cover off 3 Replace the bulb Unscrew and replace the bulb with a new one suitable for high temperatures 300 C with the following specifications 220 240V E14 and same wattage as the bulb being replaced check wattage stamped on the bulb 4 Twist the lamp cover back on 5 Turn the power to the oven back on If your model has an electronic clock set the clock Fig 13 Remo...

Страница 25: ...lly 3 Close door until the levers hook to the door 2 Open the levers 4 Remove seal Hook into Lever Seal 5 Slide out the inner pane 6 Clean the glass Use a soft cloth with a solution of mild detergent or baking soda and hot water then wipe dry Wipe with a glass cleaner and dry with a soft lint free cloth IMPORTANT Don t use any harsh abrasive cleaners scouring pads steel wool or sharp metal scraper...

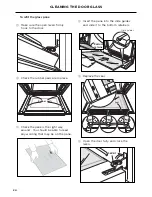
Страница 26: ...able to read any wording that may be on the pane 1 Make sure the open levers firmly hook to the door To refit the glass pane Rubber pads 1 4 Insert the pane into the slide guides and slide it to the bottom retainers F Slide guides 5 Replace the seal 6 Open the door fully and close the levers Seal Lever Bottom retainers ...

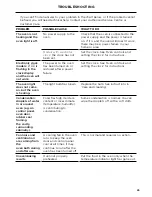
Страница 27: ... restored after a power failure Set the clock See Oven controls and setting the clock for instructions The oven light does not come on but the oven is heating The light bulb has blown Replace the bulb See instructions in Care and cleaning Condensation droplets of water in or around oven e g on control panel oven door rubber seal framing the cavity surrounding cabinetry Food has high moisture conte...

Страница 28: ...y details and your nearest Authorised Service Centre Customer Care or contact us through our website listed on the back cover This oven has been designed and constructed in accordance with the following codes and specifications In New Zealand and Australia AS NZS 60335 1 General Requirements for Domestic electrical appliances AS NZS 60335 2 6 Particular Requirements for Domestic electrical cooking...

Страница 29: ...27 ...

Страница 30: ......

Страница 31: ......

Страница 32: ...t specifications in this booklet apply to the specific products and models described at the date of issue Under our policy of continuous product improvement these specifications may change at any time You should therefore check with your Dealer to ensure this booklet correctly describes the product currently available NZ AU ...

Отзывы: