background image

10-Installation

GB

30

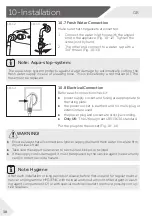
10.8 Electrical Connection

Before each connection check if:


power supply, socket and fusing are appropriate to 

the rating plate.


the power socket is earthed and no multi-plug or 

extension are used.


the power plug and socket are strictly according.


Only UK:

  The UK plug meets BS1363A standard.

Put the plug into the socket (Fig. 10-14). 


WARNING!


Ensure always that all connections (power supply, drain and fresh water hose) are firm, 

dry and leack free!


Take care these parts are never to be crushed, kinked, or twisted


If the supply cord is damaged, it must be replaced by the service agent (see warranty 

card) in order to avoid a hazard. .


Note: Hygiene

After each installation or long periods of disuse, before first use and for regular mainte

-

nance run programme HYGIENIC with no load and small amount of detergent in wash-

ing agent compartment (2) or with special machine cleaner to remove possibly corrup-

tive residues.

10-14

10.7 Fresh Water Connection 

10-13

A

10-12

Make sure that the gaskets are inserted.
1.  Connect the water inlet hose with the angled 

end to the appliance (Fig. 10-12). Tighten the 

screw joint by hand.

2.  The other end connect to a water tap with a 

3/4“ thread (Fig. 10-13). 


Note:  Aqua-stop-system:

The aqua-stop system protects against water damage by automatically cutting the 

fresh water supply in case of a leaking hose. This is indicated by a red marker (A). The 

hose must be replaced. 

Содержание HW120-B14686 Series

Страница 1: ...GB User manual Washing machine HW120 B14686 Countryspecificcode ...

Страница 2: ...ns carefully before using this appliance The instructions con tain important information which will help you get the best out of the appliance and ensure safe and proper installation use and maintenance Keep this manual in a convenient place so you can always refer to it for the safe and proper use of the appliance If you sell the appliance give it away or leave it behind when you move house make ...

Страница 3: ...ation 4 2 Productdescription 7 3 Control panel 8 4 Programmes 12 5 Consumption 13 6 Daily use 14 7 Eco friendly washing 19 8 Care and cleaning 20 9 Troubleshooting 23 10 Installation 27 11 Technical data 31 12 Customer service 33 ...

Страница 4: ...the appliance un less they are constantly supervised Children shall not play with the appliance Do not let children or pets come close to the appliance when the door is open Store washing agents out of reach of children Pull up zips fix loose threads and take care for small items to pre vent laundry from being entangled If necessary use an appropri ate bag or net Do not touch or use the appliance ...

Страница 5: ...e Maintenance cleaning Make sure children are supervised if they carry out cleaning and maintenance Disconnect the appliance from the electrical supply before un dertaking any routine maintenance Keep the lower part of the porthole clean and open door and de tergent drawer if appliance is not in use to prevent odours Do not use water spray or steam to clean the appliance Replace a damaged supply c...

Страница 6: ...unlight or in the near of heat sources e g stoves heaters Make sure that the electrical information on the rating plate agrees with the power supply If it does not contact an electri cian Do not use multi plug adapters and extension cables Make sure only the delivered electric cable and hose set are used Make sure not to damage the electric cable and the plug If dam aged have it replaced by an ele...

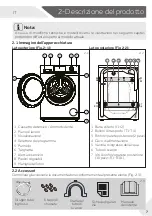
Страница 7: ... different models the illustrations in the following chap ters may differ from your model 2 3 9 7 8 6 1 4 5 2 3 2 1 3 4 5 6 7 T1 T2 T3 T4 I1 I2 R1 R2 R3 R4 R5 R6 R7 R8 R9 R10 1 Detergent Softener drawer 2 Worktop 3 Display 4 Programme selector 1 Iron bar I1 I2 2 Transportation bolts T1 T4 3 Rear wall reinforcement 2 pcs 4 Power cord 5 Water inlet vave 6 Drain hose 7 Rear wall reinforcement screws ...

Страница 8: ...gents is suitable for the various washing temperatures please refer to the manual of detergent 3 2 3 1 Note Acoustic signal In following cases an acoustic signal sounds when pressing a button when turning the programme selector at the end of programme in case of failures The acoustic signal can be deselected if necessary see DAILY USE 1 Detergent Softener drawer 2 Display 3 Programme selector 4 On...

Страница 9: ...er rupt the currently displayed programme During pro gramme run the colon in the displayed washing time is blinking During a pause also the time display is blinking 3 3 Programme selector By turning the knob Fig 3 4 one of 16 programmes can be selected related LED will light up its default settings will be displayed 3 4 Mix Cotton Synthetic Jeans Sport Wool Underwear Hygienic Express 15 min Fast D...

Страница 10: ...s and 30 minutes Press Start Pause button to activate the time delay The time delay must be longer than the programme run time Otherwise the programme will start immediately For deactivating the time delay rotate programme se lector Delay 3 10 3 6 Function buttons The function buttons Fig 3 7 enables additional op tions in the selected programme before programme start The related indicators are di...

Страница 11: ...6 7 Function Spin speed Press this button Fig 3 14 to change or deselect the spin of the programme If no value is illuminated the laundry will not spun In conjunction with the Temp button the child lock function can be switch on off see CHILD LOCK Delay speed Spin 3 14 Temp 3 15 3 6 8 Function Temp Press this button Fig 3 15 to change the washing temperature of the programme If is illuminated the ...

Страница 12: ...ns 1000 Sport 3 40 20 º Sports wear 800 Wool 3 40 º Machine washable fabric made of wool or with wool content 800 Underwear 6 60 40 º Underwear 1000 Hygienic 6 90 90 º Boil prooved cotton 1000 Express 15 min 3 3 40 º Cotton Synthetic 1000 Fast 3 6 40 40 º Lightly soiled laundry made of cotton or synthetic 1000 Daily Wash 6 60 30 º Cotton fabrics 1000 Baby Care 6 90 40 º Cotton Synthetic 1000 Delic...

Страница 13: ...lling according to 2010 30 EU Cotton 60 C 40 C with max spin speed setting and activated Intense function The standard 60 C and 40 C cotton programmes are suitable to clean normally soiled cotton laundry They are the most efficient programmes in terms of combined energy and water consumption for cotton laundry Used water temperature may differ from declared cycle temperature Note Auto Weight The a...

Страница 14: ...ttons are sewn on tightly Place sensitive items like laundry without firm hem delicate underwear Dessous and small items such as socks belts bras etc in a wash bag Unfold large pieces of fabric such as bed sheets bedspreads etc Turn jeans and printed decorated or color inten sive textiles inside out possibly wash separately 6 3 6 1 Power supply Connect the washing machine to a power supply 220V to...

Страница 15: ...ryingpossible lower temperature Do not tumble dry Line drying Flat drying Ironing Iron at a maximum temperature up to 200 C Iron at a medial tem perature up to 150 C Iron at a low temper ature up to 110 C withoutsteam steam ironing may cause irre versibledamage Do not iron Professional Textile Care Dry cleaning in tetra chloroethene Dry cleaning in hy drocarbons Do not dry clean Professional wet c...

Страница 16: ...cate Special Softener Cotton L P L P o Mix L P L P o Synthetic L P L P L o Jeans L P L P L o Sport L o Wool L o Underwear L P L P o Hygienic L P L P L o Express 15 min L L o Fast L L o Daily Wash L P L P L o Baby Care L P L P o Delicate Silk L o Hand Wash L o Duvet L L o R L gel liquid detergent P powder detergent O optional _ no If using liquid detergent it is not recommended to activate the time...

Страница 17: ...ing Do not use liquid detergent if function Delay is selected Carefully choose the programme settings according to the care symbols on all laun dry labels and according to the programme table 6 8 Select a programme To get the best washing results select a programme which fits the degree of soiling and sort of laundry type Turn the programme knob Fig 6 6 to select the right programme Related progra...

Страница 18: ...gramme and all its individual settings 1 Press Start Pause button to interrupt the running programme 2 Press On Off button for about three seconds to switch the appliance off 3 Run programme SPIN DRAIN to drain the water 4 Select a new programme and start it Note Door lock For safety reasons the door is locked partially during the washing cycle It is only pos sible to open the door at the end of t...

Страница 19: ...size Do not overload hand width clearance above laundry For slightly soiled laundry select the Quick Wash programme Apply exact dosages of each washing agent Choose the lowest adequate washing temperature modern detergents are effi ciently cleaning below 60 C Raise default settings only due to heavy staining Select max spinning speed if a domestic dryer is used ...

Страница 20: ...ible corruptive residues from time to time Add a small amount of detergent in washing agent compartment 2 or use a special machine cleaner 8 3 Water inlet valve and inlet valve filter To prevent blockage of water supply by solid substanc es like lime clean regularly the inlet valve filter Unplug the power cord and turn off the water supply Unscrew the water inlet hose at the back Fig 8 3 of the ap...

Страница 21: ...trical plug Fig 8 6 2 Turn off water supply Fig 8 7 3 Open the door to prevent formation of moisture and odours Let door open while not used Before next usage check carefully power cord water inlet and drain hose Make sure everything is properly installed and without leackage WARNING Scalding Risk Water in the pump filter can be very hot Before any action please ensure water has cooled down Note H...

Страница 22: ...as to be clean and unhurt If the lid is not full tightened water can escape The filter must be in place or it may lead to leakage 9 Clean carefully pump filter e g using running water Fig 8 14 10 Refix it thoroughly Fig 8 15 11 Close service flap 8 14 8 15 ...

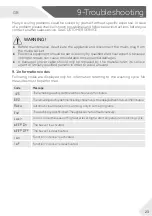
Страница 23: ...nly be replaced by the manufacturer its service agent or similarly qualified persons in order to avoid a hazard 9 1 Information codes Following codes are displayed only for information referring to the washing cycle No measures must be performed Code Message 1 25 Theremainingwashcycletimewillbe1hourand25minutes 6 30 Theremainingwashcycletimeincludingchosenend timedelaywillbe6hoursand30minutes Auto...

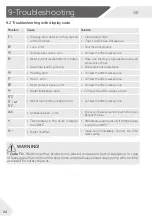
Страница 24: ...terlevelnotreachedafter12minutes Drain hose is self syphoning Make sure that tap is fully opened and water pressure is normal Check drain hose installation F4 Heating error Contact the After sales service F7 Motor error Contact the After sales service E8 Water protective level error Contact the After sales service FA Waterlevelsensorerror Contact the After sales service FC0 FC1 or FC2 Abnormal com...

Страница 25: ...ocked Pump filter is blocked Drain hose end is higher than 100 cm above floor level Unblock drain hose Clean pump filter Make sure that drain hose is properly installed Strong vibration while spinning Not all transportation bolts have been removed Appliance has no solid position Machine load is not correct Remove all transportation bolts Ensure solid ground and a ev elled position Check load weigh...

Страница 26: ...y with a spe cial cleaner Note Foam formation If too much foam is inspected during spin cycle motor stops and drain pump will be ac tivated for 90 seconds If that elimination of foam fails up to 3 times programme ends without spinning Should the error messages reappear even after the taken measures switch off the appli ance disconnect the power supply and contact the customer service 9 4 In case o...

Страница 27: ...lpackagingmaterialsoutofchildren sreachanddisposetheminanenvironmen tally friendly manner Only for some countries OPTIONAL Adjusting the bottom cover board When opening the shrink package you will find a calci um plastic board and a felt The board is used for re ducing noise after covering the bottom of the cabinet 1 Past the felt on one side of the calcium plastic board Fig 10 1 2 Lay the washing...

Страница 28: ...machineistobemovedtoadistantlocation replacethetransportprotectionbefore installation to prevent damage The assemply takes place in reserve order Note Keep in safe place Keep all parts of the transport protection in a safe place for later use Whenever the ap pliance is to be moved at first reinstall the protection parts 2 Remove the 6 screws R1 R6 from upper and 4 screws R7 R10 from lower back rei...

Страница 29: ...at a height of less than 80 cm the washing machine will continuously drain while being filled self si phoning Drain hose is not to be extended If necessary contact after sales service 10 6 3 Drain hose to sink connection The junction must lie above the siphon A spigot connection is usually closed by a pad A That must be removed to prevent any disfunc tion Fig 10 11 Secure the drain hose with a clam...

Страница 30: ...ee warranty card in order to avoid a hazard Note Hygiene After each installation or long periods of disuse before first use and for regular mainte nance run programme HYGIENIC with no load and small amount of detergent in wash ing agent compartment 2 or with special machine cleaner to remove possibly corrup tive residues 10 14 10 7 Fresh Water Connection 10 13 A 10 12 Make sure that the gaskets ar...

Страница 31: ...of cotton 60 C partial load min 238 Programme time of cotton 40 C partial load min 208 Duration of the left on mode TI in min 6 not applicable Airborne accustical noise washing spinning in dB A re 1pW 7 56 72 Type freestanding 1 Based on 220 standard washing cycles for cotton programmes at 60 C and 40 C at full and partial load and the consumption of the low power modes Actual energy consumption w...

Страница 32: ...rrent in A 10 Max power in W 1950 Water pressure in MPa 0 03 P 1 Netto weight in kg 83 11 2 Additional technical data 11 3 Standards and Directives This product meets the requirements of all applicable EC directives with the correspon ding harmonised standards which provide for CE marking ...

Страница 33: ...anty For general business enquiries please find below our addresses in Europe European Haier addresses Country Postal address Country Postal address Italy Haier Europe Trading SRL Via De Cristoforis 12 21100 Verese ITALY France Haier France SAS 3 5 rue des Graviers 92200 Neuilly sur Seine FRANCE Spain Portugal Haier Iberia SL Pg Garcia Faria 49 51 08019 Barcelona SPAIN Belgium FR Belgium NL Nether...

Страница 34: ...HW 120 B14686 GB V02_082016 ...

Страница 35: ...IT Manuale dell utente Lavatrice HW120 B14686 Codice specifico del paese ...

Страница 36: ...i iniziare a usare il disposi tivo Le istruzioni contengono informazioni importanti che vi aiuteranno a trarre il meglio da questo dispositivo e vi garantiranno altresì sicurezza in fase di installazione uso e ma nutenzione del dispositivo Conservare questo manuale in un luogo pratico di modo da poterlo sempre consultare e garantire un utilizzo sicuro e adeguato del dispositivo Qualora il disposit...

Страница 37: ...el prodotto 7 3 Pannello di controllo 8 4 Programmi 12 5 Consumo 13 6 Uso quotidiano 14 7 Lavaggio rispettoso dell ambiente 19 8 Manutenzione e pulizia 20 9 Guida alla risoluzione dei problemi 23 10 Installazione 27 11 Dati tecnici 31 12 Assistenza clienti 33 ...

Страница 38: ...ambini di età inferiore ai 3 anni lontano dal dispositivo a meno che non siano sotto costante supervisione I bambini non devono giocare con l apparecchiatura Evitare che bambini e animali si avvicinino all apparecchiatura mentre l oblò è aperto Riporre gli agenti detergenti fuori dalla portata dei bambini Chiuderelecerniere riparareifiliallentatiefareattenzioneagliogget ti di piccole dimensioni pe...

Страница 39: ...adiintraprendereeventualiinterventidimanutenzioneroutinaria quindi scollegare l apparecchiatura dalla sorgente di alimentazione elettrica per risparmiare elettricità oltre che a fini di sicurezza Tenerelapresaenonilcavoinfasediscollegamentodeldispositivo Manutenzione pulizia Verificare che i bambini siano supervisionati se eseguono oper azioni di pulizia e manutenzione Scollegareildispositivodall ...

Страница 40: ...erdite di acqua togliere la corrente e lasciare che la macchina si asciughi in modonaturale Installare o usare l apparecchiatura solo quando la temperatura è superiore ai 5 C Non mettere l apparecchiatura direttamente sul tappeto o vicino a una parete o a mobili Non installare il dispositivo direttamente esposto alla luce del sole o vicino a sorgenti di alimentazione ad esempio stufe riscaldatori ...

Страница 41: ...ustrazioni nei seguenti capitoli potrebbero differire rispetto al modello attuale 2 3 9 7 8 6 1 4 5 2 3 2 1 3 4 5 6 7 T1 T2 T3 T4 I1 I2 R1 R2 R3 R4 R5 R6 R7 R8 R9 R10 1 Cassetto detersivo Ammorbidente 2 Piano di lavoro 3 Visualizzazione 4 Selettore del programma 5 Pannello 6 Targhetta 7 Aletta di servizio 8 Piedini regolabili 9 Maniglia dell oblò 1 Barra di ferro I1 I2 2 Bulloni di trasporto T1 T4...

Страница 42: ...r ature di lavaggio rimandiamo al manuale del detergente 3 2 3 1 Nota Segnale acustico Nei seguenti casi viene emesso un segnale acustico quando viene premuto un pulsante quando viene girato il selettore programma al termine del programma in caso di guasti Il segnale acustico può essere deselezionato ove necessario cfr USO QUOTIDIANO 1 Cassetto detersivo Ammor bidente 2 Display 3 Selettore del pro...

Страница 43: ...attualmente in fase di visualizzazione In fase di esecuzione del pro gramma i due punti nell indicazione oraria del tempo di lavaggio lampeggiano L indicazione di tempo potreb be lampeggiare anche durante la pausa 3 3 Selettore programma Ruotando la manopola Fig 3 4 sarà possibile selezi onare uno dei 16 programmi il LED relativo di accende e vengono visualizzate le impostazioni predefinite 3 4 Mi...

Страница 44: ... di tempo deve essere superiore rispetto al tempo di funzionamento del programma In caso con trario il programma partirà immediatamente Per disattivare il ritardo di tempo ruotare il selettore del programma Fine ritardata 3 10 3 6 Pulsanti funzione I pulsanti funzione Fig 3 7 consentono di eseguire ulteriori operazioni nel programma selezionato prima dell inizio Vengono visualizzati i relativi ind...

Страница 45: ...hie I simboli vengono spiegati nella sezione 3 2 DISPLAY 3 6 7 Funzione Giri Premere questo pulsante Fig 3 14 per modificare o deselezionare la centrifuga del programma Qualora nessun valore si illumini il bucato non verrà sottoposto a centrifuga Inrelazionealpulsante Temp lafunzionedibloccobam bini può essere accesa spenta cfr BLOCCO BAMBINI Delay Giri 3 14 Temp 3 15 3 6 8 Funzione Temp Premere q...

Страница 46: ...Jeans 1000 Sport 3 40 20 º Indumenti sportivi 800 lana 3 40 º Tessutilavabiliamacchina in lanaoconcontenutodilana 800 Intimo 6 60 40 º Intimo 1000 Hygienic 6 90 90 º Cotone che resiste a temperature elevate 1000 Express 15 min 3 3 40 º Cotone Sintetici 1000 Rapido 60 min 3 6 40 40 º Bucato leggermente sporco in cotone o con tessuti sintetici 1000 Quotidiano 6 60 30 º Tessuti in cotone 1000 Baby Ca...

Страница 47: ...ne 60 C 40 C con impostazione velocità di centrifuga massima e funzione In tensivo attivata I programmi standard 60 C e 40 C cotone sono adatti per pulire bucato con un livello di sporcizia normale Sono i programmi più efficaci in termini di consumo combinato di en ergia e acqua per il bucato in cotone La temperatura dell acqua usata potrebbe variare rispetto alla temperatura del ciclo indicata No...

Страница 48: ...te cuciti Mettere i capi più particolari ad esempio quelli senza orlo oppure quelli delicati intimo e quelli piccoli come ad esempio calzini cinghie reg giseni ecc all internodiunsacchettodalavaggio Srotolare i pezzi più grandi di tessuto quali ad es empio lenzuola copriletto ecc Capovolgere i jeans i tessuti stampati decorati o particolarmente carichi di colore se possibile lavare separatamente 6...

Страница 49: ...se Asciugatura in piano Non passare in lavasciuga Stiro Stirare a una tempera tura massima di 200 C Stirare a una tem peratura media di 150 C Stirare a una tem peratura bassa mas sima di 110 C senza vapore la stiratura a vapore potrebbe causare danni irre versibili Non stirare Cura professionale per vostri tessuti Lavaggio a secco con tetracloroetene Lavaggio a secco con idrocarburi Non lavare a s...

Страница 50: ...versale Colore Delicati Speciale Ammorbidente Cotone L P L P o Misti L P L P o Sintetici L P L P L o Jeans L P L P L o Sport L o lana L o Intimo L P L P o Hygienic L P L P L o Express 15 min L L o Rapido 60 min L L o Quotidiano L P L P L o Baby Care L P L P o Delicati Seta L o Lavaggio a mano L o Piumone L L o R L detergente gel liquido P detergente in polvere O opzionale _ no Qualora si usi deter...

Страница 51: ...viene selezionata la modalità Fine ritadata Scegliere con attenzione le impostazioni del programma a seconda dei simboli sulle etichette del bucato e conformemente alla tabella programma 6 8 Selezionare un programma Per ottenere risultati di lavaggio impeccabili selezionare un programma che si adatti al livello di sporcizia quindi ordinare il bucato Ruotare la manopola del programma Fig 6 6 per se...

Страница 52: ...unzionamento Per annullare un programma di lavaggio e tutte le sue impostazioni individuali 1 Premere il pulsante Avvio Pausa per interrompere il programma in funzione 2 Premere il pulsante On Off per circa tre secondi per spegnere l apparecchiatura 3 Avvio programma RISCIACQUO CENTRIFUGA per scaricare l acqua 4 Selezionare un nuovo programma quindi avviarlo Nota Blocco oblò Per ragioni di sicurez...

Страница 53: ...spazio di una mano sopra al bucato Per indumenti leggermente sporchi selezionare il programma di Lavaggio Rapido Applicare dosaggi esatti per ogni lavaggio Scegliere la temperatura di lavaggio adeguata più bassa possibile i detergenti mod erni sono già efficaci a temperature inferiori ai 60 C Alzare i valori predefiniti solo in caso di elevato livello di sporco Selezionare la velocità di centrifug...

Страница 54: ... e le componenti in gomma Nonusareagentichimiciorganiciosolventicorrosivi 8 2 8 1 1 2 8 3 Valvola di ingresso dell acqua e filtro della valvola di ingresso Per evitare blocchi dell alimentazione dell acqua causati dasostanzesolidecomeadesempiolacalce pulireain tervalli regolari il filtro della valvola di ingresso dell acqua Scollegare il cavo di alimentazione e chiudere l alimentazione idrica Svit...

Страница 55: ... 7 3 Aprire l oblò per evitare la formazione di umidità e cattivi odori Lasciare aperti gli oblò quando la macchina non è in funzione Prima dell uso successivo controllare con attenzione il cavo di alimentazione la linea di ingresso dell acqua e il tubo di scarico Verificare che tutto sia installato cor rettamente e che non vi siano perdite AVVERTENZA Attenzione Rischio di scottatura L acqua all i...

Страница 56: ...a il coperchio non sia completamente chiuso l acqua potrebbe fuoriuscire Il filtro deve essere in posizione oppure potrebbe portare a perdite 8 Pulire con attenzione il filtro della pompa ad esem pio servendosi di acqua di rubinetto Fig 8 14 9 Fissarlo completamente Fig 8 15 10 Chiudere l aletta di servizio 8 14 8 15 ...

Страница 57: ...iato va sostituito unicamente dal produttore dal suo agente di servizio o da persone qualificate al fine di evitare pericoli 9 1 Codici informazioni I seguenti codici vengono visualizzati unicamente per informazioni relative al ciclo di lav aggio Non vanno eseguite misurazioni Codice Messaggio 1 25 Iltempodelciclodilavaggiorestantesaràdi1orae25minuti 6 30 Iltempodelciclodilavaggiorestante compreso...

Страница 58: ...2 minuti Iltubodiscaricosistasvuotandodasolo mediante sifone Verificare che il rubinetto sia completamente aperto e che la pressione dell acqua sia nor male Controllare l installazione del tubo di scarico F4 Errore di riscaldamento Contattare il servizio Post vendita F7 Errore motore Contattare il servizio Post vendita E8 Livello di protezione acqua errore Contattare il servizio Post vendita FA Er...

Страница 59: ...ico è superi ore di 100 cm rispetto al livello del pavi mento Sbloccare il tubo di scarico Pulire il filtro della pompa Verificare che il tubo di scarico sia installato correttamente Forti vibrazioni mentre la centrifuga è in corso Non sono stati rimossi i bulloni di tras porto L apparecchiatura non ha una posizione solida Il carico della macchina non è corretto Togliere tutti i bulloni di traspor...

Страница 60: ...mazione di schiuma Se durante il ciclo di centrifuga si forma troppa schiuma il motore si ferma e la pompa di scarico viene attivata per 90 secondi Se l eliminazione della schiuma non va a buon fine per 3 volte consecutive il programma di conclude senza centrifuga Qualora compaiano nuovamente i messaggi di errore dopo aver intrapreso le misure nec essarie spegnere l apparecchiatura scollegare l al...

Страница 61: ...imento dell imballaggio Conservare tutti i materiali dell imballaggio fuori dalla portata dei bambini e smaltirli in modo rispettoso dell ambiente Solo per alcuni paesi OPZIONALE Regolazione del pannello di copertu ra inferiore In fase di apertura della confezione si troverà un pan nello in plastica calcio e del feltro Il pannello viene us ato per ridurre il rumore dopo la copertura della parte in...

Страница 62: ...arecchiatura va spostata in un luogo lontano riposizionare la posizione di prima dell installazione al fine di evitare danni Il gruppo va re installato nell ordine contrario Nota Conservare in un luogo sicuro Tenere tutte le componenti della protezione di trasporto in un luogo sicuro per poterle consultare in futuro Quando l apparecchiatura va spostata come prima cosa procedere alla re installazio...

Страница 63: ...à a scaricare in fase di riempi mento auto sifonamento Il tubo di scarico non va allungato Ove necessario contattare il servizio post vendita sizione Fig 10 10 10 6 3 Collegamento del tubo di scarico verso il la vandino La giunzione deve avvenire sopra al sifone Viene di norma usato un collegamento a tappo chiuso da un cuscinetto A Togliere per evitare eventuali malfunzionamenti Fig 10 11 Fissare ...

Страница 64: ...cheda garanzia al fine di evitare situazioni di pericolo Nota Igiene Dopo ogni installazione o dopo lunghi periodi di inutilizzo prima di iniziare a usare il dis positivo e per interventi di normale manutenzione consigliamo di usare il programma HYGIENIC senza carico e un po di detersivo nello scomparto dell agente di lavaggio 2 oppure un detersivo particolare per togliere i residui che potrebbero...

Страница 65: ...o massimagiri Tempo del programma cotone 60 C pieno carico min 238 Tempo del programma cotone 60 C carico parziale min 238 Tempo del programma cotone 40 C carico parziale min 208 Durata della modalità lasciata accesa TI in min 6 non applicabile Rumore acustico trasmesso dall aria lavaggio centrifuga in dB A re 1pW 7 56 72 Tipo indipendente 1 Sulla base di 220 cicli di lavaggio standard per program...

Страница 66: ... in A 10 Potenza max in W 1950 Pressione dell acqua in MPa 0 03 P 1 Peso netto in kg 83 11 2 Dati tecnici aggiuntivi 11 3 Standard e Direttive Questo prodotto soddisfa i requisiti di tutte le direttive CE applicabili con i corrispondenti standard armonizzati il che gli conferisce la marcatura CE ...

Страница 67: ...a fornita in dotazione col prodotto qualora si debba fare ricorso alla garanzia Per richieste commerciali generiche indichiamo qui di seguito i nostri indirizzi in Europa Indirizzi Haier europei Paese Indirizzo postale Paese Indirizzo postale Italia Haier Europe Trading SRL Via De Cristoforis 12 21100 Verese ITALIA Francia Haier Francia SAS 3 5 rue des Graviers 92200 Neuilly sur Seine FRANCIA Spag...

Страница 68: ...HW 120 B14686_ IT_ V02_082016 0020506943DL ...

Отзывы: