background image

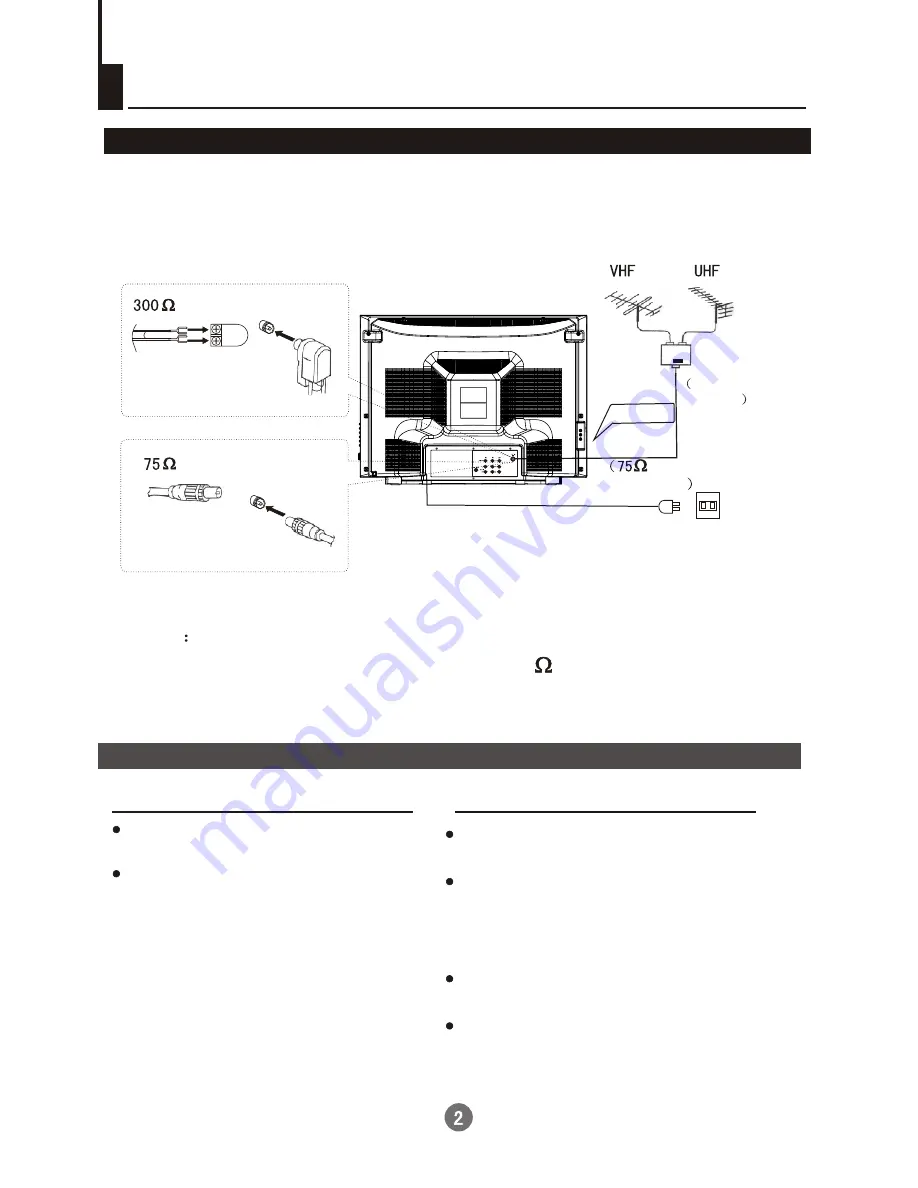
      Generally speaking, to enjoy a clearer picture, we recommend that you use a  CATV 
system or an outdoor antenna .In different places, the suitable antenna type and position 
are different.

Ì ì Ï ß µ Ä ° ² × ° ¡ ¡

Ò £ ¿ Ø Æ ÷ µ Ä × ¼ ± ¸

Battery installation

Remove the batteries cover.

Insert two size AAA batteries matching 
the +/-polarities of the battery to 
the +/- marks inside the battery
 compartment.

Tips for remote operation

The battery life should be about one year 
under normal use.
If the remote control will not be used for 
a long period of time or when the batteries 
are worn out, remove the batteries to
 prevent leakage.
Do not throw the batteries into fire. Dispose
 of used batteries in the specified manner.
Do not drop, dampen or disassemble the
 remote control.

Note

* It is recommended that you'd better use 75    coaxial cable to remove  the 

disturbance caused by airwave.

* Don't bind antenna cable and electric wire together.

twin-lead cable

coaxial cable

Antenna adapter

Plug

(additional purchase)

Mixer
additional

 purchase

AC power socket

Antenna input

standard 

coaxial type

Antenna connection

Preparation for the remote control 

Installation 

Содержание 21FA12-AM

Страница 1: ...COLOUR TV RECEIVER OWNER S MANUAL Please read this manual carefully before operating the unit and keep it for future reference The Owner s Manual for the Follow Models 21FA12 AM 29FA12 AM 29FA11 AM ...

Страница 2: ...Time functions Clock setting and on off timer REMIND PROG function Setting the other function How to start screen saver AVL function Channel exchange Calendar function Others Connecting additional equipments Troubleshooting Specifications ù Ù Æ Á Ä Ï Ô Ê Ë µ ò é CONTENTS Basic Operation Ä Â Before Operation Ù Ö Ç Warning and Cautions Installation Antenna connection Preparation for the remote contr...

Страница 3: ... cover otherwise it is possible to damage the components in the TV set and harm you 3 Don t place the TV set in the sunshine or near heat source 6 When the TV set isn t going to be used for long time or it is in thunder and lightening please pull out the plug from AC outlet and the antenna plug from the cover of the TV set Explanation on the display tube In general it is not needed to clean the tu...

Страница 4: ...f the remote control will not be used for a long period of time or when the batteries are worn out remove the batteries to prevent leakage Do not throw the batteries into fire Dispose of used batteries in the specified manner Do not drop dampen or disassemble the remote control Note It is recommended that you d better use 75 coaxial cable to remove the disturbance caused by airwave Don t bind ante...

Страница 5: ...rease sound 3 VOL Increase sound 4 CH Select next lower channel 5 CH Select next higher channel 6 Menu Access Exit main menu 7 Power Indicator 8 Sensor Windows 9 Power Power on off 1 S VIDEO Input 2 VIDEO AUDIO Input 3 YUV DVD component Input 4 VIDEO AUDIO Output 5 Antena Input Side Front Back panel 2 1 3 4 5 6 7 8 9 TV AV VOL VOL CH CH MENU 6 1 2 3 4 5 9 8 7 A11 A12 ...

Страница 6: ...rectly select channel numbers Menu Select Adjust Button Use this button to adjust the menu the volume and the channels as well as to control the game Program Scan Button Picture Mode Select Button There are standard Rich User listen soft five modes of picture Function menu button Time menu button Exit button Digit Select Button Change the channel position number between one digit two digit and thr...

Страница 7: ... the TV set CH 2 If you want to exchange to standby status please press down the POWER button on the remote control 3 If you want to fully switch off the power supply for the TV set please press the power switch button on the TV set Auto switch off function When the Back function is on if an empty channel is selected or the TV programs are ended for the day the power will be switched off 5 minutes...

Страница 8: ...press the number of the channel If you want to select a three digit channel press the Digit Select button and change it into three digits mode then press the number of the channel The settings of the colour system may be wrong Press the TUNE button and setting menu shown on the right will display on the screen If picture colour is abnormal Use the CH buttons to select then the VOL buttons to chang...

Страница 9: ...t to return to the last watched program channel 8 you can simply press the SWAP button In one word using the Program swap function we can choose channels among the present channel and four channels we last watched conveniently Auto program scan 1 If you want to select a desirable program you may scan all the TV programs in memory You can simply press the SCAN button to do this The programs will ap...

Страница 10: ...y be the color system has not been set properly so you should adjust it to the proper system Reference to page 6 If you want to stop the search just press MENU button The order of the automatic search is due to the frequency of the program generally speaking it is used only at the first time you search the program and once the order of the program has been confirmed you don t have to use this func...

Страница 11: ...n or the Direct digit Choosing button to select a channel directly take channel 1 for example Press the TUNE menu button and the TUNE menu display on the screen Press the CH buttons select SEARCH Manual search If you changed the channel number 5 seconds ago the channel number will disappear If you want to know the screen display please press the CALL button VOL CH CH VOL MENU TUNE TUNING COLOR SYS...

Страница 12: ...ired channels I E channel 1 2 Press the TUNE menu button and TUNE menu appear on the screen Press CH to select FINETUNE FINE TUNE FINE TUNE Fine tune VOL CH CH VOL MENU If the picture or sound is poor try the FINE TUNE feature Do not use this feature unless reception is poor CH CH VOL VOL MENU TUNING COLOR SYSTEM BAND SKIP OFF PROG NO SEARCH FINE TUNE AUTO SEARCH ...

Страница 13: ...the channel number to be recovered 2 Repeat those steps just now Press the VOL buttons to turn the SKIP function OFF 1 Press the CH buttons or PROGRAM NUMBER 0 9 button to choose desired channels I E channel 1 2 Press the TUNE menu button and the TUNING menu shown on the right display on the screen Press the CH buttons to select SKIP The Program skip feature enables you to skip hide programs that ...

Страница 14: ... item to adjusted then press the VOL buttons to obtain the desired effect Press the PICTURE menu button again to exit 1 Press the PICTURE menu button and the PICTURE menu shown on the right display on the screen I T E M CONTRAST BRIGHTNESS Weak Dark Shallow Soft Strong Bright Deep Sharp Press VOL Press VOL STANDARD RICH SOFT LISTEN USER à Ö Ö Í Ï ñ Ä Ê SHARPNESS COLOUR CH CH VOL VOL MENU Convenien...

Страница 15: ...nu button and the FUNCTION menu appears on the screen 1 Press PICTURE menu button and the PICTURE menu appears on the screen ã µ Ä Í Ï ñ Ó É Ï Ò Convenient picture control functions BALCK STRETCH and PICTURE BOOST PICTURE BRIGHTNESS 32 COLOR 48 SHARPNESS 40 PICTURE BOOST 1 CONTRAST 48 Í Ï ñ µ Ô ë Í Ï ñ Ô ö Ç Ø Ø PICTURE VOL CH CH VOL MENU FUNCTION VOL CH CH VOL MENU FUNCTION BACKGROUND ON BLACK ST...

Страница 16: ...to adjust the time in hour position press again the CH buttons to select the time in minute position then press the VOL buttons to adjust the value of minutes 2 Press the CH buttons to select ON TIME then press the VOL buttons to set the value in hour position press again the CH buttons to select the minute position and set the value of the minute take 18 00 as an example 1 Press the TIME menu but...

Страница 17: ...Press the TIME menu button to call up the TIME menu on the screen Press the CH buttons to select REMIND TIME then press the VOL buttons to set the value in hour position press again the CH buttons to select the minute position and then set the value of the minute Take 19 00 as an example Time functions Continued REMIND PROG function TIME ON TIME ON PROG OFF TIME SLEEP TIME REMIND TIME REMIND PROG ...

Страница 18: ...the BACKGROUND function ON FUNCTION Set up function FUNCTION BACKGROUND ON BLACK STRETCH ON AVL ON How to start screen saver AVL function VOL CH CH VOL MENU Automatic Volume Level control reduce the effortof large volume changes FUNCTION BACKGROUND ON BLACK STRETCH ON AVL ON 1 Press the FUNCTION menu button the and FUNCTION menu shown on the right display on the screen 3 Press VOL button to turn t...

Страница 19: ...he PROGRAM NUMBER 0 9 buttons to set PROGRAM 2 TO 9 1 Press MENU button continuously until select menu Channel exchange Setting the other Function continued The function of channel exchange will enable you to exchange any two programs and you can conveniently adjust the order of the programs due to your own need Channel exchange EXCHANGE PROGRAM 2 EXCHANGE PROGRAM 1 EXCHANGE PROGRAM 2 EXCHANGE PRO...

Страница 20: ...lay will disappear after a moment if you want to cancel the menu diaplay right now press the EXIT button Calender function How to use the calendar function This TV set has been designed to store the calender from the year 1901 2099 1 Press the MENU button till the CALENDAR menu appears on the screen Usually when you press the CALL button the channel number will appear on the top right corner of th...

Страница 21: ...Note About the S VIDEO Signal flow White Audio left channel Red Cr and audio right channel Blue Cb Green Y Yellow Video To video input To audio input To S VIDEO input To audio output Connecting additional equipments Video and audio input terminals in the side panel To video terminal To AUDIO R terminal To AUDIO L terminal To video output To AUDIO R output To AUDIO L output To audio video input Con...

Страница 22: ...attempt to remove the back cover as the TV set has dangerous voltages in side that may cause a fatality or fire 3 The cabinet may produce the occasional snapping sound This is normal and caused by the materials in the cabinet expanding with room temperature changes Electrical interference which can be caused by cars motorbikes etc Fluorescent lamps and dirty insulators on overhead power cables Thi...

Страница 23: ...an Mongolia Moldova Cyprus Russia Turkmenstan Ukraine Latvia Bulgaria 160V 250V 50 60Hz Jordan Oman UAE Lebann India Yemen Kuwait Bahrain Philippine Srilanka Bengal 150V 240V 50 60Hz New Zealand Australia Malaysia 150V 250V 50 60Hz Hong Kong Algeria Nepal Turkey 220V 50Hz The actual voltage and frenquency of the TV set is for the country or area different Indonisia 150V 240V 50Hz or 150V 250V 50 6...

Страница 24: ...02 0090505249 ...

Отзывы: