


27
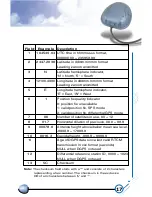
TROUBLESHOOTING
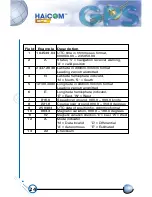
Problem
Reasons
Solutions
No Position
output but
timer is
counting
Weak or no GPS signal
can be received at the
place of HI-204
III
-USB
unit
Place the HI-204
III
-USB
under
an open space, then, press
'Reset'
At outdoor space but
GPS signal is blocked
by building or car roof
To try again, go to outdoor and
press 'Reset' or connect
external antenna on the side
of HI-204
III
-USB
to improve
the poor GPS signal
Can's open
COM port
The PS/II connector
did not insert correctly
or some other
application is the COM
port
Plug HI-204
III
-USB
connector
firmly or close all other
application that occupied the
COM port
Can not find
HI-204
III
-USB
Poor connection
Check HI-204
III
-USB
if Plug
firmly
No signal
No action for few
minites may causes
PocketPC into the
power saving mode. It
could close the COM
port at the same time.
Close all applications and
exacute it again to re-open the
COM port
Weak or no GPS signal
when using HI-204
III
-USB
indoor or inside the car.
Put HI-204
III
-USB
to an open
space or car roof, then, press
the Reset button
Содержание HI-204III
Страница 1: ...HI 204III USB Ultra High Sensitive USB GPS Receiver...
Страница 3: ...1 HI 204III USB WATERPROOF Ultra High Sensitive USB GPS Receiver...
Страница 7: ...5 For notebook PC use HI 204III USB connect with a LaptopPC USB port USB port...
Страница 13: ...11 2 2 LED INDICATOR LED flashing 0 25Hz LED flashing 1Hz Signal Searching Position Fixed...
Страница 30: ...28 USB Driver Setup Guide HI 204III USB USB GPS Receiver...
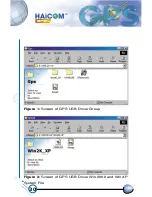
Страница 32: ...30 Figure 1 Screen of GPS USB Driver Group Figure 2 Screen of GPS USB Driver Win 2000 and Win XP System File...
Страница 33: ...31 Figure 3 Screen of GPS USB Driver Win 98 and Win ME Group...
Страница 35: ...33 Step 1 Click the Next button Figure 4 Win 98 Automatic Installation Driver Screen...
Страница 36: ...34 Step 2 Select Automatically and click the Next button Figure 5 Win 98 Automatic Installation Driver Screen...
Страница 38: ...36 Step 4 Click the Next button Figure 7 Win 98 Automatic Installation Driver Screen...
Страница 39: ...37 Step 5 Click the Finish button Figure 8 Win 98 Automatic Installation Driver Screen...
Страница 41: ...39 Step 2 Double click the Control Panel icon Figure 10 My Computer Screen...
Страница 42: ...40 Step 3 Double click the System icon Figure 11 Control Panel Screen...
Страница 43: ...41 Step 4 Press Device Manager button Figure 12 System Properties Screen...
Страница 44: ...42 Step 5 Slect USB to Serial Port COM3 and click Propertes button Figure 13 System Properties Screen...
Страница 45: ...43 Step 6 Browse COM3 properties Figure 14 System Properties Screen...
Страница 51: ...49 Step 2 Select Hardware Figure 23 System Properties Screen...
Страница 52: ...50 Step 3 Select Device Manager Figure 24 System Properties Screen...
Страница 53: ...51 Step 4 Select Ports COM LPT Figure 25 Device Manager Screen...
Страница 54: ...52 Step 5 Select COM4 Figure 26 Device Manager Screen...
Страница 55: ...53 Step 6 Select Driver Figure 27 USB to Serial Bridge Screen...
Страница 56: ...54 Step 7 Browse COM4 properties Figure 28 USB to Serial Bridge Properties Screen...
Страница 64: ...WATERPROOF USB GPS Receiver...


