background image


IoT Controller TJA560 
Installer Manual 


24 


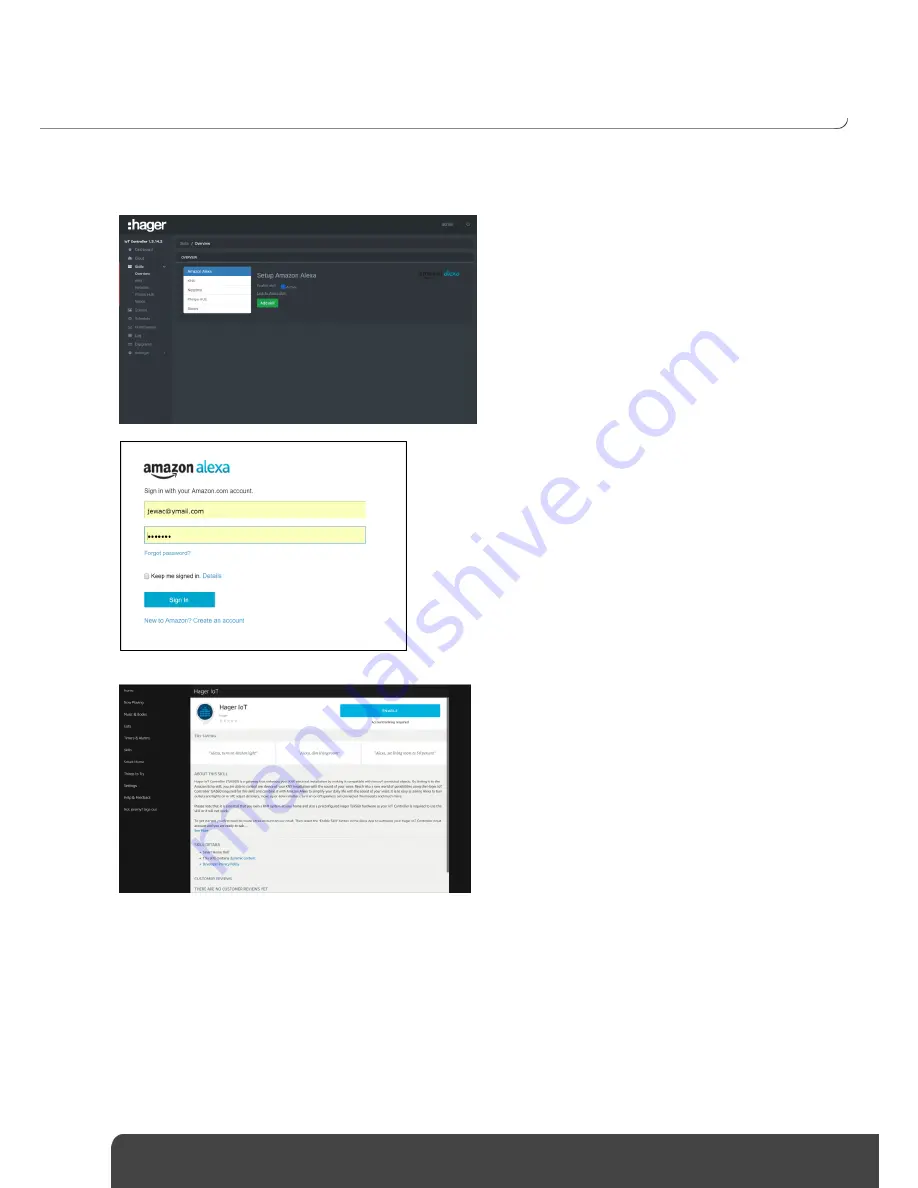
PLAY A SCENE USING AMAZON ECHO 

4.8

 
The objective is to play the 

I’m back

 scene when the user ask it to Alexa 


o

  Click the 

Amazon Alexa 

skill 

o

  Click 

Add skill 

to confirm 

o

  Click on 

Link to Alexa Skill

 to open the web 

page for your Amazon Alexa account 


o

  Once the alexa webpage is opened, fill in your 

amazon credentials 


o

  Go to Alexa skills store and search for the 

Hager 

IoT skill


o

  Click on 

Connect


Содержание TJA560

Страница 1: ...01 2018 6LE005108C TJA560 IoT Controller Installer Manual ...

Страница 2: ...nos skill 14 SKILLS CONFIGURATION 15 4 2 4 2 1 KNX skill 15 4 2 2 Philips HUE skill 15 4 2 3 Sonos skill 16 4 2 4 Netatmo skill 16 CREATE A SCENE 18 4 3 CREATE A DIGIGRAM TO PLAY THE SCENE 19 4 4 CREATE A NOTIFICATION 19 4 5 CREATE AN EVENT SIGNALLING NOTIFICATION 20 4 6 PLAY A SCENE USING GEOLOCALISATION 20 4 7 4 7 1 Configuring the IFTTT account 20 4 7 2 Create the scenario in IFTTT 21 PLAY A SC...

Страница 3: ...3 LIMITATIONS 41 5 9 LIST OF DATAPOINTS 41 5 10 LIST OF ALEXA VOCAL COMMANDS 42 5 11 ...

Страница 4: ...ce TJA560 2 GENERAL INFORMATION INTRODUCTION TO THE SYSTEM 2 1 The IoT Controller is a gateway between KNX products and third party connected devices It allows access to all functionalities of non KNX products with an IP connection It can be installed on a new or existing installation and does not require the presence of a domovea server You can access the system configuration through a web browse...

Страница 5: ...unctionalities along with PC touch screens or Smartphones for the configuration THE IOT CONTROLLER 2 3 The TJA560 is a gateway between the KNX products and connected products from third parties The product connects both to the KNX bus via connector and to the local IP network via the two Ethernet ports or This software operates in conjunction with web browsers installed on tablets smartphones and ...

Страница 6: ...ddress Lights up green Network detected and IP address allocated Lights up red IP address conflict Blinks red Waiting for IP address allocation Portal Off No Hager portal connection Blinks green Hager portal connection attempt Lights up green Hager portal connection established Lights up red Hager portal connection inaccessible or connection refused Bus voltage present Lights up red Check the bus ...

Страница 7: ...f an IP address conflict on the network other equipment already using the defined IP address the module does not automatically switch to the fallback address Connected Connected Offline This mode is a fallback mode in which the 2 ports are interchangeable Therefore they are automatically configured in client DHCP If no IP address is attributed by a DHCP server after a wait of 40 seconds the IoT Co...

Страница 8: ... Maximum dissipation 24V output 5W PoE power supply consumption 50 mA Backup duration for the date and time 1 year minimum Ethernet network communication 2 x 100 1000 BaseT Bus connection 0 6 0 8 mm Power supply socket 0 75 2 5 mm Ethernet IP network socket 2 x RJ45 Operating T 0 C 45 C Storage T 20 C 70 C Footprint 6 x 17 5 mm USB2 Interface 2 Installation method DIN rail Operating altitude 2000 ...

Страница 9: ...ribution board or in the VDI box Voice Data Images The IoT Controller can also be connected to a PoE Power over Ethernet network If there is no VDI distribution board the server can be installed in the electric distribution board In this case the ELV Extra Low Voltage and SELV Safety Extra Low Voltage connections must be properly secured ...

Страница 10: ...om the DHCP server 3 2 2 INSTALLATION WITHOUT A DHCP SERVER It is possible to connect the IoT Controller directly to the installer s PC In this case the vertical switch must be placed in the on line position and the horizontal switch in the PC position This mode activates the DHCP server built into the module The 2 ports are interchangeable and configured with the following parameters Interface IP...

Страница 11: ...appear its default name Your platform s web browser will open the configuration page for your IoT Controller The connection will also initiate the push notifications functionality in addition to the Apple Watch connection on iOS 3 3 2 WINDOWS From any other platform including a PC using a Windows operating system open your web browser and enter your IoT Controller s IP address There are several wa...

Страница 12: ...e defined Modules Commands Group addresses Format DPT Phillips Hue On Off 1 1 1 1 bit 1 001 switch Luminosity 1 1 2 4 bit 3 007 dimming control Colour 1 1 3 1 bit 1 001 switch Sonos Play Pause 2 1 1 1 bit 1 001 switch Volume 2 1 2 4 bit 3 x Netatmo Indoor temperature 3 1 1 16 bit 9 001 temperature C Outdoor temperature 3 1 2 16 bit 9 001 temperature C For the scene a group address must be defined ...

Страница 13: ...ount or click Sign up for free to create a myHager account 4 1 2 KNX SKILL Click the Skills tab then Overview Click the KNX tab Activate the KNX module Enter the KNX module physical address Select the group address style Two or three levels Click Save skill to confirm Refresh the HTML page to verify that the module is connected to the KNX bus 4 1 3 NETATMO SKILL Click the Skills tab then Overview ...

Страница 14: ...HUE SKILL Click the Skills tab then Overview Click the Philips HUE tab Activate the Philips HUE module Click Save skill to confirm 4 1 5 SONOS SKILL Click the Skills tab then Overview Click the Sonos tab Activate the Sonos module Click Save skill to confirm ...

Страница 15: ...bit 1 001 switch Luminosity 1 1 2 4 bit 3 007 dimming control Colour 1 1 3 1 bit 1 001 switch Sonos Lecture Pause 2 1 1 1 bit 1 001 switch Volume 2 1 2 4 bit 3 x Netatmo Indoor temperature 3 1 1 16 bit 9 001 temperature C Outdoor temperature 3 1 2 16 bit 9 001 temperature C Others Living room light 4 1 1 1 bit 1 001 switch Music scene 4 1 2 1 bit 1 001 switch Alarm 5 1 1 1 bit 1 001 switch It is a...

Страница 16: ...r loop Click Close to confirm 4 2 3 SONOS SKILL Click the Skills tab then Sonos Click Add device to add the desired module Click Quick Config to create links with the group addresses o Click Select on the Play pause command o Select the 2 1 1 Play pause address by clicking Add o Click Save to confirm Continue in the same way for addresses in groups 2 1 2 Raise lower volume 4 bits Click Close to co...

Страница 17: ...ate links with the group addresses o Click Select for the Temperature information o Select the 3 1 1 Indoor temperature address by clicking Add o Click Save to confirm Click Close to confirm Click Quick Config for the Outdoor module to create links with the group addresses o Click Select for the Temperature information o Select the 3 1 2 Outdoor temperature address by clicking Add o Click Save to ...

Страница 18: ...ck Action o Select the 4 1 1 Living room light address in the KNX folder o Set the switch to OFF to turn it off Click Action o Select the Turn on command in the Hue directory Click Action o Select the Colour command in the Hue directory o Set the desired colour Click Action o Select the Brightness command in the Hue directory o Enter the desired brightness value Click Action o Select the Play comm...

Страница 19: ...elect the 4 1 2 Music scene address in the KNX directory o Set the switch to ON Click Action o Select the Play scene command in the System directory o Select the Music scene Click Create digigram to confirm CREATE A NOTIFICATION 4 5 To create an email alert that the alarm has been triggered follow the example Click the Notification tab Click Create new notification Select the type of notification ...

Страница 20: ...Select the 5 1 1 Alarm address in the KNX directory o Set the switch to ON Click Action o Select the Notification command in the System directory o Select the There is an alarm notification Click Create digigram to confirm PLAY A SCENE USING GEOLOCALISATION 4 7 The objective is to play the I m back scene when the user is within a radius of 500 m around his or her home To do this we will use the IF...

Страница 21: ...the website o Connect to your myHagar account o Click Authorize App to confirm the IFTTT service o Enter your myHagar login and password 4 7 2 CREATE THE SCENARIO IN IFTTT o Using your account connect to the IFTTT service o Click New Applet to create the new application o Click this to create the condition to play the scene ...

Страница 22: ...cation corresponding to the geolocalisation o Click Location o Click You enter an area to define the condition o Enter the domicile area and the action radius o Click that to configure the scene to play o Enter Hager IoT to find the IoT Controller application o Click Hager IoT ...

Страница 23: ...Installer Manual 23 o Click Run scene to define the action to carry out o Select the I m back scene o Click Create action to confirm The IFTTT service confirms that the application has been created o Click Finish to confirm ...

Страница 24: ...e when the user ask it to Alexa o Click the Amazon Alexa skill o Click Add skill to confirm o Click on Link to Alexa Skill to open the web page for your Amazon Alexa account o Once the alexa webpage is opened fill in your amazon credentials o Go to Alexa skills store and search for the Hager IoT skill o Click on Connect ...

Страница 25: ... in your myhager credentials o Click on authorize app o From the smart home menu click on discover devices Alexa will then discover all your scenes and components o You can then control the scenes and components by using the alexa smart home commands ...

Страница 26: ... scenes SUNRISE SUNSET Sunrise and sunset time depending on the position SONOS List of quick commands Play pause Previous track Next track Repeat track Shuffle Pause All Resume All PHILIPS HUE List of quick commands ON OFF Light brightness Colour selection Turn all ON Turn all OFF NETATMO List of connected modules Temperature CO2 Atmospheric pressure Sound meter Humidity Battery status if availabl...

Страница 27: ...to the Internet Cloud o OFF The IoT Controller is disconnected from the Internet Cloud Cloud Account Lets you view the myHager account in use o Click Manage Devices to configure the myHager account o Click Unlink this Device to disconnect from the myHager account Connect devices Lets you link your myHager account to the IoT Controller to use the services o Click Sign In to link the IoT Controller ...

Страница 28: ...e available skills are Amazon Alexa o Click the Amazon Alexa tab o Click the Amazon Alexa module o Click Add skill to confirm o Click on Link to Alexa Skill to open the web page for your Amazon Alexa account KNX o Click the KNX tab o Activate the KNX skill o Enter the KNX module physical address 2 o Select the group address style Two or three levels 3 o Click Add skill to confirm ...

Страница 29: ...the Netatmo tab o Activate the Netatmo skill o Click Add skill to confirm Philips HUE o Click the Philips HUE tab o Activate the Philips HUE skill o Click Add skill to confirm Sonos o Click the Sonos tab o Activate the Sonos skill o Click Add skill to confirm ...

Страница 30: ...object and a return to initial state Creating a component lets you simplify the other configuration steps KNX projects Click the Projects tab Click Import project file Select the project file to import Click Display address list to view the addresses of the imported groups Click Delete project to delete group addresses related to this project Compatible file formats for importation are knxproj esf...

Страница 31: ...gle degree DPT11 001 Date The group address format can always be modified even after creation Create a component Click the Create component tab Enter the name of the component to create Select the component classification Select the type of component Different actuators and triggers are displayed depending on the classification and type selected Click Add to open the list of compatible group addre...

Страница 32: ...o remove the lamp from the project 5 3 4 SONOS This section configures the various Sonos peripherals Click Add Device to add the peripherals of your choice in the configuration group Click Quick Config to create links with the group addresses o Click Select for the desired command o Select the group address by clicking Add o Click Save to confirm Click Delete Device to remove the lamp from the gro...

Страница 33: ...o remove the module from the group SCENES 5 4 This section lets you set up and configure the scenes Click Create new scene Enter the name of the scene to create Click Action and select the command to carry out from the list of peripherals Click Action to add an additional command Click Save to confirm It is possible to check the scene s functionality during configuration by clicking the Test butto...

Страница 34: ...unset Select the scene to be played you may select several scenes at once Click Save to confirm NOTIFICATIONS 5 6 This section lets you set up and configure notifications to send Click Create new notification Select the type of notification o Email to send a message via email o Push notification on iOS and Android Enter the notification name Enter the recipient s email address or select the device...

Страница 35: ...als Click Action and select the command to carry out from the list of peripherals Click Create digigram to confirm It is possible to configure several triggers conditions and actions Triggers the event occurs when one of the trigger values changes Conditions the event occurs only if all of the conditions are true Actions All actions will be executed one after the other 5 7 2 LIST OF DIGIGRAMS Afte...

Страница 36: ...ngs Click the Network tab to view o The host name o The name or IP address of the DNS 1 and 2 servers Modification is only possible when the DHCP functionality is inactive Click the Hostname field and enter the new name Click the Nameserver DNS 1 or 2 field and enter the new name or the new IP address Click Save and reboot to record the modifications Click the br0 tab to view o Activation of the D...

Страница 37: ...language and geographically localise the product Language Click to select your language from the scrolling list Click Set language to record the modifications Time zone Click to select your time zone from the scrolling list Click Set Timezone to record the modifications Localisation In Country click to select the country from the scrolling list Click the Region field and enter the region Click the...

Страница 38: ...u save and restore the system configuration Click the Backup configuration field and enter the new name of the backup if necessary The default name will be IoT Controller Click Save to launch a system backup At the end of the backup the configuration will be stored in a bkp file In the Restore Configuration field click Browse to select the backup file bkp Click Restore to launch a system restore R...

Страница 39: ...n An Installer profile with administrator privileges A User profile with restricted privileges The tab lets you o Activate access protection using a password o View the list of users Click Activate authentication to enable or disable password authentication to access the various views Click the Refresh field to reinitialise the page Click Filter to search for a specific peripheral or a group of pe...

Страница 40: ... tool to connect to the system The user is automatically redirected to a page where the password can be changed 5 8 7 UPDATE This part lets you check if the system software is up to date Click Check for Updates The system checks the application software version and advises if an update is necessary If this is not the case it signals that the system is up to date Click Changelog to view the list of...

Страница 41: ... 1 byte 5 001 Percentage Percentage Sonos Play Pause 1 bit 1 001 Switch Switch Volume Increase Decrease 4 bit 3 x Dimming Volume percentage 1 byte 5 001 Percentage Percentage Title 14 byte 16 000 ASCII ASCII Volume status 1 byte 5 001 Percentage Percentage Next playlist 1 bit 1 001 Switch Switch Previous playlist 1 bit 1 001 Switch Switch Next title 1 bit 1 001 Switch Switch Previous title 1 bit 1...

Страница 42: ...exa turn on the lights or Alexa turn off the living room lights Dim the lights Alexa dim the lights to 50 percent Component thermostat Adjust temperature Alexa raise the temperature 1 degree Set temperature Alexa set the temperature to 23 All others components Not compatible while waiting for an update from Amazon smart home skills update IFTTT Use IFTTT applets Alexa trigger IFTTT applet ...

Страница 43: ...Hager Controls S A S 33 Rue Saint Nicolas B P 10140 67703 SAVERNE CEDEX France www hager fr 01 2018 6LE005108C ...

Отзывы: