2
6LE007146A
Box
• EGN200 size: 36 mm / 2 modules
• EGN400 size: 72 mm / 4 modules
• Product for surface mounting on DIN rail according
to EN 60715
Environment
• Operating temperature -5 °C to +45 °C
• Storage temperature -25 °C to +70 °C
• Relative humidity: 95% at 20°C
• Pollution level 2
Connection by screw terminals
• Rigid 0.2 to 4 mm
2
• Flexible 0.2 to 2.5 mm
2
• Screw impression: PH1
Startup
With the confi guration application
If you are using the app to configure the clock, install
as described below.
1. Access the app download link directly by scanning
the QR code printed on the clock and on the
manual with a mobile device.
2. Download and install the configuration app.
3. Check that Bluetooth
®
is enabled (see Chapter
Settings / BLUETOOTH).
4. Pair your mobile device and your clock via the
Bluetooth
®
app.
5. Program your product via the app. To do this, use
the app to guide you in configuring your clock.
With the local programming interface
In some cases, the following needs to be set during
startup:
- language;
- year, month, day;
- hour and minutes;
- Daylight Savings Time.
Press keys
3
/
4
to configure the required settings on
the display.
Press the
ok
key to confirm.
After configuring these settings, the clock switches to
automatic mode.
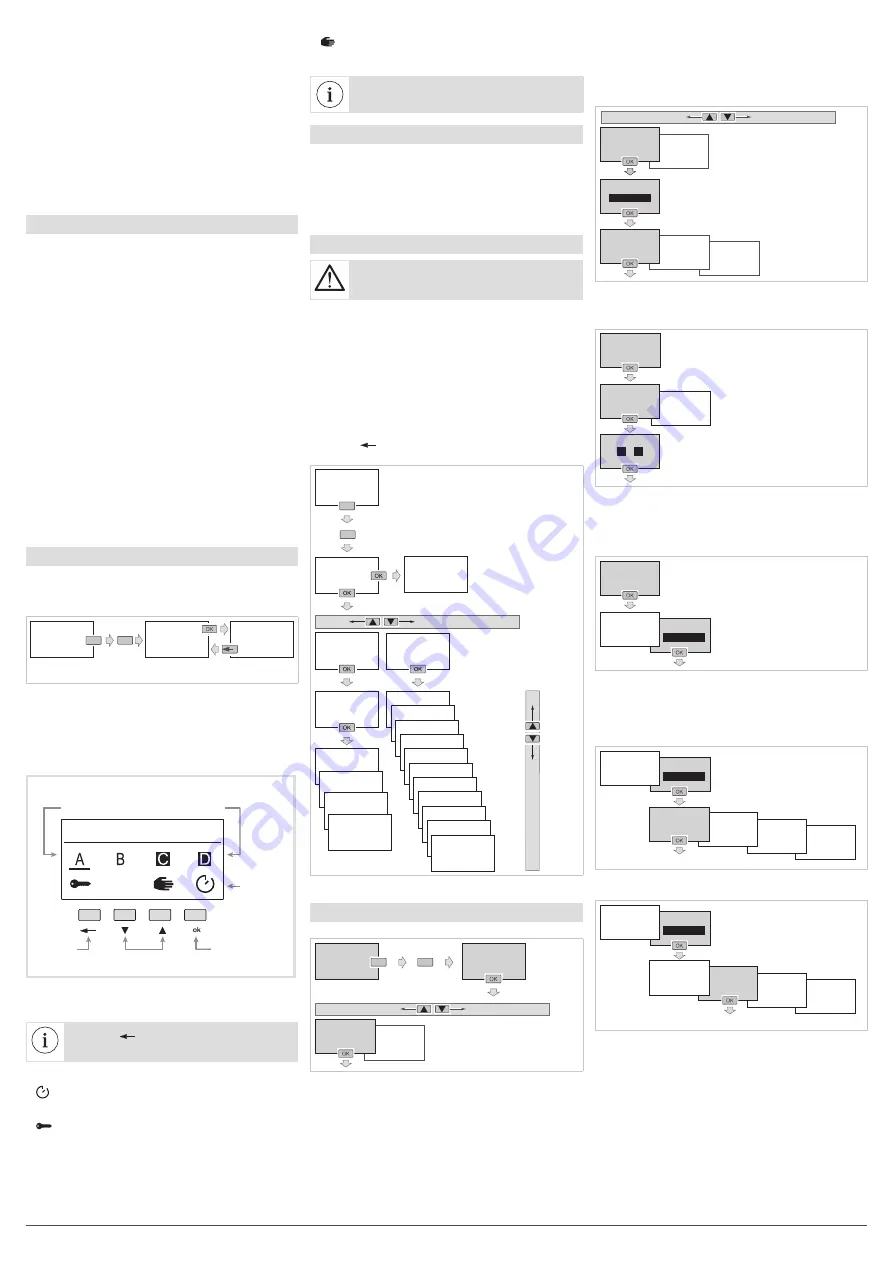
Manual Commands
From the screen saver, press one of the 4 keys
twice to enable the backlight and then switch to the
home screen. Press the
ok
key to view the manual
commands screen.
SCREEN
SCREEN
MANUAL
COMMANDS
SCREEN
SAVER
Press
a key twice
All programming and settings are based on the
following principle:
• keys
3
/
4
are used to navigate between outputs A,
B, C and D (depending on the version).
• to scroll through the different manual command
options for the selected output, the ok key is
pressed briefly and repeatedly.
Return to
the home screen
View the
option
Set the option
for manual
control
Change channel
A, B, C or D
Display the output:
• output status ON (black background);
• output status OFF (white background).
MANUAL COMMANDS...
Image 4:
presentation of the manual commands
screen.
Press the
key at any time to return to
the home screen.
The manual command options available for each
output (A, B, C and D) are:
•
: ON or OFF variance of the output with respect
to the current command. The device will return to
automatic mode at the next program step.
•
: forcing the output to ON or OFF (constant
control). The Forcing function is used to force an
output into an ON or OFF status. No other
command (ON, OFF, timer, pulse or variance) is
taken into account if the forcing function is enabled.
Only a cancellation of the forcing function or a
manual command via the front of the device
enables the other commands.
•
: manual ON or OFF switching of the output
(highest priority command and only available with
the buttons on the product).
Priority:
Manual mode > Forcing > Variance
Reset
It is possible to independently reset the Bluetooth
®
and RF link settings or to return to the product’s
factory configuration.
Reset is accessible via:
• the configuration app;
• locally on the clock; for more information, refer to
Settings / Changing Settings
.
Menu
If the programming was performed via the
configuration app, the local menu does not
allow you to edit the period (annual cycle).
From the screen saver, press one of the 4 keys twice
to enable the backlight and then switch to the home
screen.
Press and hold the
ok
key to view the
Programs /
Settings
menu.
All programming and settings are based on the
following principle:
- keys
3
/
4
are used to navigate menus and change
settings;
- the
ok
key is used to confirm.
Press the
key at any time to return to the previous
choice level.
Press a key twice
Press and hold
PROGRAMS
SETTINGS
BLUETOOTH
DATE/TIME
WIRE INPUT
DAYLIGHT SAVINGS
TIME
ASTRO
PROGRAM 1
PROGRAM 2
––––––––
PROGRAM XX*
SCREEN
SCREEN
MANUAL
COMMANDS
CONTRAST
BACKLIGHT
LANGUAGE
CHANGING SETTINGS
ABOUT
RF LINKS
LIST OF
PROGRAMS
SCREEN
SAVER
* 10 or 20 programs depending on the version
Programs
To access the programs:
sett
SETTINGS
PROGRAMS
SCREEN
SCREEN
SCREEN
SAVER
Press and hold
Press a key twice
WRITING / EDITING A PROGRAM
It is possible to create up to 10 or 20 programs
(depending on the version).
In order to create a program:
• Select the
+ Add
function;
• Edit the program.
SETTINGS
PROGRAMS
PROGRAM 1
DELETE
PROGRAM 1
DISABLE
PROGRAMS
+ ADD
PROGRAM 1
EDIT
Then define the weekly program. To do this:
• Program the selection of the output (or outputs)
concerned.
LIST
OF EVENTS
A
B
C
S
OK
OUTPUTS
PROGRAM 1
EDIT
Using keys
3
/
4
and
ok
, select the output (or
outputs) to be enabled.
The enabled output is on a black background
Press the
ok
key after selecting OK to return to the
Edit
menu.
• In the list of events, create the first programming
step by selecting
+ Add
. Up to 40 programming
steps can be added per program.
LIST OF EVENTS
+ ADD
OUTPUTS
PROGRAM 1
EDIT
After selecting a program step, three steps need
to be taken to establish the sequence:
Step 1
. Def
ine the type of action associated with the
program step among the 4 available:
- ON to enable the selected output
step 2
PULSE OFF
PULSE ON
LIST OF EVENTS
+ ADD
OUTPUTS
OFF
ON
- OFF to disable the selected output
PULSE OFF
PULSE ON
LIST OF EVENTS
+ ADD
OUTPUTS
OFF
ON
step 2