6
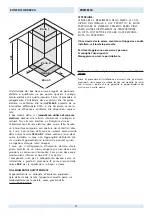
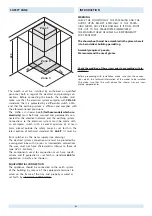
60
240
225
Zona 1
Zona 0
Zona 2
Zona 3
The booth must be installed by authorised or qualified
personnel, both as regards the electrical and plumbing con-
nections. Before connecting the booth, the installer must
make sure that the electrical system complies with
CEI 64.8
standards, the it is protected by a differential switch 0.03A,
and that the earthing system is effi cient and complies with
the aforementioned provisions.
The Hafro s.r.l. shower booth
(for those models which use
electricity)
must be fi rmly secured and permanently con-
nected to the electrical network and the earthing system.
Connections to the electrical system must be made with
an omnipolar switch with a contact aperture of at least
3mm, placed outside the safety zones as set forth in the
latest edition of technical standard CEI
64-8/7
(it must be
from splashes or the water supply (see drawing).
The electrical system connection wire must be protected by
a corrugated tube with no joins or intermediate connections.
The wire must not have characteristics inferior to those of
type HVV-F 3x2.5mm
2
.
The components used for connection must have specifi -
cations and IP protection as set forth in standards
64.8
for
application in baths and showers.
EQUIPOTENTIAL CONNECTION
The appliance should be connected to the earth system
of the building by means of the appropriate terminal lo-
cated on the frame of the tray and properly marked as
set forth by
standards 60335.2.105.
SAFETY ZONE
WARNING:
CHECK THE CONDITION OF THE PACKAGING AND THE
GOODS UPON RECEIPT, ESPECIALLY IF THE PACKA-
GING SHOWS ANY VISIBLE DAMAGE. IF IT DOES, POINT
THIS OUT TO THE TRANSPORTER IMMEDIATELY.
THE MANUFACTURER DECLINES ALL RESPONSIBILITY
FOR TRANSPORT.
The shower booth must be assembled in the place where it
is to be installed, building permitting.
Assembly requires 2 people.
We recommend the use of gloves.
INTRODUCTION
Check the condition of these items prior to proceeding with in-
stallation.
Before proceeding with installation, make sure that the connec-
tions match the technical information of the model to be installed.
Also make sure that the walls above the shower tray are com-
pletely perpendicular.
Содержание BOX SOUND STEP
Страница 15: ...15 3 4 S1 S S...
Страница 18: ...18 3 S 4 2 2 SI NO...
Страница 19: ...19 5 2 1 6 8...
Страница 21: ...21 9 6 x6 E1 F9 x6 10 F4 O W2 F4 O W2...
Страница 25: ...25 17 27 158 18 R F1 D1 1 2 x1 F 2 F 1 6 x2 E B B 4 3 x2 C C A A1 A R R D D...
Страница 28: ...28 22 23 F8 D3 Q x4...
Страница 29: ...24 25 2 1 3 29 G6 G1 G1 G6 G2 G3 G3...


