background image


Check before installation 

Before you install an AP, check the following: 


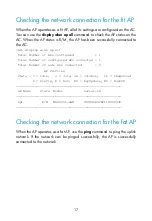
Connect the power cord and connect the AP to the network. Check the 
LED status to make sure that the AP can operate properly. For more 

information about AP LEDs, see “

Appendix LEDs and ports

.” 


Check that cabling has been completed. 


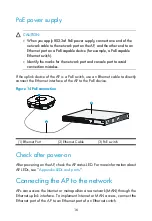
The WA2620i-AGN supports 802.3af-compliant PoE. To achieve the best 
performance, H3C recommends that you adopt GE connection to the 

power device. 


Record the MAC address and serial number of the AP (marked on the 
rear of the AP) for future use. 

Determining the installation position 

Determine the installation position by observing the following principles: 


Leave as few obstacles (such as wall) as possible between APs and 
clients. 


Install APs away from electronic devices (such as microwave ovens) that 
may generate radio frequency (RF) noise. 


Install APs in a place where they will not hinder people’s daily work and 
life. 


Do not install APs in a place where water seeping, water soaking, and 
condensing occur. Prevent water or moisture from entering the APs. 


CAUTION: 

If part of the power line is routed outdoors, use a power strip with lightning
protection (user supplied) to connect the power cord of the AP to the power 

line to protect the AP from being damaged by lightning strikes. 


Содержание WA2620i-AGN

Страница 1: ...H3C WA2620i AGN Access Point Installation Guide Hangzhou H3C Technologies Co Ltd http www h3c com Document version 6PW102 20130712...

Страница 2: ...d All other trademarks that may be mentioned in this manual are the property of their respective owners Notice The information in this document is subject to change without notice Every effort has bee...

Страница 3: ...n feedback Audience This documentation is intended for Network planners Field technical support and servicing engineers Network administrators working with the WA2620i AGN APs Conventions This section...

Страница 4: ...ion You can access the most up to date H3C product documentation on the World Wide Web at http www h3c com Click the links on the top navigation bar to obtain different categories of product documenta...

Страница 5: ...Documentation feedback You can e mail your comments about product documentation to info h3c com We appreciate your comments...

Страница 6: ...AP on a ceiling 12 Connecting the power supply 14 Check before power on 14 Local power supply 15 PoE power supply 16 Check after power on 16 Connecting the AP to the network 16 Checking the network co...

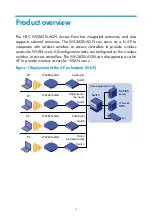
Страница 7: ...users All configuration tasks are configured on the wireless switches or access controllers The WA2620i AGN can also operate as a fat AP to provide wireless access for WLAN users Figure 1 Deployment o...

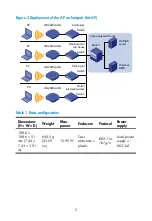
Страница 8: ...ply 188 6 188 6 51 mm 7 43 7 43 2 01 in 640 5 g 22 59 oz 12 95 W Cast aluminum plastic 802 11a b g n Local power supply 802 3af Core equipment room RADIUS server Wireless NMS Switch Switch Switch Swit...

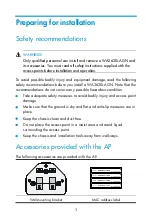
Страница 9: ...a WA2620i AGN Note that the recommendations do not cover every possible hazardous condition Take adequate safety measures to avoid bodily injury and access point damage Make sure that the ground is d...

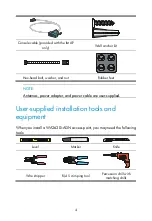
Страница 10: ...Rubber feet NOTE Antennas power adapter and power cable are user supplied User supplied installation tools and equipment When you install a WA2620i AGN access point you may need the following tools L...

Страница 11: ...5 Rubber hammer Phillips screwdriver Ladder...

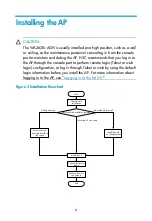
Страница 12: ...gin configuration or log in through Telnet or web by using the default login information before you install the AP For more information about logging in to the AP see Logging in to the fat AP Figure 3...

Страница 13: ...use Determining the installation position Determine the installation position by observing the following principles Leave as few obstacles such as wall as possible between APs and clients Install APs...

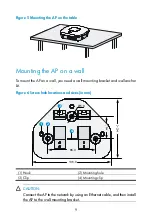
Страница 14: ...tennas is not covered in this document Mounting the AP on a table WARNING Do not place the WA2620i AGN on any metal surface Place it on a place where there are no obstacles and good signal strength is...

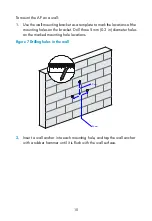
Страница 15: ...ll you need a wall mounting bracket and wall anchor kit Figure 6 Screw hole locations and sizes in mm 1 Hook 2 Mounting hole 3 Clip 4 Mounting clip CAUTION Connect the AP to the network by using an Et...

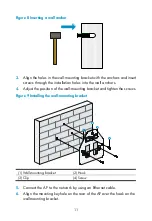
Страница 16: ...s of the mounting holes on the bracket Drill three 5 mm 0 2 in diameter holes on the marked mounting hole locations Figure 7 Drilling holes in the wall 2 Insert a wall anchor into each mounting hole a...

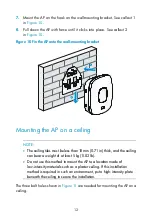
Страница 17: ...les into the wall anchors 4 Adjust the position of the wall mounting bracket and tighten the screws Figure 9 Installing the wall mounting bracket 1 Wall mounting bracket 2 Hook 3 Clip 4 Screw 5 Connec...

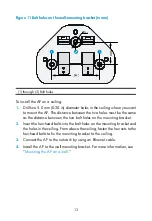
Страница 18: ...TE The ceiling tiles must be less than 18 mm 0 71 in thick and the ceiling can bear a weight of at least 5 kg 1 1 02 lb Do not use this method to mount the AP to a location made of low intensity mater...
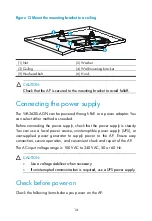
Страница 19: ...he same as the distance between the two bolt holes on the mounting bracket 2 Insert the hex head bolts into the bolt holes on the mounting bracket and the holes in the ceiling From above the ceiling f...

Страница 20: ...Before connecting the power supply check that the power supply is steady You can use a local power source uninterruptible power supply UPS or user supplied power generator to supply power to the AP E...

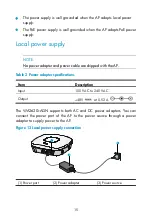
Страница 21: ...and power cable are shipped with the AP Table 2 Power adapter specifications Item Description Input 100 VAC to 240 VAC Output 48V at 0 52 A The WA2620i AGN supports both AC and DC power adapters You c...

Страница 22: ...s a PoE switch use an Ethernet cable to directly connect the Ethernet interface of the AP to the PoE device Figure 14 PoE connection 1 Ethernet Port 2 Ethernet Cable 3 PoE switch Check after power on...

Страница 23: ...all Total Number of APs configured 1 Total Number of configured APs connected 1 Total Number of auto APs connected 0 AP Profiles State I Idle J Join JA JoinAck IL ImageLoad C Config R Run KU KeyUpdate...

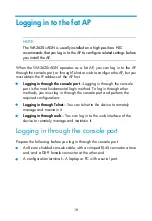
Страница 24: ...ole port is the most fundamental login method To log in through other methods you must log in through the console port and perform the required configurations Logging in through Telnet You can telnet...

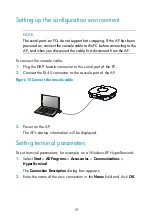
Страница 25: ...e DB 9 female connector to the serial port of the PC 2 Connect the RJ 45 connector to the console port of the AP Figure 15 Connect the console cable 3 Power on the AP The AP s startup information will...

Страница 26: ...20 Figure 16 Connection description 3 Select the serial port to be used from the Connect using list and click OK...

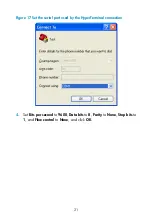
Страница 27: ...21 Figure 17 Set the serial port used by the HyperTerminal connection 4 Set Bits per second to 9600 Data bits to 8 Parity to None Stop bits to 1 and Flow control to None and click OK...

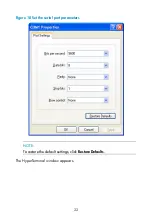
Страница 28: ...22 Figure 18 Set the serial port parameters NOTE To restore the default settings click Restore Defaults The HyperTerminal window appears...

Страница 29: ...is starting Booting Normal Extend BootWare System application is starting Startup configuration file does not exist User interface con0 is available Press ENTER to get started Logging in through Telne...

Страница 30: ...5 255 255 0 If the default IP address is changed contact the administrator to get the new IP address or use the display vlan 1 command to view the IP address after logging in to the AP from the consol...

Страница 31: ...n AC Breathing A client is connected to the 2 4G port Blue Flashing at 0 25 Hz The AP has been booted and is in standby state no client is connected to the AP NOTE When the AP operates as a fit AP thi...

Страница 32: ...e AC it flashes green and blue to show the fit AP has been associated with the AC Breathing green and blue alternatively Clients are connected to both the 2 4G and 5G radio interfaces NOTE For more in...

Страница 33: ...cal power port Table 4 WA2620i GN port description Port Standards and protocols Description 2 4G 1 2 IEEE802 1 1b IEEE802 1 1g IEEE802 1 1n The antenna ports are provided for 2 4 GHz single RF antenna...

Страница 34: ...000 Mbps copper Ethernet port The Ethernet port can serve as an uplink interface to access the Internet or MAN and as an 802 3af compliant PoE port at the same time Console port RS EIA 232 The console...

Страница 35: ...ting the AP to the network 16 Connecting the power supply 14 D Determining the installation position 7 I Installing the AP 8 L LEDs 25 Logging in through Telnet or web 23 Logging in through the consol...

Отзывы: