background image

H3C SR6608/6604 Routers  Installation Manual 

Chapter 1  Router Overview


1-37 

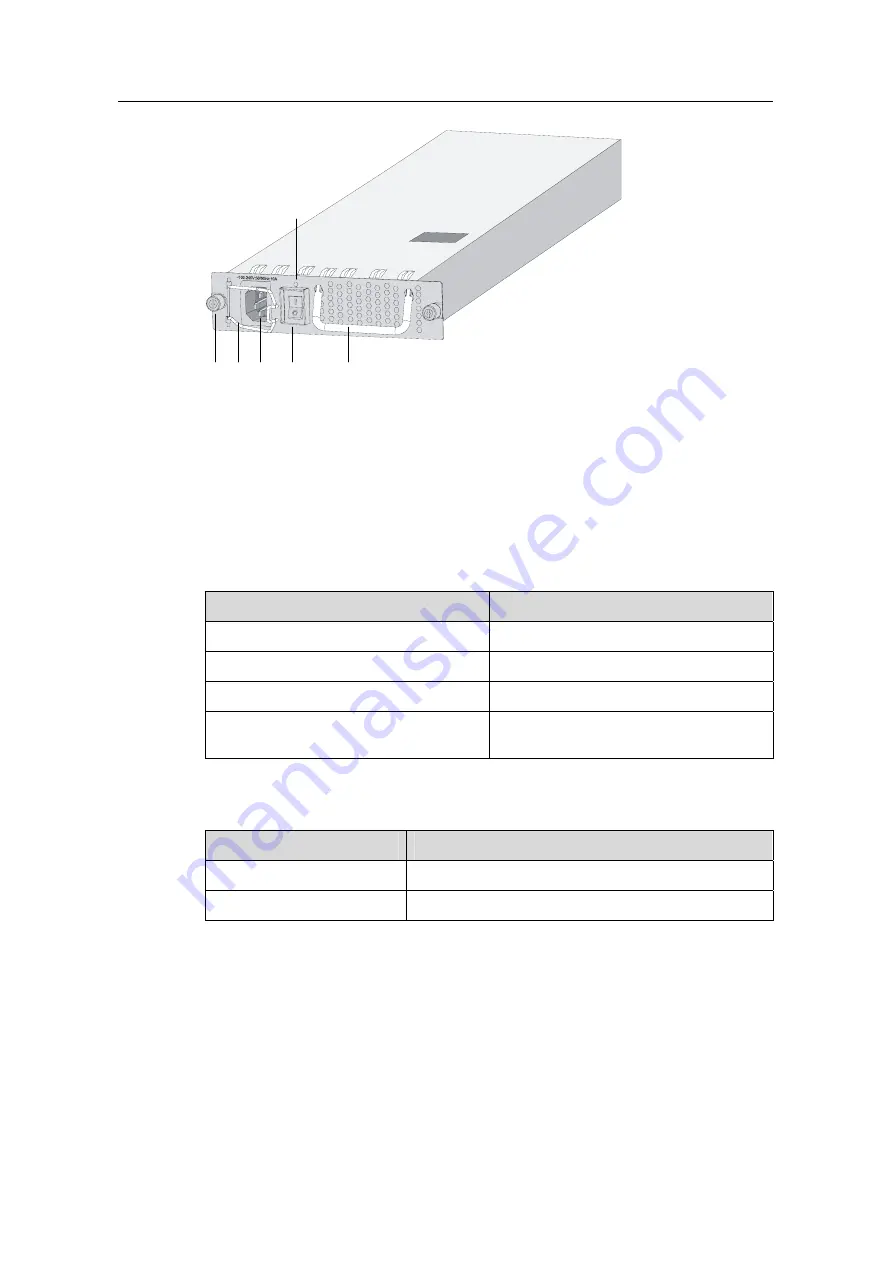
(1) (2) (3)

(4)

(5)

(6)


(1) Captive screw


(2) Bail latch 


(3) Power socket


(4) Power switch


(5) Power LED


(6) Power module handle


Figure 1-21 

AC power module 

II. DC power module 

Table 1-29 lists the specifications for the DC power module of the device.  

Table 1-29 

DC power module specifications 

Item


Specification


Rated voltage range


–48 VDC to –60 VDC


Maximum input current


25 A


Maximum power


650 W


Physical dimensions (H × W × D)


40.2 × 140 × 353.5 mm (1.58 × 5.51 
×13.92 in.) 


Table 1-30 

Description of the DC power LED 

Status


Meaning


Solid green


The power module is working normally.


Solid red


The power module is faulty.


Содержание SR6608

Страница 1: ...H3C SR6608 6604 Routers Installation Manual Hangzhou H3C Technologies Co Ltd http www h3c com Manual Version T2 08040D 20080516 C 1 02...

Страница 2: ...InnoVision and HUASAN are trademarks of Hangzhou H3C Technologies Co Ltd All other trademarks that may be mentioned in this manual are the property of their respective owners Notice The information i...

Страница 3: ...ol security VPN QoS as well as a command index Low End and Mid Range Series Routers Cable Manual This manual introduces all cable pinouts available with low end and mid range series routers Organizati...

Страница 4: ...of the H3C SR6608 6604 routers 9 Troubleshooting Describes some problems that may occur during installation and startup of the router and how to solve them Conventions The manual uses the following co...

Страница 5: ...w Multi level menus are separated by forward slashes For example File Create Folder III Symbols Convention Description Warning Means reader be extremely careful Improper operation may cause bodily inj...

Страница 6: ...1 3 2 FIP 100 1 9 1 3 3 FIP 200 1 13 1 3 4 Dimensions Weight and LPU Slots 1 16 1 3 5 Voltage and Current 1 16 1 3 6 Interface Modules 1 16 1 3 7 Fan Tray 1 19 1 3 8 Operating environment 1 19 1 4 Com...

Страница 7: ...d hardware architecture and H3C proprietary Comware V5 platform the SR6608 and SR6604 provide high service processing capabilities good service scalability and high reliability In addition the SR6608...

Страница 8: ...lot 1 3 RPE X1 Slot 0 4 Right mounting bracket 5 Chassis handle 6 Fan tray 7 AC power module PWR 1 8 Blank panel for PoE power module reserved PoE slot 9 Blank panel for power module PWR 2 10 ESD sock...

Страница 9: ...ht mounting bracket 5 Chassis handle 6 Fan tray 7 AC power module PWR 1 8 Blank panel for PoE power module reserved PoE slot 9 Blank panel for power module PWR 2 10 ESD socket and silkscreen 11 Blank...

Страница 10: ...assis handle 7 Weight bearing warning label 50 kg namely 110 2 lb 8 Grounding screw and sign 9 Vents Figure 1 3 Rear view of the SR6608 1 Warning label 2 Handle on the rear chassis panel 3 Upper slide...

Страница 11: ...eight 1 3 System Specifications 1 3 1 RPE X1 I Front view 1 RESET button RESET 2 Run LED RUN 3 Active LED of the RPE X1 ACT 4 Alarm LED ALM 5 Link state data reception transmission LED LINK ACT 6 CF c...

Страница 12: ...thernet interface 1 10Base T 100Base TX 1000Base T CF card 256 MB by default for the built in CF card 256 MB 512 MB or 1 GB for an optional external CF card USB interfaces 2 USB 0 Type A connector ope...

Страница 13: ...X1 1 Device LEDs Table 1 2 Description of the device LEDs LED Status Meaning Off No power input is available or the RPE X1 has failed Slow blinking 1 Hz The RPE X1 is operating normally RUN green Fas...

Страница 14: ...terface LED LED Status Meaning Solid yellow A 10 100 Mbps link is present Solid green A 1000 Mbps link is present Blinking yellow Data is being received or transmitted at a rate of 10 100 Mbps LINK AC...

Страница 15: ...e platform 100 FIP 100 is a type of line processing unit LPU that supports H3C legacy multifunctional interface modules MIMs FIP 100 can be inserted in slot 2 3 4 or 5 of the SR6608 or slot 2 or 3 of...

Страница 16: ...n Chapter 8 Maintaining Hardware Plug unplug an HIM MIM Section 8 9 Installing and Removing an HIM and section 8 10 Installing and Removing an MIM in Chapter 8 Maintaining Hardware Connect an Ethernet...

Страница 17: ...me Hardware encryption Supported Note If you need to install two memory modules make sure they are of the same type and size For a Combo interface the default operating interface is the electrical int...

Страница 18: ...RUN green Fast blinking 8 Hz Application software is being loaded in this case never power off the device or hot swap the FIP100 otherwise the FIP100 may be damaged or FIP 100 is not working Off No op...

Страница 19: ...hese numbers are not silk screened on an FIP 100 1 3 3 FIP 200 I Introduction Flexible interface platform 200 FIP 200 another type LPU of the device provides a high speed service processing capability...

Страница 20: ...ptical fiber II Technical specifications Table 1 8 Technical specifications for FIP 200 Item Specifications Processor Multi core MIPS CPU 1 GHz Processor cores 8 Flash 4 MB Memory type and size DDR2 S...

Страница 21: ...t the combo enable copper fiber command refer to H3C SR66 Series Routers User Manual III LEDs The LEDs on FIP 200 have the same meanings as those on FIP 100 See Table 1 7 IV Slots An FIP 200 can be in...

Страница 22: ...ltage and current specifications Item Specification Rated voltage range AC powered 100 VAC to 240 VAC 50 Hz or 60 Hz DC powered 48 VDC to 60 VDC Maximum input current AC powered 10 A DC powered 25 A M...

Страница 23: ...trical Ethernet interface module 8GBE 8 port 1000 Mbps electrical Ethernet interface module WAN 4GBE 4 port 1000 Mbps electrical Ethernet interface module WAN CL2P 2 port 155 Mbps channelized POS inte...

Страница 24: ...port E1 CE1 PRI interface module 75 ohms 8E1 75 F 8 port non channelized E1 interface module 75 ohms MIM POS 1 port POS interface module with the interface transmission rate STM 1 OC 3 155 52 Mbps Not...

Страница 25: ...n of fan tray LEDs LED Status Meaning RUN green On The fan tray is working normally ALM red On The fan tray is faulty Note The device supports automatic fan speed adjustment and hot swapping of the fa...

Страница 26: ...R2 SDRAMs for the RPE X1 have two sizes DDR2 SDRAM 512MB DDR2 SDRAM 1GB IV NVRAM The NVRAM is 128 KB in size and is used for storing exception information of the system during operation V CF card 1 In...

Страница 27: ...evice provides an RS232 asynchronous serial console port that can be connected to a computer for system debugging configuration maintenance management and host software loading 2 Technical specificati...

Страница 28: ...Signal direction DB 9 pin Signal 1 8 CTS 2 6 DSR 3 2 RXD 4 1 DCD 5 5 GND 6 3 TXD 7 4 DTR 8 7 RTS Note For the connection of the console cable refer to section 5 10 1 Connecting the Console Cable in C...

Страница 29: ...ces Used to connect the serial interface of a remote PC through a pair of modems to establish a dial up connection with the PC 3 AUX cable The AUX cable is an 8 core shielded cable At one end of the c...

Страница 30: ...ace 1 LED Figure 1 15 USB interfaces 1 USB 0 USB interface 0 on the device is a USB 1 1 compliant type A interface USB interface 0 can be connected to an external USB storage device to expand the rout...

Страница 31: ...internal CF card quickly and perform file operations on it For the description of the USB 1 status LED see Table 1 4 on page 1 8 IX Management Ethernet interface The management Ethernet interface is a...

Страница 32: ...switch the services to the standby RPE X1 without interrupting the ongoing services If you press the RESET button on the standby RPE X1 when two RPE X1s are equipped the standby RPE X1 will be reset b...

Страница 33: ...RPE X1 and operates in the master mode and the other is the standby RPE X1 and operates in the slave mode The configuration of the standby RPE X1 is synchronized with that of the active RPE X1 Thus i...

Страница 34: ...unavailable 1 4 2 FIP 100 FIP 200 I Ethernet interface introduction The FIP 100 FIP 200 of the device provides two Combo interfaces each of which consists of an electrical Ethernet interface and an op...

Страница 35: ...ace SFP0 LED 8 1000 Mbps optical Ethernet interface SFP1 LED 9 Run LED RUN Figure 1 16 Combo interfaces on FIP 100 FIP 200 Note For a Combo interface you can use either the electrical Ethernet interfa...

Страница 36: ...hernet interface the electrical Ethernet interface operates in the auto negotiation mode No matter whether an electrical Ethernet interface operates in the forced or auto negotiation mode it supports...

Страница 37: ...ry 5 twisted pair cables are used for RJ 45 connectors Figure 1 17 shows the appearance of an RJ45 connector Figure 1 17 RJ 45 connector IV LC connector and SC connector Optical fiber connectors are i...

Страница 38: ...eceive power of the optical module Otherwise the optical module may be damaged V Cable connecting a 1000 Mbps electrical Ethernet interface Usually you can use a category 5 twisted pair cable to conne...

Страница 39: ...nother terminal You can make crossover cables by yourself as needed Table 1 24 Straight through cable connector pinouts RJ 45 pin Signal Category 5 twisted pair Signal direction RJ 45 pin 1 Tx White O...

Страница 40: ...optical interfaces on these SFP modules use LC optical connectors you must use fibers with LC connectors All SFP modules are hot swappable Note No SFP module is shipped with the device Use only the S...

Страница 41: ...irst two states the system will present different prompts depending on the command you enter 1 display version If a FIP 100 FIP 200 is installed in slot 3 the following information is displayed Slot3...

Страница 42: ...module slots for 1 1 redundancy The power modules for the device support online insertion and removal OIR Note Online insertion and removal of a power module refers to first switching off the power mo...

Страница 43: ...Table 1 29 lists the specifications for the DC power module of the device Table 1 29 DC power module specifications Item Specification Rated voltage range 48 VDC to 60 VDC Maximum input current 25 A...

Страница 44: ...output voltage 10 700 s waveform core core 40 V core ground 600 V Note For the installation of the port lightning arrester refer to section 5 6 Installing a Port Lightning Arrester Optional in Chapter...

Страница 45: ...rotection parts signal lightning arrester maximum discharge current 2 5KA protection voltage 25V BNC 75K BNC 75K 10MBit s Voltage limiting protection parts signal lightning arrester U port maximum dis...

Страница 46: ...face Modules 2 1 2 1 HIMs 2 1 2 1 1 8FE 2 1 2 1 2 4GBE 8GBE 2 3 2 1 3 CL1P CL2P 2 6 2 1 4 CLS1P CLS2P 2 9 2 1 5 MSP4P 2 13 2 1 6 PS1P 2 16 2 1 7 4GBP 2 19 2 2 MIMs 2 21 2 2 1 1ATM OC3MM 1ATM OC3SM 1AT...

Страница 47: ...e implements communication between the SR6608 and a LAN It provides eight RJ 45 interfaces each of which supports the Layer 3 routing function and has a dual color status LED The 8FE module has the fo...

Страница 48: ...e 6 15 FE interface 4 16 FE interface 2 17 FE interface 0 18 Ejector lever Figure 2 1 Front panel of 8FE III LEDs Table 2 1 Description of the LEDs on the front panel of 8FE Status Meaning Off No link...

Страница 49: ...For the connection of an 8FE interface cable refer to section 5 10 5 I Connecting an 8FE interface cable in Chapter 5 Installing the Router 2 1 2 4GBE 8GBE I Introduction 4GBE and 8GBE are 10Base T 1...

Страница 50: ...GE interface 7 13 GE interface 7 status LED 14 GE interface 6 15 GE interface 4 16 GE interface 2 17 GE interface 0 18 Ejector lever Figure 2 3 Front panel of 8GBE 1 2 3 4 5 6 7 10 9 8 1 Captive screw...

Страница 51: ...0 m 328 08 ft Supported frame format Ethernet_II Ethernet_SNAP 10 Mbps Full half duplex auto negotiation 100 Mbps Full half duplex auto negotiation Interface speed and duplex mode 1000 Mbps Full duple...

Страница 52: ...s A CL1P CL2P has the following features z CL1P CL2P is connected to the processor through a 10 Gbps high speed bus Each CPOS interface can be channelized into 63 E1s or 84 T1s and it can be channeliz...

Страница 53: ...SFP interface 4 SFP interface 5 Ejector lever Figure 2 5 Front panel of CL1P 8 1 3 2 4 5 7 6 1 Captive screw 2 Carrier signal LED LINK ACT of SFP interface 0 3 Loopback alarm LED LP AL of SFP interfa...

Страница 54: ...Interface specifications of CL1P CL2P Item Specification Connector type SFP LC Number of interfaces 1 CL1P 2 CL2P Interface standards SONET OC 3 SDH STM 1 Interface speed 155 52 Mbps Type Multi mode...

Страница 55: ...er Figure 2 8 Optical fiber with LC connectors Note z For descriptions on fiber connectors refer to section 1 4 2 FIP 100 FIP 200 in Chapter 1 Router Overview z For the connection of a CL1P CL2P inter...

Страница 56: ...ndwidth options z CLS1P CLS2P can receive multiplexed E3 T3 circuits on a pair of fibers through a channelized interface largely saving the link resource the occupied area and the cost of local networ...

Страница 57: ...7 Description of LEDs on the front panel of CLS1P CLS2P LED Status Meaning Off No link is present and no carrier signal is received On A 155 52 Mbps link is present and carrier signals are received at...

Страница 58: ...ission distance 2 km 1 24 miles 15 km 9 32 miles 40 km 24 86 miles 80 km 49 71 miles Fiber type 62 5 125 m multi mode 9 125 m single mode 9 125 m single mode 9 125 m single mode V Interface cable A CL...

Страница 59: ...etwork layer An MSP4P module has the following features z The module can be configured through the command line to work in OC 3 STM 1 POS or OC 12 STM 4 POS mode z The module supports the following ty...

Страница 60: ...L of SFP interface 2 155 Mbps or SFP interface 0 622 Mbps 11 SFP interface 3 155 Mbps or SFP interface 1 622 Mbps 12 Carrier signal LED LINK ACT of SFP interface 3 155 Mbps or SFP interface 1 622 Mbps...

Страница 61: ...dBm 28 0 dBm 34 0 dBm 34 0 dBm Overload optical power 14 0 dBm 7 0 dBm 9 0 dBm 10 0 dBm Central wavelength 1310 nm 1310 nm 1310 nm 1550 nm Max transmission distance 2 km 1 24 miles 15 km 9 32 miles 40...

Страница 62: ...e cable in Chapter 5 Installing the Router 2 1 6 PS1P I Introduction PS1P is a high speed OC 48 STM 16 2 5 Gbps non channelized packet over SONET SDH POS module developed by H3C PS1P supports PPP Fram...

Страница 63: ...ont panel of PS1P LED Status Meaning Off No link is present and no carrier signal is received On A 2488 32 Mbps link is present and carrier signals are received at the SFP interface LINK ACT Green Bli...

Страница 64: ...m Max transmission distance 2 km 1 24 miles 15 km 9 32 miles 40 km 24 86 miles 80 km 49 71 miles Fiber type 9 125 m single mode 9 125 m single mode 9 125 m single mode 9 125 m single mode V Interface...

Страница 65: ...ew 2 SFP interface 1 3 SFP interface 3 4 LED of SFP interface 3 SFP3 5 LED of SFP interface 2 SFP2 6 Ejector lever 7 LED of SFP interface 1 SFP1 8 LED of SFP interface 0 SFP0 9 SFP interface 2 10 SFP...

Страница 66: ...electrical conversion 4GBP supports 10 100 1000 Mbps auto sensing if used together with an optical transceiver z 4GBP is an optional module to be separately ordered if needed V Interface cable z When...

Страница 67: ...e following features z Supports two frame formats of SDH STM 1 and SONET OC 3 z Supports data scrambling in transmitted ATM cells z Adopts two clock modes line clock when the interface on it is used a...

Страница 68: ...nt panel of 1ASM 1 Captive screw 2 Link status LED LINK of ATM interface 3 TX interface 4 RX interface 5 Ejector lever 6 Active LED ACT of ATM interface that indicates if the interface is receiving or...

Страница 69: ...21 dBm 15 dBm 5 dBm Optical transit power Max 14 dBm 8 dBm 0 dBm Min 28 dBm 30 dBm 34 dBm Receiving sensitivity Max 8 dBm 14 dBm 10 dBm Central wavelength 1310 nm Services supported ATM Traffic CBR C...

Страница 70: ...receive or sent data z Cables for these three types of modules are optional accessories you need to purchase the cables if needed z For descriptions of the SC type connectors refer to section 1 4 2 FI...

Страница 71: ...Front panel of a 2SAE module Figure 2 19 illustrates the front panel of a 4SAE module 1 2 3 4 5 6 7 8 9 10 12 13 14 11 1 Captive screw 2 LINK LED of serial interface 0 3 Serial interface 0 4 Serial i...

Страница 72: ...nterface 1 15 Serial interface 1 16 Serial interface 0 17 Handle 18 LINK ACT LED of serial interface 0 Figure 2 20 Front panel of an 8SAE module III LEDs z A LINK LED and an ACT LED are provided for e...

Страница 73: ...232 DTE cable V 24 RS232 DCE cable V 35 DTE cable V 35 DCE cable X 21 DTE cable X 21 DCE cable RS449 DTE cable RS449 DCE cable RS530 DTE cable RS530 DCE cable Services supported DDN leased line V Inte...

Страница 74: ...V 24 RS232 DCE cable DB 25 female connector at the network end A Pos 25 Pos 1 A X2 W X1 B Pos 1 Pos 28 B Figure 2 22 V 24 DCE cable z V 35 DTE cable 34 pin male connector at the network end A Pos 28 P...

Страница 75: ...ure 2 24 V 35 DCE cable z X 21 DTE cable DB 15 male connector at the network end Figure 2 25 X 21 DTE cable z X 21 DCE cable DB 15 female connector at the network end Figure 2 26 X 21 DCE cable z RS44...

Страница 76: ...end A Pos 28 Pos 1 X1 W X2 B B Pos 1 Pos 37 A Figure 2 28 RS449 DCE cable z RS530 DTE cable DB 25 male connector at the network end W X1 X2 B A A Pos 25 Pos 1 Pos 1 Pos 28 B Figure 2 29 RS530 DTE cab...

Страница 77: ...hapter 5 Installing the Router 2 2 3 2GBE I Introduction 2GBE is a 2 port 10 100 1000M Base T electrical interface RJ 45 module where GBE stands for Gigabit Ethernet 2GBE is designed for router LAN co...

Страница 78: ...ndard is typically used on hubs or LAN switches z When 10 100 Mbps and half duplex full duplex are specified for an Ethernet electrical interface the Ethernet electrical interface operates in the forc...

Страница 79: ...5 module allows arbitrary grouping of 31 channels and thereby multiple bundles II Front panel 1 2 3 4 5 7 8 9 10 6 14 13 12 11 19 18 17 16 15 1 Captive screw 2 LINK LED of port 0 3 LINK LED of port 1...

Страница 80: ...f interfaces 1 Interface standard G 703 Interface speed 2 048 Mbps Interface cable type 75 ohm 8E1 splitter cable Cable characteristic impedance 75 ohm Working mode E1 CE1 and FE1 8E1 75 F only Servic...

Страница 81: ...o one and only one serial interface which is automatically created without the need of additional configuration z For the connection of the 8E1 75 8E1 75 F interface cable refer to section 5 10 5 X Co...

Страница 82: ...modules are all optional modules to be separately ordered if needed II Front panel The following figure illustrates the front panel of the POS module 1 Captive screw 2 Link LED 3 POS interface 4 Handl...

Страница 83: ...0 dBm Central wavelength 1310 nm 1310 nm 1310 nm 1550 nm Max transmission distance 2 km 1 24 miles 15 km 9 32 miles 40 km 24 86 miles 80 km 49 71 miles Cable type 62 5 125 m multi mode 9 125 m single...

Страница 84: ...on Manual Table of Contents i Table of Contents Chapter 3 Arranging Slots and Numbering Interfaces 3 1 3 1 Slot Arrangement 3 1 3 2 Numbering Interfaces 3 2 3 3 Examples 3 2 3 3 1 Example 1 3 2 3 3 2...

Страница 85: ...ging Slots and Numbering Interfaces 3 1 Slot Arrangement The device provides many types of interfaces such as console AUX GigabitEthernet serial synchronous POS and E1 ports This chapter describes how...

Страница 86: ...serial interface z X Number of the slot where the FIP 100 FIP 200 resides in the range of 2 to 5 on the SR6608 and 2 to 3 on the SR6604 z Y Sub slot number namely the number of the slot where the HIM...

Страница 87: ...rs of GigabitEthernet interfaces are z GigabitEthernet 3 2 0 z GigabitEthernet 3 2 1 3 3 2 Example 2 An FIP 200 is installed in slot 3 and a 4GBE module is installed in sub slot 2 of the FIP 200 I Num...

Страница 88: ...abitEthernet interfaces on the FIP 200 z GigabitEthernet 2 0 0 z GigabitEthernet 2 0 1 II Numbers of serial interfaces on the 4SAE module 1 If a 4SAE is installed in slot 1 of the FIP 200 the numbers...

Страница 89: ...equirements 4 1 4 1 3 Ventilation Requirements 4 2 4 1 4 Electrostatic Discharge Prevention 4 3 4 1 5 Electromagnetic Interference Prevention 4 4 4 1 6 Lightning Protection 4 5 4 1 7 Cabinet Mounting...

Страница 90: ...ESD which may damage the CMOS circuit on the router A high temperature will speed up the aging of insulation materials which greatly lowers the router s reliability and shortens the service life Table...

Страница 91: ...cted Harmful gases could accelerate the corrosion of metal parts and the aging of some parts Table 4 3 lists the concentration limit of SO2 H2S NH3 and CI2 in the equipment room Table 4 3 Concentratio...

Страница 92: ...static electricity exceeds a certain limit II Measures against ESD To prevent electrostatic discharge ESD Make sure that the router and the floor are well grounded Take dust proof measures for the eq...

Страница 93: ...gure depicts how to use an ESD preventive wrist strap and grounded to the SR6608 2 1 4 3 1 ESD preventive wrist strap 2 Snap fastener 3 ESD socket 4 Connector Figure 4 2 Use an ESD preventive wrist st...

Страница 94: ...e power supply Install a special lightning arrester at the input end of outdoor signal lines for example E1 line to which interface modules of the router are connected to enhance the lightning protect...

Страница 95: ...moving the chassis 4 2 3 Electricity Safety Locate the emergency power switch in the equipment room before installation and maintenance so that you can switch the power off in case of an electrical a...

Страница 96: ...specifications Various meters and devices such as hub configuration terminal optional modules or multimeter Optional cables III Reference When installing or maintaining the device you can refer to th...

Страница 97: ...ved memory module CF card or HIM MIM on an antistatic workbench with the face upward or put it into an antistatic bag Touch only the edges instead of electronic components when observing or moving a r...

Страница 98: ...a closed cabinet make sure that the cabinet is equipped with a good ventilation system The rack is sturdy enough to support the weight of the router and installation accessories The size of the cabin...

Страница 99: ...Lightning Arrester Optional 5 10 5 6 1 Tools 5 11 5 6 2 Installation Procedure 5 11 5 6 3 Precautions 5 12 5 7 Installing a Power Lightning Arrester Lightning Protection Busbar Optional 5 12 5 8 Selec...

Страница 100: ...e Router 5 1 Preparations Before installing the router make sure that z You have read through Chapter 4 Preparing for Installation z Make sure all the requirements mentioned in Chapter 4 Preparing for...

Страница 101: ...n 5 3 2 Installing an N68 Rack The device can be installed in an H3C N68 rack For the installation of an N68 rack refer to N68 Cabinet Installation Guide Skip this procedure if you want to install the...

Страница 102: ...5 Installing the Router 5 3 1 2 1 Left mounting bracket 2 Cable management bracket Figure 5 2 Install the cable management bracket for the SR6608 1 2 Figure 5 3 Install the cable management bracket f...

Страница 103: ...the SR6608 1 2 1 Left mounting bracket 2 Right mounting bracket Figure 5 5 Structure of the mounting brackets of the SR6604 3 Install the mounting brackets to the router Before installing the router...

Страница 104: ...tray on the rack for the router Skip this step if a support tray is already installed 3 Use screws to fix the mounting brackets onto both sides of the front panel of the router Refer to section 5 3 3...

Страница 105: ...4 Routers Installation Manual Chapter 5 Installing the Router 5 6 satisfy the installation requirements maximally M6 and the surface of the screws should be anti rust treated Figure 5 8 Install the SR...

Страница 106: ...SR6604 are very heavy When installing an SR6608 SR6604 in a rack you need to install it on a support tray rather than the slide rails directly 5 4 Installing Generic Modules Generic modules include RP...

Страница 107: ...h a noise filter The neutral ground of the power input end is directly connected to the chassis and is called PGND also known as chassis ground You need to securely connect the PGND cable to the earth...

Страница 108: ...is attached with the OT terminal of the PGND cable into the grounding screw hole with a screwdriver 4 Connect the other end of the PGND cable to the ground Generally the cabinets installed in equipme...

Страница 109: ...the router 5 6 Installing a Port Lightning Arrester Optional Note z Only 10 100 Mbps RJ 45 Ethernet interfaces need to be equipped with port lightning arresters z No port lightning arrester is shippe...

Страница 110: ...ding to its distance to the grounding screw Then fix the grounding cable onto the grounding screw of the router 3 Use the multimeter to check the connection between the grounding cable of the port lig...

Страница 111: ...ou need to check with a multimeter after connection z The installed port lightning arresters are not sufficient When more than one outdoor Ethernet cable is connected to the router you need to install...

Страница 112: ...er the grounding cable is not well connected or the live and zero wires are connected reversely When the red LED is ON use a multimeter to examine the polarity at the multi purpose socket of the power...

Страница 113: ...stalling a signal lightning arrester you need to consider such performance indexes of the lightning arrester as lightning protection bandwidth transmission loss and interface type The device supports...

Страница 114: ...er socket for the AC powered router Provides 100 VAC to 240 VAC DC power input terminals for the DC powered router Provides 60 VDC to 48 VDC PGND terminal Connected to the ground through a PGND cable...

Страница 115: ...power modules to the OFF position 3 Move the bail latch to the left 4 Connect one end of the supplied AC power cord to the power socket on the router and the other end to an AC power outlet 5 Move the...

Страница 116: ...le handle Figure 5 16 DC power module in the chassis III DC power cables 1 2 3 4 5 6 9 8 7 1 Naked crimping terminal OT 6mm 2 M4 tin plating naked ring terminal 12 to 10 AWG 2 Heat shrink tube 3 Label...

Страница 117: ...the power module and fasten the screw 4 Connect the end marked with of the supplied black DC power cable to the positive terminal on the power module and fasten the screw 5 Connect the other end of t...

Страница 118: ...the SR6604 The following figure shows how to connect a console cable for the SR6608 1 Console port 2 RJ 45 connector 3 Serial interface on the configuration terminal 4 DB 9 female connector 5 Console...

Страница 119: ...are and manage the router through a network management server It is not a service interface and therefore it cannot send or receive data You can connect the management Ethernet interface to the config...

Страница 120: ...nfiguration terminal 6 RJ 45 connector of Ethernet cable 7 Serial interface on the configuration terminal 8 DB 9 female connector 9 Ethernet cable 10 Console cable Figure 5 20 Connect the management E...

Страница 121: ...10 100 Mbps II Connecting an optical Ethernet interface An optical Ethernet interface is connected in the same way for both the SR6608 and the SR6604 In the following description the SR6608 is used as...

Страница 122: ...ne end of one fiber cable into the Rx port of the router and the LC connector at the other end into the Tx port of the peer device Plug the LC connector at one end of another fiber cable into the Tx p...

Страница 123: ...e are connected correctly z Keep the end faces of optical fiber cables clean Caution z Never stare into an open optical Ethernet interface because invisible rays may be emitted from the optical Ethern...

Страница 124: ...GBE 8GBE to a sub slot on the FIP 100 FIP 200 z For the installation of a 2GBE interface module refer to section 8 10 Installing and Removing an MIM in Chapter 8 Maintaining Hardware z For the install...

Страница 125: ...uter and the LC connector at the other end to the Rx port of the peer device 5 Check the status of the LINK LED on the module panel after connecting the optical fiber cables z If the LED is on a link...

Страница 126: ...FIP 100 FIP 200 in Chapter 8 Maintaining Hardware Skip this step if an FIP 100 FIP 200 is already installed 2 Install a 1AMM 1ASM 1ASL interface module in a sub slot on the FIP 100 FIP 200 For the ins...

Страница 127: ...hronization fails In this case you need to check the line X Connecting an 8E1 75 8E1 75 F interface module cable Caution z Pay attention to the interface identifications to prevent damage to the inter...

Страница 128: ...75 8E1 75 F interface module cable 1 z If it is necessary to extend the 75 ohm 8E1 splitter cable you can connect the BNC connectors of the 8E1 splitter cable to those of a 75 ohm E1 trunk cable of th...

Страница 129: ...Interface Modules 1 Install an FIP 100 FIP 200 in an LPU slot on the router For the installation procedure refer to section 8 5 2 Installing FIP 100 FIP 200 in Chapter 8 Maintaining Hardware Skip thi...

Страница 130: ...ch time you power on the router during installation you must verify that z There is enough space around the router for heat dissipation and the workbench is stable enough z The power supply matches th...

Страница 131: ...to a Configuration Terminal 6 1 6 1 2 Setting the Parameters for the Console Terminal 6 1 6 2 Router Power on 6 5 6 2 1 Checklist for Router Power on 6 5 6 2 2 Powering On the Router 6 5 6 2 3 Checkl...

Страница 132: ...RPE X1s in Chapter 1 Router Overview z You can perform operations and configurations only on the active RPE X1 z The startup and configuration process is the same for both the SR6608 and the SR6604 Th...

Страница 133: ...connection 2 Select a connection port Select a serial port from the Connect using drop down list in the Connect To dialog box as shown below Be sure to select the serial port to which the console cab...

Страница 134: ...erial port in the COM1 Properties dialog box as shown in Figure 6 3 Table 6 1 Set serial port parameters Item Value Bits per second 9600 bps default Data bits 8 Parity None Stop bits 1 Flow control No...

Страница 135: ...inal window 5 Set HyperTerminal properties In the HyperTerminal window select File Properties from the menu and select the Settings tab to enter the properties setting dialog box as shown in Figure 6...

Страница 136: ...ated so that you can disconnect the power supply in time in case of an emergency 6 2 2 Powering On the Router z Turn on the power source z Turn on the power switch on the router 6 2 3 Checklist Operat...

Страница 137: ...ess on page 6 6 4 After completing the power on self test POST the system prompts you to press Enter When the prompt appears you can proceed to configure the router 6 3 Startup Process After power on...

Страница 138: ...e extended BootWare menu after the system starts decompression you need to restart the router z When booted with both Slot 0 and Slot 1 used the system uses the RPE X1 in Slot 0 to start applications...

Страница 139: ...gure the IP addresses of all the interfaces on the router according to the division of the subnets 5 Configure routes If it is necessary to enable a dynamic routing protocol you need to configure rela...

Страница 140: ...ress Tab all commands starting with dis will be displayed 6 5 2 Command Line Interface The command line interface of the device provides plenty of configuration commands All the commands are grouped i...

Страница 141: ...4 Updating BootWare 7 18 7 4 Updating an Application Using TFTP 7 20 7 4 1 Updating an Application Using TFTP Through the BootWare Menu 7 21 7 4 2 Updating and Backing Up an Application Using TFTP Thr...

Страница 142: ...ed for the basic initialization of the system z The extended section provides abundant human computer interaction HCI functions and is used to initialize interfaces and update the applications and the...

Страница 143: ...an application file without a specific attribute assigned to it cannot z You can modify the attribute of application files using the BootWare menu or the command line interface CLI after the applicat...

Страница 144: ...a type of configuration file without a specific attribute assigned to it The configuration files have a file name extension of cfg By default they are stored in the built in CF card Note that you can...

Страница 145: ...g terminator contains more than 57 characters errors will occur in file operation Typically the file name without drive identifier and string terminator is recommended to contain no more than 16 chara...

Страница 146: ...e Comware application to the latest version and restart the device the system checks whether the current BootWare version is consistent with the one in the host application If not the system automatic...

Страница 147: ...ng flow 7 2 BootWare Menu 7 2 1 Main Menu When the router is powered on it first runs the basic segment and then the extended segment of the BootWare The following information is displayed on the conf...

Страница 148: ...ended boot menu Starting to get the main application file cfa0 main bin The main application file is self decompressing Press Ctrl B to enter the extended BootWare menu Otherwise the system starts to...

Страница 149: ...ssword z You can enter the main menu only after you enter the correct BootWare password Note The current operating device is cfa0 Enter Storage Device Operation to select device EXTEND BOOTWARE MENU 1...

Страница 150: ...you lose the password 7 BootWare Operation Menu BootWare operation sub menu For detailed description on this sub menu refer to section 7 2 5 BootWare Operation Sub menu on page 7 12 8 Clear Super Pas...

Страница 151: ...ion 1 Download Application Program To SDRAM And Run Download an application to SDRAM through the serial interface and run the program 2 Update Main Application File Update the main application file 3...

Страница 152: ...on file 5 Modify Ethernet Parameter Modify Ethernet interface parameters 0 Exit To Main Menu Return to the main menu 7 2 4 File Control Sub menu Select 4 on the main menu to enter the file control sub...

Страница 153: ...ed in the following table Table 7 5 BootWare operation sub menu Menu item Description 1 Backup Full BootWare Back up the entire BootWare 2 Restore Full BootWare Restore the entire BootWare 3 Update Bo...

Страница 154: ...he cooperation of a receiving program and a sending program The receiving program sends a negotiation character to negotiate a packet check method After the negotiation the sending program starts to t...

Страница 155: ...s Please change the terminal s baudrate to 115200 bps press ENTER when ready At this time the baud rate of the serial interface of the router is modified to 115200 bps while that of the terminal is st...

Страница 156: ...connection Then press the Enter key and the system will prompt the current baud rate and return to the previous menu The system displays The current baudrate is 115200 bps Note After you download fil...

Страница 157: ...main bin To improve the updating speed you can modify the serial port baud rate before updating the main application file refer to section 7 3 2 Modifying Serial Interface Parameters on page 7 13 Sel...

Страница 158: ...example Input the File Name main bin Updating File cfa0 main bin Done After that you need to return to the main menu enter the file control sub menu and set the application file as the default boot p...

Страница 159: ...ud rate to improve the updating speed refer to section 7 3 2 Modifying Serial Interface Parameters on page 7 13 and then select 3 on the BootWare operation sub menu The system prompts To update the en...

Страница 160: ...pplication file to be downloaded and select Xmodem from the Protocol drop down list Then click Send and the following dialog box appears Figure 7 8 Sending file dialog box After the file is downloaded...

Страница 161: ...ion when the system reboots z When FIP 100 FIP 200 is started up it automatically checks the currently running BootWare version If the bound version is different from the current version the system up...

Страница 162: ...Figure 7 9 Set up a TFTP updating environment z The router serves as the TFTP client and the PC serves as the TFTP server z Connect the management Ethernet interface MANAGEMENT on the router to the PC...

Страница 163: ...e main bin Server IP Address 192 168 80 200 Local IP Address 192 168 80 10 Gateway IP Address FTP User Name FTP User Password Table 7 7 Description on the display information of setting Ethernet inter...

Страница 164: ...lly return to the Ethernet parameter set sub menu where you can select 2 to update the main application file Loading done 24802996 bytes downloaded Updating File cfa0 main bin Done 4 After the updatin...

Страница 165: ...use the ping command to check whether the connection is successful Caution You can update the applications of the device through the console port or the management Ethernet interface 2 View the files...

Страница 166: ...oad an application file if the file name already exists on the router the system prompts whether to overwrite the file on the router You need to choose Y or N for confirmation z For details about the...

Страница 167: ...u can also update it using FTP to save updating and maintenance time As an application layer protocol in the TCP IP suite File Transfer Protocol FTP is mainly used for file transfer between remote hos...

Страница 168: ...ossover Ethernet cable Ensure the connectivity between the router and the PC In this example the IP address of the management Ethernet interface is 192 168 80 10 and that of the PC is 192 168 80 200 z...

Страница 169: ...page 7 24 3 Enable FTP server on the PC and set the path where the application file is stored the FTP username and the password In the example the FTP username is guest and the password is 123456 4 Lo...

Страница 170: ...e downloaded file exists on the router the system prompts whether to overwrite the file on the router You need to choose Y or N for confirmation z For details about the get command refer to H3C SR66 S...

Страница 171: ...outer Display information Description ftp get main bin main bin Download the file used for updating cfa0 main bin has been existing Overwrite it Y N y The system prompts whether to overwrite the exist...

Страница 172: ...esses of the server and the PC to be on the same network segment Ensure the connectivity between the router and the PC In this example the IP address of the management Ethernet interface on the router...

Страница 173: ...f the FTP server are configured The FTP server supports multi client access A remote FTP client sends a request to the FTP server The FTP server executes an action accordingly and returns the executio...

Страница 174: ...ing The updated application file takes effect when the router reboots Upload file main_bac bin from the PC to the router and saves it as main bin ftp binary 200 Type set to I ftp lcd d update Local di...

Страница 175: ...s User Manual z You can back up a configuration file in the way you back up an application file Table 7 13 Description on the display information of enabling FTP server Display information Description...

Страница 176: ...02996 Nov 11 2007 15 11 42 M cfa0 main bin II Displaying all files through the CLI H3C dir Directory of cfa0 0 drw Nov 28 2000 04 09 30 logfile 1 rw 24802996 Nov 04 2007 17 03 26 sr6608 bin 2 rw 1355...

Страница 177: ...cfa0 main_bak bin 0 Exit Ente r file no Enter the file number select 1 and the system prompts Modify the file attribute 1 Main 2 Main 3 Backup 4 Backup 0 Exit Enter your choice 0 4 You can set the fi...

Страница 178: ...Enter file no Note For details about the boot loader command refer to H3C SR66 Series Routers User Manual 7 6 3 Setting Configuration File Attributes I Setting configuration file attributes through th...

Страница 179: ...ributes of the configuration files if you select 0 to exit the menu the system enters the default mode for the main and backup configuration files namely the files cfa0 main cfg and or cfa0 backup cfg...

Страница 180: ...system at a time z You can use the undo startup saved configuration command to erase the main and backup attributes of the configuration files Namely the system has no longer a main nor a backup conf...

Страница 181: ...file to be deleted Delete the file test txt in the root directory H3C delete test txt Delete cfa0 test txt Y N y Delete file cfa0 test txt Done Now the file test txt is moved to the recycle bin If you...

Страница 182: ...e correct old password the system prompts you to enter a new password twice Please input new password Please input new password again If the system displays the following information the password is s...

Страница 183: ...al default configuration but the original configuration file is still stored on the storage medium To restore the original configuration you can use the display saved configuration command to display...

Страница 184: ...he super password quit the menu and reboot the router you can enter system view directly z This setting super password clearing is valid only for the first reboot of the router The super password will...

Страница 185: ...otWare of the current main processing unit RPE X1 on slot 0 or 1 7 8 2 Restoring the Entire BootWare Select 2 on the BootWare operation sub menu to overwrite the BootWare in the system with the BootWa...

Страница 186: ...l 8 14 8 6 3 Installing a Blank Panel 8 15 8 7 Installing and Removing a Power Module 8 15 8 7 1 Power Module Structure 8 16 8 7 2 Installing a Power Module 8 16 8 7 3 Removing a Power Module 8 17 8 8...

Страница 187: ...of Contents ii 8 12 4 Removing a Memory Module 8 33 8 12 5 Installing a Memory Module 8 34 8 13 Installing and Removing an Air Filter 8 34 8 13 1 Function of an Air Filter 8 35 8 13 2 Installing an A...

Страница 188: ...engineers appointed by H3C z To avoid injuries ensure that all power sources to the router are disconnected before maintaining any hardware modules of the router z Always wear an ESD preventive wrist...

Страница 189: ...lot 0 4 Right mounting bracket 5 Chassis handle 6 Fan tray 7 AC power module PWR 1 8 Blank panel for PoE power supply reserved PoE slot 9 Blank panel for power module PWR 2 10 ESD socket and silkscree...

Страница 190: ...or the RPE X1 slot 1 3 RPE X1 slot 0 4 Right mounting bracket 5 Chassis handle 6 Fan tray 7 AC power module PWR 1 8 Blank panel for PoE power supply reserved PoE slot 9 Blank panel for power module PW...

Страница 191: ...et interface LINK ACT 16 Run LED RUN 17 Active LED of the RPE X1 ACT 18 Alarm LED ALM 19 RESET button RESET 20 EMI gasket 21 Ejector lever 22 Captive screw Figure 8 3 Interior structure of the RPE X1...

Страница 192: ...n on the power switch of the router if the router is powered off 6 After the RPE X1 is powered on the RUN LED green flashes fast 8 Hz It flashes slowly 1 Hz after the RPE X1 application is loaded This...

Страница 193: ...t is unnecessary to run the undo remove slot slotnumber command after you remove an RPE X1 and insert it again To remove an RPE X1 reverse the installation procedure 1 Face the front panel of the rout...

Страница 194: ...t install a blank panel to prevent dust from entering the chassis For how to install a blank panel refer to section 8 6 Installing and Removing a Blank Panel on page 8 12 8 5 Installing and Removing a...

Страница 195: ...face 0 15 10 100 1000 Mbps Ethernet electrical interface 1 16 1000 Mbps Ethernet optical interface 1 Figure 8 8 Interior structure of the FIP 100 1 2 3 4 6 7 9 10 11 8 12 13 15 14 5 1 Positioning hole...

Страница 196: ...8 6 Installing and Removing a Blank Panel on page 8 12 3 Gently push the LPU into the slot along the slide rails until the positioning pin is seated in the positioning hole on the backplane and then p...

Страница 197: ...ed in slots 2 and 3 of the SR6604 If only FIP 100 LPUs or only FIP 200 LPUs are installed their RUN LEDs will light up in the sequence of slot 2 and slot 3 z If both FIP 100 and FIP 200 LPUs are insta...

Страница 198: ...oved The figures below illustrate how to remove the LPU in slot 3 3 Loosen the captive screws on the FIP 100 FIP 200 by turning them counterclockwise with a Philips screwdriver Figure 8 12 Loosen the...

Страница 199: ...ing and Removing a Blank Panel on page 8 12 8 6 Installing and Removing a Blank Panel 8 6 1 Blank Panel Structure Installed in empty slots on the device blank panels can prevent dust from entering the...

Страница 200: ...Chapter 8 Maintaining Hardware 8 13 1 Front view 2 Side view 3 Oblique rear view 4 EMI gasket Figure 8 15 Blank panel for an LPU slot 1 2 3 4 1 Front view 2 Side view 3 Oblique rear view 4 EMI gasket...

Страница 201: ...anel of the router 2 Locate the blank panel to be removed z For an RPE X1 LPU power or HIM blank panel loosen the two captive screws by turning them counterclockwise with a Philips screwdriver Then re...

Страница 202: ...will install a blank panel z For an RPE X1 LPU or power blank panel Insert the blank panel into the slot and then fasten the captive screws by turning them clockwise with a Philips screwdriver z For a...

Страница 203: ...ptive screw 2 Power input terminals 3 Power switch 4 Power LED 5 Handle Figure 8 21 DC power module 8 7 2 Installing a Power Module The following describe how to install an AC power module You can ins...

Страница 204: ...e device supports online insertion and removal OIR of a power module z The device does not support intermixing of AC and DC power modules When two power modules are installed in the device both can wo...

Страница 205: ...ong the slide rails Figure 8 25 Pull out the power module Note z To protect the removed power module place it in an antistatic bag z If you do not install a new power module in the slot install a blan...

Страница 206: ...5 CAUTION sign 6 Captive screw Figure 8 26 Fan tray on the SR6608 1 2 4 3 5 6 1 Run LED RUN 2 Alarm LED ALM 3 Fan 4 Handle 5 CAUTION sign 6 Captive screw Figure 8 27 Fan tray on the SR6604 8 8 2 Inst...

Страница 207: ...along the slide rails Figure 8 28 Push the fan tray into the slot 4 Fasten the captive screws by turning them clockwise with a Philips screwdriver Figure 8 29 Fasten the captive screws 5 Turn on the p...

Страница 208: ...1 15 in Chapter 1 Router Overview 8 8 3 Removing a Fan Tray Caution Keep your hands away from the spinning fan blades when removing the fan tray To remove a fan tray reverse the installation procedure...

Страница 209: ...ic bag 8 9 Installing and Removing an HIM 8 9 1 Installing an HIM Follow these steps to install an HIM 1 Face the front panel of the router 2 Locate the slot where you will install the HIM 3 Remove th...

Страница 210: ...zed the following information will be displayed on the configuration terminal screen Apr 26 15 35 28 493 2000 H3C DEV 1 SUB CARD INSERTED Trap 1 3 6 1 4 1 2011 2 23 1 12 1 13 hwSubcardInsert frameInde...

Страница 211: ...HIM use uniform force and keep the HIM in the horizontal position to avoid damage to components on the card 8 9 2 Removing an HIM Caution z Be sure to run the remove slot slotnumber subslot subslot n...

Страница 212: ...igure 8 35 Take out the HIM Note z Before pulling an HIM out of a slot loosen all the four captive screws Otherwise the panel of the HIM may be seriously deformed z To protect the removed HIM place it...

Страница 213: ...IM For how to remove the blank panels refer to section 8 6 Installing and Removing a Blank Panel on page 8 12 4 Gently push the MIM into the MIM slot along the slide rails Figure 8 36 Push the MIM int...

Страница 214: ...ot recognize the MIM or the MIM installation failed the following information appears on the terminal screen H3C Apr 26 15 36 09 404 2000 H3C DRVICOUT 1 DrvIcOutStr Slot 2 Src Slot 2 Slot 2 4 Plug In...

Страница 215: ...nel of the router 2 Locate the MIM to be removed 3 Remove the fastening screws on the MIM by turning them counterclockwise with a flat blade screwdriver Figure 8 38 Loosen the fastening screws 4 Holdi...

Страница 216: ...how to install blank panels refer to section 8 6 Installing and Removing a Blank Panel on page 8 12 8 11 Inserting and Removing a CF Card 8 11 1 CF Card and Slot 1 Eject button 2 CF card slot 3 CF LED...

Страница 217: ...3 Removing a CF Card Follow these steps to remove a CF card 1 Check whether the CF card LED is blinking If yes the system is accessing the CF card Proceed to the next step after the LED stops blinkin...

Страница 218: ...8 5 3 Removing an FIP 100 FIP 200 on page 8 10 8 12 1 When to Replace a Memory Module Memory modules are removable components on the main board Generally you need to replace a memory module in the fo...

Страница 219: ...stall a new memory module End Locate the memory module Remove the RPU Remove the FIP 100 FIP 200 Install the RPU or FIP 100 FIP 200 FIP 100 FIP 200 RPU Figure 8 44 Memory module replacement flowchart...

Страница 220: ...release latches away from the memory module at both ends so that the memory module is lifted from the memory module slot 3 Remove the memory module by holding its non conductive edge Figure 8 47 Remov...

Страница 221: ...nto the slot 4 Carefully and firmly press the memory module at both ends until you hear a click This indicates the memory module is seated in the connector 5 Check that the release latches have firmly...

Страница 222: ...of the left side of the chassis as shown in Figure 8 49 Align the screw holes on the slide rail with those on the chassis 3 Fasten the fastening screws one by one by turning them clockwise with a Phil...

Страница 223: ...rning them clockwise with a Philips screwdriver Figure 8 51 Fasten the captive screws 8 13 3 Removing an Air Filter To remove an air filter reverse the installation procedure 1 Face the left side of t...

Страница 224: ...captive screws 3 Gently pull out the air filter along the slide rails Figure 8 53 Pull out the air filter Caution z Keep the removed air filter and fastening screws in a safe place for future use z Y...

Страница 225: ...leshooting HIM MIM Installation 9 5 9 6 Troubleshooting the Configuration System 9 6 9 6 1 No Display on the Terminal Screen 9 6 9 6 2 Illegible Characters on the Terminal Screen 9 6 9 6 3 Serial Port...

Страница 226: ...le 1 2 in Chapter 1 Router Overview II Solution Check that z The RPE X1 is properly seated in slot 0 or slot 1 z The power supply of the router is operating properly The power LED is green when the po...

Страница 227: ...the serial terminal and the software management tool If cause cannot be located and the problem persists record the above information and contact your local sales agent Table 9 1 RPE X1 LED states LED...

Страница 228: ...cannot be located in the steps above and the problem persists contact your local sales agent 9 2 2 Symptom 2 I Symptom Twenty minutes after the router is powered on or the FIP 100 FIP 200 is inserted...

Страница 229: ...is red II Solution Check that z The power module is firmly in place z The power source meets the requirement of the router If the cause cannot be located in the steps above and the problem persists co...

Страница 230: ...e cause cannot be located in the steps above and the problem persists contact your local sales agent 9 5 Troubleshooting HIM MIM Installation I Symptom When an HIM MIM is inserted while the router is...

Страница 231: ...gram z Terminal settings are incorrect The required settings are as follows 9600 bits per second 8 data bits no parity 1 stop bit no flow control and VT100 for terminal emulation type z The configurat...

Страница 232: ...e sure that the work mode of the AUX port is flow 2 Power off the router connect the RJ 45 connector of the console cable to the AUX port and then connect the DB 9 female connector to the serial port...

Страница 233: ...below 75 C 167 F the following information appears on the configuration terminal screen May 14 22 25 17 804 2000 H3C DRVMSG 3 TempHOK Environment temperature recovered from OT in Slot 0 index is 2 Ma...

Страница 234: ...and Connections I Symptom After the HIM MIM is installed and the router is powered on the LED on the HIM MIM panel indicates abnormal operation For description of the HIM MIM LED refer to Chapter 2 In...

Страница 235: ...is not found The following information appears File will be transferred in binary mode Downloading file from remote TFTP server please wait File not found z Symptom 3 The configuration of the network...

Страница 236: ...nformation appears FTP Unrecognized host or wrong IP address II Solution z For symptom 1 Delete some files in the CF card or use a new CF card so that enough space is available for the application pro...

Страница 237: ...cation file does not exist cfa0 backup bin Starting to get the secure application file cfa0 secure bin The secure application file does not exist cfa0 secure bin Booting App fails The names of the mai...

Отзывы: