background image


1. 

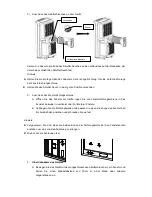
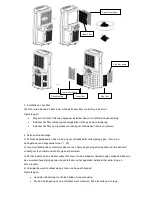
Beschrijving van de onderdelen 


1. 

Voorste paneel 

2. 

Afstandsbediening ontvanger 

3. 

Controle paneel 

4. 

Bovenste paneel 

5. 

Horizontale ventilatiekoepel 

6. 

Rechter decoratieve bord 

7. 

Bovenste filter van het achterpaneel 

8. 

Afstandsbediening compartiment 

9. 

Linker decoratieve bord 

10. 

Stroom kabel   

11. 

Opwindpilaar 

12. 

Onderste filter van het achterpaneel   

13. 

Putdeksel 

14. 

Universal wiel 

15. 

Filter samenstel van zijpaneel 

16. 

Beschermend rooster 

17. 

Sluiting 

18. 

Handvat 

19. 

Ronde connector van uitlaatslang 

20. 

Uitlaatslang 

21. 

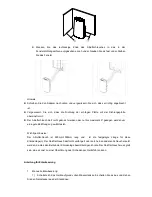
Adapter van uitlaatslang 

22. 

Raam afdichting


Paneel van de adapter 

Содержание KOL6012

Страница 1: ...utilisation Bedienungsanleitung Handboek Manual de Utilizaci n Manuale d uso KOL6012 Portable Air Conditioner Climatiseur Portable Mobile Kilmaanlage Draagbare Air Conditioner Aire acondicionado port...

Страница 2: ...n with reduced physical sensory or mental capabilities or lack of experience and knowledge unless they have been given supervision or instruction concerning use of the appliance by a person responsibl...

Страница 3: ...ut off the power before disassembling or installing the filter Remark Do not use this unit in cooling mode if the ambient temperature is higher than 35 Features and Identification of Parts 1 Features...

Страница 4: ...eft decoration board 10 Power cord 11 Winding pillar 12 Lower filter assembly of back panel 13 Drain cover 14 Universal wheel 15 Filter assembly of side panel 16 Protective grid 17 Fastener 18 Handle...

Страница 5: ...ll show ambient temperature fan starts running and air outlet window will open automatically B When unit is off all parts stop working air outlet window will close automatically 3 Touch this key to sw...

Страница 6: ...re for hours 00 24 and last two digits are for minutes 00 60 You can increase or decrease half an hour each time by touching or to finish hour and minute setting B You can set unit AUTO OFF time when...

Страница 7: ...this button to turn on or turn off auto swing function 7 Sleep Press this button to select or cancel sleep mode only effective under cooling operation or energy conversation modes 8 Timer press this...

Страница 8: ...2 Press the lower part of built in compartment gently to open it and take out remote controller Note In order to avoid losing the remote control please put the remote control inside of the storage pla...

Страница 9: ...or onto it with anticlockwise direction at least 3 laps C Extend another end of exhaust hose screw the adapter onto it with anticlockwise direction at least 3 laps Note Screw round connector and adapt...

Страница 10: ...embly installed in front of window and keep the unit at least 50cm away from the walls or other objects B Install the rectangle end of exhaust hose assembly into the corresponding rectangle hole in wi...

Страница 11: ...ry Tilt the unit slightly backwards when draining Block the drain hole as soon as possible before the tray is full if it cannot hold all water in the unit to prevent the water leakage and wet the floo...

Страница 12: ...ction to compressor Except that the compressor may start immediately when the unit is energized first time there is 3 minute delay re start protection after compressor is shut down Maintenance and Ser...

Страница 13: ...End of Season Storage 1 Screw off the drain cover and pull out the stopper to drain condensate water completely Note the tilt angle of the unit must be 30 2 Keep unit running in fan mode for half day...

Страница 14: ...the set temperature in cooling mode or higher temperature in heating mode Change the set temperature Bad cooling effects There is direct sunlight Close the window curtain The doors and windows are op...

Страница 15: ...igerant Charge g R410A 560 Rated Input Cooling W 1 350 Rated Current Cooling A 6 20 Moisture Removal L h 1 4 Air Circulation m h 430 Noise High dB A 55 Middle dB A 53 Low dB A 50 Body Size W H D mm 47...

Страница 16: ...about the places where you can return this product In fact electrical and electronic products contain hazardous substances that have harmful effects on the environment or human health and should be re...

Страница 17: ...u des instructions concernant l utilisation de l appareil par une personne responsable de leur s curit Les enfants doivent tre surveill s pour s assurer qu ils ne jouent pas avec l appareil AVERTISSEM...

Страница 18: ...Les produits abrasifs pourraient rayer l appareil D brancher l appareil avant de manipuler le filtre Note ne pas utiliser de la fonction d air conditionn par temp ratures sup rieures 35 Caract ristiqu...

Страница 19: ...up rieur 8 Rangement de la t l commande 9 Panneau d coratif gauche 10 C ble d alimentation 11 Rembobinage 12 Filtre inf rieur 13 Cache de l vacuation 14 Roue universelle 15 Acc s lat ral au filtre 16...

Страница 20: ...nouveau l appareil s teint A Quand l appareil est allum l cran LCD affiche la temp rature ambiante le ventilateur se d clenche et la sortie d air s ouvre automatiquement B Quand l appareil est teint l...

Страница 21: ...rloge de 24h les deux premiers chiffres repr sentent les heures 00 24 et les 2 autres affichent les minutes 00 60 Vous pouvez r gler l horloge par tranche de 30 minutes en maintenant les boutons ou bi...

Страница 22: ...teindre l appareil 2 Mode Pressez pour s lectionner le mode 3 Pressez le bouton pour augmenter le temp rature et l horloge 4 Pressez le bouton pour diminuer le temp rature et l horloge 5 Ventilateur...

Страница 23: ...mpatibles Remplacez toujours les deux piles ne pas laisser une pile us e avec la nouvelle Si vous entendez ne pas utiliser l air conditionn pendant une longue p riode de temps enlevez les piles de la...

Страница 24: ...tuyau d vacuation A Sortez le tuyau d vacuation et son connecteur du sac plastique B tendez le tuyau d vacuation et vissez l extr mit dans le sens inverse des aiguilles d une montre au moins trois tou...

Страница 25: ...ion du support de fen tre A Entrouvrez la fen tre placez le support de fen tre la verticale ou l horizontale B Ajustez le support en place et vissez le en place Note Faites en sorte que le support soi...

Страница 26: ...e le remplacez pas par un autre tuyau d vacuation il pourrait ne pas tre adapt et affecter l efficacit de l appareil L vacuation doit tre facile et naturelle sans encombre Instructions pour l vacuatio...

Страница 27: ...fonctionne pendant plus de 10 minutes si le tuyau est moins de 2 36 pendant 20 secondes le mode anti gel se d clenche E4 s affiche l cran LCD et le compresseur s arr te Si le tuyau est 8 46 le mode a...

Страница 28: ...e du filtre Nettoyer le filtre toutes les deux semaines pour viter de l encombrer de poussi re Comment nettoyer le filtre A Retirez le filtre en tirant sur la poign e B Nettoyer le filtre avec un peu...

Страница 29: ...pareil dans un endroit sec Tous les accessoires doivent tre rang s dans un endroit sec et propre D pannage Essayez une des solutions ci dessous en cas de probl me si cela ne suffit pas portez l appare...

Страница 30: ...V rifiez les senseurs E4 s affiche Protection anti gel L appareil reprendra normalement une fois le mode anti gel sera fini s affiche Le r servoir est plein Videz le r servoir et red marrez l appareil...

Страница 31: ...r aupr s de votre mairie afin d en conna tre les emplacements En effet les produits lectriques et lectroniques peuvent contenir des substances dangereuses qui ont des effets n fastes sur l environneme...

Страница 32: ...hnlich qualifizierten Person ersetzt werden um eventuelle Gefahren zu vermeiden 4 Dieses Ger t ist nicht f r Personen einschlie lich Kindern mit eingeschr nkten physischen sensorischen oder geistigen...

Страница 33: ...als 5 Neigung und aufrecht auf Halten Sie den Abflussschlauch immer in gutem Zustand ohne ihn zu verbiegen und schlie en ihn dann an das Ger t an Das Ger t arbeitet in bestimmten Raumverh ltnissen ef...

Страница 34: ...es einfache Montage und schnelle L ftung Ein intelligentes umweltfreundliches und energiesparendes K hlsystem mit Selbstverdampfung 24 Stunden Timer Funktion Signalton zur Erinnerung f r das Ein und A...

Страница 35: ...des LED Display leuchten f r 2 Sekunden auf und ein Ton ert nt Danach zeigt das LED Display die Umgebungstemperatur im Bereich von 5 35 C 41 95 F an Das Ger t ist bereit f r den Betrieb 2 Dr cken Sie...

Страница 36: ...llen A Unter K HL und L FTUNGS Modus kann die L ftergeschwindigkeit in nachstehender Reihenfolge eingestellt werden B Unter TROCKEN Modus l uft der L fter auf niedriger Geschwindigkeit die Temperatur...

Страница 37: ...SCHLAF Funktion durch gleichzeitiges Dr cken von im K HL oder HEIZ Modus scheint auf der LED Anzeige auf durch erneutes Dr cken von stoppt die Schlaf Funktion erlischt auf der Anzeige Die Schlaf Funkt...

Страница 38: ...um die Zeit automatisch ein AUTO ON oder automatisch auszuschalten AUTO OFF Die Zeit kann zwischen 0 5 bis 24 Stunden gew hlt werden Sie springt in 0 5 Stunden Intervallen bis zu 5 Stunden ab 5 Stunde...

Страница 39: ...n unteren Teil des integrierte Einbaufachs sanft um es zu ffnen und nehmen Sie die Fernbedienung heraus Anmerkung Damit die Fernbedienung nicht verloren geht geben Sie sie immer in das Fach wenn Sie s...

Страница 40: ...lauches und seine Adapter A Nehmen Sie den Abluftschlauch und seine Aufs tze und Adapter heraus und entfernen Sie das Plastik B Ziehen Sie an einem Ende des Abluftschlauches schrauben Sie das Ende mit...

Страница 41: ...legen Sie die Fensterdichtungsschiene in das Fenster entweder in vertikaler oder horizontaler Position B Verl ngern Sie die Dichtungsplatten und passen Sie sie an die L nge des Fensters an bis beide E...

Страница 42: ...nur bis maximal 45 gebogen werden um eine gute Bel ftung zu gew hrleisten Wichtige Hinweise Der Abluftschlauch ist 280mm 1500mm lang und ist die festgelegte L nge f r diese Klimaanlage n Der Abluftsc...

Страница 43: ...Konsenswasser ausl uft wenn das Ger t erneut in Betrieb genommen wird 2 Dauerdrainage 1 Drehen Sie den Verschluss auf ziehen Sie den St psel aus dem Wasserablauf 2 Stecken Sie einen Schlauch von 12mm...

Страница 44: ...tion beim Wiederanlauf Nach dem Ausschalten besteht eine 3 min tige Verz gerung bis sich der Kompressor wieder erneut einschaltet au er das Ger t wurde das erste Mal in Betrieb genommen dann startet e...

Страница 45: ...ht mit scharfen Gegenst nden oder B rsten 3 Einsetzen der Filter Richten Sie das Ende des Filters in Richtung des Schlitzes und dr cken Sie den Filter vorsichtig in den Schlitz Anmerkungen Vergewisser...

Страница 46: ...cken Sie die Klimaanlage in einem weichen Plastik und lagern Sie sie an einem trockenen Ort und sch tzen Sie sie vor Staub und halten Sie sie vor Kinder fern 6 Nehmen Sie die Batterien aus der Fernbed...

Страница 47: ...ebene und feste Oberfl che sollte den L rm reduzieren Der Kompressor funktioniert nicht Start des berhitzungsschutzes Warten Sie bis die Temperatur sinkt das Ger t schaltet sich automatisch wieder ein...

Страница 48: ...tu h 12 000 W 3 520 K hlmittel Menge g R410A 560 Leistungsaufnahme K hlung W 1 350 Nennstrom K hlung A 6 20 Feuchtigkeitsaustritt L h 1 4 Luftzirkulation m h 430 L rm Hoch dB A 55 Mittel dB A 53 Niedr...

Страница 49: ...k nnen zu informieren In der Tat enthalten elektrische und elektronische Produkte gef hrliche Stoffe die sch dliche Auswirkungen auf die Umwelt oder die menschliche Gesundheit haben und sollte recycel...

Страница 50: ...of geestelijke vermogens of gebrek aan ervaring en kennis tenzij ze onder toezicht staan of worden ge nstrueerd over het gebruik van het apparaat werd gegeven door een persoon die verantwoordelijk is...

Страница 51: ...ohol Glazer om het apparaat oppervlak schoon te maken niet krabben of het toestel beschadigen Zorg ervoor dat de stroom af te snijden Voor de demontage en montage van de filter Let op Gebruik dit appa...

Страница 52: ...ter van het achterpaneel 8 Afstandsbediening compartiment 9 Linker decoratieve bord 10 Stroom kabel 11 Opwindpilaar 12 Onderste filter van het achterpaneel 13 Putdeksel 14 Universal wiel 15 Filter sam...

Страница 53: ...edrijf met ingestelde temperatuur 22 72 ventilator draait in de gemiddelde snelheid Druk op deze toets zal apparaat uit en herinneren muziek zal klinken A Wanneer unit is ingeschakeld zal LCD display...

Страница 54: ...de ventilatorsnelheid hetzelfde te houden wanneer het apparaat veranderd in KOELING modus Als ventilator draait op hoge snelheid onder KOELING modus zou het zelfde te houden wanneer het apparaat vera...

Страница 55: ...elen wordt weer ingeschakeld nadat een willekeurig knop wordt ingedrukt B Auto schoonmaak Apparaat zal starten en blijft drie minuten alvorens uit te schakelen in de KOELING en ONTVOCHTIGINGS modus C...

Страница 56: ...kingen Gebruik alleen alkaline batterijen Geen oplaadbare batterijen gebruiken Als de batterijen te vervangen altijd beide batterijen vervangen door nieuwe batterijen geen oude en nieuwe batterijen Al...

Страница 57: ...assembly and its adapter A Neem de afvoerslang en de connector en de adapter om de plastic zak te verwijderen B Breid het ene uiteinde van de uitlaat slang schroef het uiteinde zonder slot van de conn...
Страница 58: ...fdichting plaatdelen en aan te passen aan de lengte van het venster houden beide uiteinden om het venster rand te ontmoeten zet deze vast met schroeven dan Notitie Houd beide uiteinden van raam afdich...

Страница 59: ...e bak onder de waterafvoer aan de achterzijde van het apparaat 3 Schroef de putdeksel de stekker uit het water stop voor de waterstroom in de lade 4 Sluit stopper en schroef de putdeksel stevig op wat...

Страница 60: ...chermen en te herstellen in de oorspronkelijke staat Compressor zal opnieuw begint te werken met 3 minuten vertraging voor de bescherming 2 Water volledige veiligheid alarm en sloot off beveiligingsfu...

Страница 61: ...andere soortgelijke oplosmiddelen is verboden unit reinigen 2 Filter schoonmaken Reinig het filter eens per twee weken of het zou de functie eenheid te be nvloeden als filter verstopt met stof 1 Hoe...

Страница 62: ...n het apparaat moet 30 2 Houd unit draaiende ventilator modus voor een halve dag te drogen binnenkant van de eenheid volledig om te voorkomen dat uit te gaan schimmelen 3 Zet het toestel trek de stekk...

Страница 63: ...Foute koeleffecten Direct zonlicht Doe het raamgordijn dicht De deuren en ramen zijn open de kamer is te vol of er zijn andere hitte bronnen Sluit ramen en deuren verwijder andere hittebronnen en pla...

Страница 64: ...ge g R410A 560 Nominaal ingansvermogen Koeling W 1 350 Nominale stroom Koeling A 6 20 Vochtverwijderaar L h 1 4 Lucht circulatie m h 430 Geluid Hoog dB A 55 Middel dB A 53 Laag dB A 50 Afmetingen W H...

Страница 65: ...e plaats aanvragen Elektrisch en elektronische producten kunnen gevaarlijke stoffen inhouden die schadelijk zijn voor mensen en het milieu en moet recycled worden Het symbool aan de kant geeft aan dat...

Страница 66: ...Esta unida no est destinada para personas incluidos ni os con capacidades f sicas sensoriales o mentales reducidas o con falta de experiencia y conocimiento sobre el uso de esta misma a menos que haya...

Страница 67: ...n el almacenamiento para prolongar la vida til de la unidad al final de la temporada No utilice solventes qu micos por ejemplo benceno alcohol para limpiar la superficie de la unidad y as no da e ni r...

Страница 68: ...ersiana horizontal 6 Tablero de decoraci n derecho 7 Conjunto de filtro superior del panel posterior 8 Compartimiento del control remoto 9 Tablero de decoraci n izquierdo 10 Cable de conexi n 11 Sopor...

Страница 69: ...ad se activar en modo de refrigeraci n de forma autom tica con la temperatura de ajuste 22 72 el ventilador funcionar en velocidad media Toque esta tecla de nuevo y la unidad se apagar y la m sica de...

Страница 70: ...ambiar si la unidad opera entre los modos de ventilador y fresco eso significa que si el ventilador funciona a baja velocidad en el modo FAN ventilador la velocidad del ventilador mantendr misma cuand...

Страница 71: ...ineficaz cuando la unidad se encuentre en modo VENTILADOR o DESHUMIDIFICACION 7 Activar o desactivar el modo Auto oscilaci n presionando Las rejas horizontales giraran autom ticamente cuando la unidad...

Страница 72: ...energ a 8 Temporizador presione este bot n para ajustar el modo AUTO encendido AUTO apagado El tiempo se puede ajustar entre 0 5 24 horas Salta por intervalo de 0 5 horas a 5 horas y el intervalo de...

Страница 73: ...one la parte inferior del compartimento integrado con suavidad para abrirlo y sacar el mando a distancia Nota Con el fin de evitar la p rdida del mando a distancia por favor ponga el mando a distancia...

Страница 74: ...ra de escape y su adaptador A Retire el tubo de salida su conector y adaptador para quitar la bolsa de pl stico B Extender un extremo del tubo de escape atornillar el final sin dejar espacio del conec...

Страница 75: ...ta ponga el sello de la placa en la ventana ya sea en posici n vertical u horizontal C Extienda las partes de la placa de sello y ajuste a la longitud de la ventana mantenga ambos extremos para cubrir...

Страница 76: ...00 mm de largo y esta longitud se determina en base a la especificaci n del acondicionador de aire s No utilice la manguera prolongada y no la sustituya por otras mangueras diferentes ya que esto pued...

Страница 77: ...re libre Notas La manguera de drenaje debe ser instalada cuando no haya agua en la bandeja Se sugiere que no utilice el drenaje continuo cuando la unidad est en modo fr o para poder reciclar suficient...

Страница 78: ...unidad y desconecte el enchufe antes de mantener o enviar a un centro de servicio 1 Limpieza de la superficie 1 Limpiar la superficie de la unidad con un pa o suave y h medo y no use disolventes qu m...

Страница 79: ...ota el ngulo de inclinaci n de la unidad debe ser 30 2 Mantenga la unidad funcionando en el modo de ventilaci n por medio d a para secar el interior de la unidad completamente para evitar que aparezca...

Страница 80: ...enderlo Se visualiza el icono de exceso de agua Escurrir el agua almacenada en la unidad Temperatura ambiente demasiado baja o poco alta Se recomienda utilizar esta unidad entre 7 40 La temperatura am...

Страница 81: ...tura del tubo y circuitos relacionados visualizaciones de c digos E4 Se activa el protector de Anti congelaci n Restaurar las funciones autom ticamente una vez que la protecci n anticongelante ha term...

Страница 82: ...or las comunidades debe de informarse en su ayuntamiento acerca de los lugares en los que puede depositar este producto De hecho los productos el ctricos y electr nicos pueden contener substancias pel...

Страница 83: ...na qualificata in modo da evitare ogni pericolo 4 Questo apparecchio non destinato a persone compresi i bambini con ridotte capacit fisiche sensoriali o mentali o mancanza di esperienza e conoscenza a...

Страница 84: ...rficie dell unit non graffiare o danneggiare l unit Assicurarsi di togliere l alimentazione prima di smontare o installare il filtro Nota Non utilizzare l apparecchio in modalit di raffreddamento se l...

Страница 85: ...e 8 Vano Telecomando 9 Bordo di decorazione sinistro 10 Cavo di alimentazione 11 Avvolgi cavo 12 Gruppo filtro inferiore del pannello poposteriore 13 Copertura scarico 14 Rotella universale 15 Assembl...

Страница 86: ...arecchio il segnale musicale si attiva e l unit funziona in modalit raffreddamento con temperatura impostata automaticamente a 22 C 72 F con la ventola che gira a velocit media Premendo nuovamente que...

Страница 87: ...er alla stessa velocit D La ventola funzioner a bassa velocit in modalit di deumidificazione e Sleep e la velocit della ventola non pu essere regolata 6 Premere questo tasto per impostare l unit di ac...

Страница 88: ...la luce di sfondo dello schermo LCD si illuminer per 10 secondi e poi automaticamente si spegne se si tocca un tasto quando l unit collegata o la luce di sfondo spenta B Auto pulizia l apparecchio co...

Страница 89: ...lecomando possibile rimuovere il coperchio 2 Inserire due nuove batterie alcaline AAA nel vano batterie accertandosi della corretta polarit Rimontare il coperchio della batteria facendo attenzione che...

Страница 90: ...re questo condizionatore d aria in bagno o in altri ambienti umidi 1 Installazione di assemblaggio del tubo di scarico e il suo adattatore A Estrarre il tubo di scarico e il suo connettore e adattator...

Страница 91: ...a sigillata nella finestra o in posizione verticale o orizzontale B Estendere le parti della piastra sigillata e regolarla alla lunghezza della finestra far in modo che entrambe le estremit tocchino i...

Страница 92: ...di scarico lungo 280 millimetri 1500 millimetri e questa lunghezza determinata in base alle specifiche del condizionatore d aria s Non usare tubi prolunga e non sostituire questo tubo con altri diver...

Страница 93: ...tubo di scarico in bagno o all aperto Note Il tubo di scarico deve essere installato quando non c acqua nel vassoio Si suggerisce di non utilizzare il drenaggio continuo quando l unit in modalit di r...

Страница 94: ...essore prima che si riaccenda quando viene spento Manutenzione e assistenza Nota Assicurarsi di spegnere l apparecchio e staccare la spina prima di eseguire manutenzione o inviare l apparecchio a un c...

Страница 95: ...gruppo deve essere 30 2 Tenere l unit in funzione in modalit ventilatore per mezza giornata in modo che tutto si asciughi completamente all interno dell unit evitando la creazione di muffa 3 Spegnere...

Страница 96: ...assa o troppo alta Si consiglia di utilizzare quest apparecchio in ambienti tra i 7 40 C La temperatura ambiente inferiore alla temperatura impostata in modalit di raffreddamento o la temperatura supe...

Страница 97: ...gelo L apparecchio si ripristina automaticamente quando la protezione antigelo finita Sul display appare l icona Il serbatoio dell acqua nello chassis pieno Scaricare la condensa e ri avviare l unit A...

Страница 98: ...per conoscere il giusto smistamento del rifiuto Infatti i prodotti elettrici ed elettronici possono contenere sostanze pericolose che hanno effetti dannosi sull ambiente o sulla nostra salute e quind...

Отзывы: