background image

en 

17 

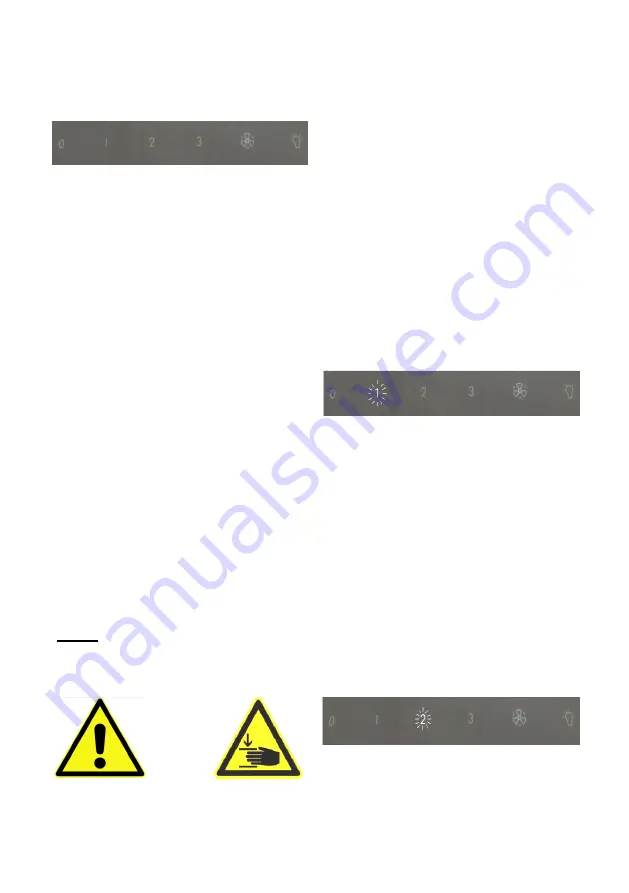
Control Panel


There  are  6  symbols  on  the  Control 
Panel 

Aspiration Power


The  first  5  keys  regulate  the  aspiration 

power:


Symbol “0” = Stand by, “0” flashes


Symbol “0” = Off, “0” doesn’t flash


Symbol “1” = Low power


Symbol “2” = Medium power


Symbol “3” = High power


Symbol

“=  Intense  mode  lasts  for  5 

minutes,  after  which  it  is  automatically 

turned  off  and  the  previously  selected 

mode continues.


ON / OFF


To  activate  the  hood,  press  “0”  for  3 

seconds:  the  symbol  flashes  and  the 

hood  is  in 

Stand  by

 mode.  By  pressing 

“0”  once  more,  the  symbol  stops  flash-

ing  and  the  hood  is  turned  off.  To  acti-

vate the hood, press the key relating to 

the  desired  power  level.  To  turn  it  off, 

press  the  illuminated  key  once  more. 

The  intense  mode  if  automatically 

turned off after 3 minutes, and the high 

mode continues (level 3).


Pressing the power level keys, the envi-

ronment lighting function is activated. 


Note: 

By  turning  of  the  hood,  the  flap 

fan (4) is automatically turned off. Cau-

tion:  never  expose  body  parts  near  the 

hood during operation. 

Lighting


Pressing  the  key  with  the  lighting  sym-
bol,  the  lighting  function  is  activated.  If 
you  press  it  one  more  time,  the  lights 
are turned off.


By  activating  the  fan  function,  the envi-
ronment  lighting  function  is  activated 
automatically


Hood  lights  cannot  be  regulated  with  a 
dimmer!


Filter cleaning signal


When  the  filter  cleaning  signal  (1) 
flashed,  it  is  necessary  to  clean  the  fil-
ter.


After the cleaning, reinstall the filter and 
reset  the  cleaning  signal  key  by  press-
ing  the  “0”  key  for  at  least  3  seconds. 
Symbol “1” will then stop flashing. 

To reset the key, it is necessary that the 
hood is in the OFF mode. The signal is 
activated after max. 40 operating hours. 


Activated  carbon  filter  regenera-

tion symbol


When the activated carbon regeneration 
filter  symbol  (2)  flashes,  the  activated 
carbon  filter  needs to be cleaned.  After 
the cleaning, reinstall the filter and reset 
the  activated  carbon  filter  regeneration 
key,  by  pressing  keys  1  and  2  at  the 
same  time,  for  at  least  3  seconds:  the 
symbol  will  stop  flashing  and  will  be 
reset,  after  a  short  beep.  To  reset  the 
key,  the  hood  must  be  in  the  OFF 
mode. 

The  signal  is  activated  after  max  160 
operating hours. 


Содержание Amplia 5300

Страница 1: ...DE Bedienungsanleitung EN Operating Instructions FR Mode d emploi IT Istruzioni per l uso ES Instrucciones de uso NL Bedieningshandleiding Amplia TYP 5300 5310 ...

Страница 2: ...en alleine der Produktbeschreibung Eine Aussage über eine bestimmte Beschaffenheit oder Eignung für einen bestimmten Einsatzzweck kann aus unseren Angaben nicht abgeleitet werden Die Angaben entbinden den Verwender nicht von eigenen Beurteilungen und Prüfungen Es ist natürlich zu beachten dass unsere Produkte einem natürlichen Verschleiß und Alterungsprozess unterliegen Alle Rechte liegen bei der ...

Страница 3: ... dürfen nicht in Betrieb genommen werden Defekte Teile müssen durch Originalteile ersetzt werden Reparaturen dürfen nur durch autorisiertes Fachpersonal durchgeführt werden Vergiftungsgefahr Wenn die Dunstabzugshaube im Abluft betrieb gleichzeitig mit anderen raum luftabhängigen Feuerstätten z B holz gas öl oder kohlebefeuerte Geräte in einem Raum betrieben wird können tödliche Verbrennungsgase du...

Страница 4: ...on takt Steckdose angeschlossen werden andernfalls droht elektrischer Schlag Stellen Sie sicher dass die Steckdose am Gerät oder die Schutzkontakt Steckdose der Hausinstallation frei zugänglich ist damit im Notfall oder bei Service bzw Wartungsarbeiten das Netzkabel aus der Steckdose gezogen werden kann Gefahr durch elektrischen Schlag Reinigen Sie die Haube nicht mit einem Dampfreiniger oder mit ...

Страница 5: ...durch Magnete gehalten Die Zugänglichkeit dieser Metallfilter ist bei den Haubenmodellen durch abschwenken der Glasfront problemlos sowie ohne Werkzeug gewährleistet Die Absaugleistung sowie auch andere Zusatzfunktionen werden über das Bedien feld geregelt Die Beleuchtung wird ebenfalls über das Bedienteil gesteuert Die Beleuchtung ist an der Unterseite der Dunsthaube sowie hinter der Glasfront mi...

Страница 6: ... Beleuchtung Durch Drücken auf das Beleuchtungs symbol geht die Beleuchtung an Beleuchtungssymbol noch mal Drücken Beleuchtung geht aus Beim Einschalten der Haube geht die Ambiente Beleuchtung automatisch an Die Beleuchtung der Haube ist nicht dimmbar Anzeige Fettfilterreinigung Wenn die Fettfilteranzeige blinkt Symbol 1 muss der Filter gereinigt werden Nach dem Reinigen des Filters den Filter wie...

Страница 7: ... hartnä ckigen Verschmutzungen vorzubeugen Reinigungs und Pflegehinweise Beim Reinigen der Metallfilter sind die zugänglichen Gehäuseteile von abgela gertem Fett zu befreien Dadurch wird einer Brandgefahr vorgebeugt und die Funktionalität bleibt erhalten Zum Reinigen der Dunstabzugshaube heiße Spüllauge oder mildes Fenster p u t z m i t t e l v e r w e n d e n Kratzen Sie angetrocknete Verschmut z...

Страница 8: ...immt der Hersteller keine Garantie Temperaturen über 55 Grad sind gleichfalls zu vermei den Achtung Keine 3 Phasen Reiniger oder Mehr Phasen Reiniger verwenden Den Metallfilter NICHT in einer gewerb lichen Spülmaschine reinigen Eine Reinigung mit aggressiven Mitteln wie Benzin Aceton Trichlorethylen etc führt zur Zerstörung der Metallfilter Bitte beachten Aufgrund einer beim S p ü l v o r g a n g ...

Страница 9: ...de 9 Beleuchtung LED Defekte Leuchtmittel müssen unverzüg lich ausgetauscht werden Austausch der LED Beleuchtung nur durch Kun dendienst möglich Art Nr 3641 ab 07 2016 Filtergitter Ein Ausbauen ...

Страница 10: ...Backöfen verbunden mit einer langen Lebensdauer aus Hervorzuheben ist ebenso der 12 fache Wirkungsgrad ge genüber herkömmlicher Aktivkohle als auch die minimierte Geräuschbildung hervorgerufen durch laminare Strömung in den Wabenkanälen Die adsorptive Leistungsfähigkeit der GUTMANN Aktiv kohle Wabenkörper beruht auf einer überdurchschnittlich großen Oberfläche Regeneration Die Regeneration erfolgt...

Страница 11: ...nden in Folie verpackt vor Installation Folie entfernen Ausblasgitter abnehmen Rändelschrauben am Aktivkohle filter entfernen Aktivkohlefilter aus den Füh rungsschienen nehmen Der Einbau erfolgt in Umgekehrter Rei henfolge Kabelvarianten ab 04 2016 ab 04 2016 ...

Страница 12: ...der Filter im Haubeninnern Bei anderen Problemfällen rund um Ihre Gutmann Haube können Sie an unsere Kundenabteilung eine E mail an der kuemmerer gutmann exklusiv de sen den Entsorgung Verpackung Die Verpackung der Dunstabzugshaube ist recycelbar Als Verpackungsmateria lien werden Karton und Polyethylenfolie PE verwendet Diese Materialien sind umweltgerecht und nach den jeweiligen vor Ort geltende...

Страница 13: ...fully read the following information and explanations on the proper use of your new GUTMANN hood before using the appliance for the first time Please also read our operating and installation instructions as well as the cleaning recommenda tions to ensure that you enjoy many years of service from your appliance ...

Страница 14: ...to operation simultaneously with other aspirators e g aspirators powered by gas fuel oil or coal there is a danger of developing deadly fumes caused by decompression established in the envi ronment Always ensure an adequate supply of fresh air The level of decom pression should never be above 4Pa 0 04 mbar Fire risk The hood must never be operated with out the grease filter active carbon filter an...

Страница 15: ... hood in case of emergency or for maintenance Electric shock risk Do not clean the hood with steam clean ers or high pressure washers Always disconnect the hood from the power supply before cleaning Transportation Precautions During transport ensure that the hood cannot touch objects that could damage it Danger to the physical safety During transport keep away from the hood Make sure that other pe...

Страница 16: ...rs are held within the hood body via magnets Metal filters are accessed with ease by rotating the front glass without tools The aspiration function and other additional functions are activated via the control panel as is the case with the lighting function The lighting is located either on the bottom of the hood or behind the front glass and uses LED lights technology With this innovative technolo...

Страница 17: ...ood during operation Lighting Pressing the key with the lighting sym bol the lighting function is activated If you press it one more time the lights are turned off By activating the fan function the envi ronment lighting function is activated automatically Hood lights cannot be regulated with a dimmer Filter cleaning signal When the filter cleaning signal 1 flashed it is necessary to clean the fil...

Страница 18: ... and care instructions When cleaning the grease filters also remove any grease deposits from the accessible housing components This will prevent a fire hazard and maintain an optimum range of functions Use hot soapy water or a mild window cleaning agent to clean the hood Do not scratch off baked on deposits Soften them us ing a damp cloth Do not use abrasive agents or scouring pads Note Do not use...

Страница 19: ...o be avoided Caution Do not use three phase or multiphase detergents DO NOT clean the metal filters in industrial dishwash ers Cleaning with strong detergents such as gasoline acetone trichloroethylene etc may ruin the metal filters beyond repair Caution To prevent galvanic reactions during the washing process the metal filters cannot be washed at the same time with a silver cutlery or crockery Th...

Страница 20: ...en 20 Removing the filtergitter Art Nr 3641 ab 07 2016 ...

Страница 21: ...s and by durability It is also worth mentioning that their effi cacy 12 times superior to that of tradi tional carbon filters and their noise is minimum compared to other filters thanks to the honeycomb lamellar structure The absorbency capacity of the GUTMANN activated carbon filters is also due to a surface larger than the other filters Regeneration Regeneration takes place in a pre heated oven ...

Страница 22: ...screws from the activated carbon filter Remove the filter from the tracks To remount the filter follow the se quence in reverse To preserve the hygiene the filter car tridge is wrapped in a film which must be removed before installation ab 04 2016 electrical connections ...

Страница 23: ...le It is made up off cardboard and polyethylene foil PE Please dispose these materials in a environmentally aware responsible way and in accor dance with the regulations of your local authority Extractor hood Your local community will be able to advise you on an environmentally com patible disposal of sorted out household appliances Environmental information This appliance is labelled in accordanc...

Страница 24: ... la première utilisation nous vous conseillons de bien lire les informations et explications ci dessous pour une utilisation conforme de votre nouvelle hotte GUT MANN Merci d également de respecter notre mode d emploi et nos instructions de montage ainsi que nos conseils de nettoyage afin de pouvoir profiter longuement de votre hotte ...

Страница 25: ...ons ne doivent être effectuées que par du personnel qualifié Risque d intoxication Si la hotte fonctionne en mode d aspira tion en même temps que d autres appa reils d aspiration alimentés par des combustibles par ex appareils alimen tés par bois gaz ou charbon des fu mées létales provenant de la combus tion peuvent apparaître à cause de la dépression qui s est créée dans l envi ronnement Il faut ...

Страница 26: ...s équipés de prise sont fournis avec le câble d alimentation tes té dans le pays d installation et sont reliés exclusivement à des prises four nies de mise à la terre pour éviter les risques de fulguration S assurer que les fiches et le câble de mise à la terre soient facilement acces sibles de façon à permettre de débran cher la hotte en cas de nécessité ou pour l entretien Risque de fulguration ...

Страница 27: ...la hotte par des aimants On accède aux filtres métal liques avec la plus grande facilité en faisant tournant le verre antérieur sans outils La fonction d aspiration et les autres fonctions supplémentaires s activent à travers le panneau de contrôle de façon analogue à ce qui se produit pour la fonction éclairage L éclairage se trouve tant dans la partie inférieure se la hotte que derrière le verre...

Страница 28: ...cu ne raison durant le fonctionnement approcher des pièces du corps de la hotte Eclairage appuyer 1 fois la touche rétro éclairage verre appuyer 2 fois la touche les deux éclai rages sont éteints Eclairage non réglable par dimmer Signal nettoyage filtre Quand le signal de nettoyage filtre 1 clignote il faut effectuer le nettoyage du filtre Après le nettoyage replacer le filtre et faire le reset de...

Страница 29: ...optimal Pour le nettoyage de la hotte aspirante utiliser une base lavant chau de ou un produit nettoyant doux pour les vitres Ne pas gratter les dépôts desséchés mais les ramollir à l aide d un linge humide Ne pas utiliser de nettoyants abrasifs ou d éponges abra sives Indication Ne pas appliquer d alcool diluant sur des surfaces en matériau synthétique ces produits peuvent en traîner des marques ...

Страница 30: ...eures à 55 C Attention ne pas utiliser de détergents triphases ou multiphases NE PAS net toyer les filtres métalliques dans un lave vaisselle industriel Un nettoyage avec des détergents agressifs tels que l es sence l acétone le trichloréthylène etc abîment de façon irrémédiable les filtres métalliques Attention pour éviter les réactions gal vaniques durant le processus de lavage les filtres métal...

Страница 31: ...fr 31 Art Nr 3641 ab 07 2016 Enlever le filtre gitter ...

Страница 32: ...on nels et par leur durabilité Il faut men tionner aussi leur efficacité 12 fois supé rieure à celle des traditionnels au char bon ainsi que leur faible bruit par rap port à d autres filtres grâce à la structu re lamellaire en nid d abeille La capaci té d absorption des filtres au charbon actif GUTMANN est due aussi à une plus grande surface plus grande par rapport aux autres filtres Régénération ...

Страница 33: ...rbon actif Faire glisser le filtre des rails Pour replacer le filtre effectuer la séquence dans l autre sens Pour en préserver l hygiène la cartouche de filtration est enroulée dans une pellicule qui doit être enlevée avant la mise en place ab 04 2016 des connexions électriques ab 04 2016 ...

Страница 34: ...st recyclable Le matériel d emballage est composé de carton et de feuilles PE Jetez ces maté riaux de manière écologique et en te nant compte des réglementations loca les Hotte aspirante Votre commune vous indiquera com ment éliminez écologiquement votre hotte aspirante Respect de l environnement Cet appareil est marqué selon la directi ve européenne 2002 96 EG relative aux appareils électriques e...

Страница 35: ...amente le seguenti informazioni e spiegazioni per un utilizzo corretto del Suo nuovo modello di cappa GUTMANN prima di metterla in fun zione La preghiamo di osservare inoltre le nostre istruzioni per l uso e per il montag gio oltre ai consigli per la pulizia in esse contenuti Le permetteranno di godersi il Suo nuovo acquisto più a lungo ...

Страница 36: ...ettuate solo da personale Pericolo di intossicazione Se la cappa in modalità aspirazione viene messa in funzione contemporanea mente ad altri aspiratori ad es aspiratori alimentati a gas combustibile liquido o a carbone sussiste il pericolo che si svi luppino esalazioni letali provocate dalla decompressione instauratasi nel locale Assicurare sempre un adeguato ricircolo d aria Il livello di decomp...

Страница 37: ...mentazione collaudato nel Paese di installazione e collegati esclusivamente a prese provviste di messa a terra per evitare pericoli di fol gorazione Assicurarsi che spine e cavo di messa a terra siano facilmente acces sibili in modo da permettere di scollegare la cappa in caso di necessità o per la manutenzione Rischio di folgorazione Non pulire la cappa con pulitori a vapore o idropulitrici Scoll...

Страница 38: ...ite magneti Ai filtri metallici si accede con la massima facilità facendo ruotare il vetro anteriore senza bisogno di attrezzi La funzione di aspirazione e altre funzioni aggiuntive si attivano tramite il pannello di controllo analo gamente a quanto avviene per la funzione illuminazione L illuminazione è collocata sia sulla parte inferiore della cappa sia dietro il vetro frontale ed ha una tecnolo...

Страница 39: ... tasto con il simbolo illumi nazione si attiva la funzione illuminazio ne Premendolo nuovamente l illumina zione si spegne Attivando la funzione ventola si attiva automaticamente la funzione illumina zione ambiente L illuminazione della cappa non è rego labile con un dimmer Segnalazione pulizia filtro Quando lampeggia il simbolo di pulizia filtro 1 è necessario procedere alla pulizia del filtro Do...

Страница 40: ...i depositi di grasso dalle parti accessibili dell alloggiamento Si prever rà così il rischio di incendi salvaguar dando il funzionamento ottimale della cappa Per la pulizia della cappa aspi rante utilizzare soluzioni detergenti cal de o prodotti delicati per la pulizia di vetri Non grattare lo sporco incrostato ma rimuoverlo delicatamente ammorbi dendolo con un panno umido Non utiliz zare prodotti...

Страница 41: ...itare anche temperature oltre i 55 gradi Attenzione non utilizzare deter genti trifasici o multifasici Una pulizia con detergenti aggressivi quali benzina acetone tri cloretile etc rovina irreparabilmente i filtri metallici Attenzione per evitare reazioni galvani che durante il processo di lavaggio i filtri metallici non possono essere lavati con temporaneamente a posate o stoviglie d argento Non ...

Страница 42: ...it 42 Art Nr 3641 ab 07 2016 Rimozione del filtrogitter ...

Страница 43: ...à nei forni tradizionali e per la durabili tà E da menzionare anche la loro effi cacia 12 volte superiore a quella dei tradizionali al carbone nonchè la mini ma rumorosità rispetto agli altri filtri grazie alla struttura lamellare a nido d ape La capacità di assorbenza dei filtri al carbone attivo GUTMANN è do vuta anche ad una superficie maggiore rispetto agli altri filtri Rigenerazione La rigene...

Страница 44: ...viti dal filtro al carbo ne attivo Sfilare il filtro dai binari Per rimontare il filtro seguire la se quenza al contrario Per preservarne l igiene la cartuccia filtrante è avvolta in una pellicola che va rimossa prima dell installazione ab 04 2016 ab 04 2016 collegamenti elettrici ...

Страница 45: ...teri base per il ritiro e il ricupero di apparecchiature usate validi su tutto il territorio UE La preghiamo di rivolgersi al Suo rivenditore specializzato per in formazioni sulle diverse modalità di smaltimento attuali Modifiche tecniche riservate Dati tecnici Allacciamento alla rete 230 V 50 Hz max 270 Watt Lampade LED 7 W Guasti In caso di segnalazione di guasti scol legare la cappa dall alimen...

Страница 46: ...imera puesta en servicio lea detalladamente la información y las explicaciones siguientes sobre el uso adecuado de su nueva campana de la empresa GUTMANN Respete también nuestras instrucciones de uso y montaje así como las recomendaciones de limpieza incluidas en las mismas para que pueda disfrutar de su aparato durante mucho tiempo ...

Страница 47: ...ciones pueden ser realizadas solamente por personal calificado Peligro de intoxicación Si la campana en modalidad de aspiración es puesta en funcionamiento contemporáneamente a otros aspiradores ej aspiradores para alimentos a gas combustible líquido o carbón existe el peligro que se desarrollen gases mortales producidos por la descompresión causada en el lugar Siempre asegurar la adecuada recircu...

Страница 48: ...e de alimentación probados para su funcionamiento en el país de instalación y conectados exclusivamente a enchufes provistos con conexión a tierra para evitar los peligros de descargas eléctricas Asegurarse de que los enchufes y los cable de conexión a tierra sean fácilmente accesibles con el fin de permitir desconectar la campana en caso de necesidad o para el mantenimiento Riesgo de descarga elé...

Страница 49: ...otorizado Los filtros metálicos inferiores se mantienen en el interior del cuerpo de la campana a través de imanes Se accede a los filtros con la máxima facilidad mediante la rotación del vidrio frontal sin necesidad de herramientas La función de aspiración y otras funciones adicionales se activan a través del panel de control del mismo modo como sucede con la función de iluminación La iluminación...

Страница 50: ...s primeros 5 botones regulan la potencia de aspiración Símbolo 0 Stand by 0 parpadea Símbolo 0 Off 0 no parpadea Símbolo 1 Potencia baja Símbolo 2 Potencia media Símbolo 3 potencia elevada Símbolo la modalidad intensiva dura 5 minutos y luego se apaga automáticamente volviendo a la m o d a l i d a d s e l e c c i o n a d a anteriormente ON OFF Para activar la campana mantener presionado el botón 0...

Страница 51: ...regular con un dimmer Señal de limpieza del filtro Cuando parpadea el símbolo de limpieza del filtro 1 es necesario proceder con la limpieza del filtro Después de la limpieza instalar nuevamente el filtro y restablecer el botón de señal de limpieza presionando el botón 0 durante al menos 3 segundos De ésta manera el símbolo 1 dejará de parpadear Para poder restablecer el botón es necesario que la ...

Страница 52: ...n temperaturas por encima de los 55 grados centígrados Precaución No utilizar detergentes trifásicos o multi fasicos NO limpiar los filtros m e t á lic o s e n la v a va j i l la s industriales Una limpieza con productos de limpieza agresivos c o m o g a s o l i n a a c e t o n a tricloretileno etc arruinan irreparablemente los filtros metálicos Atención Para prevenir reacciones galvánicas durante...

Страница 53: ...es 53 Art Nr 3641 ab 07 2016 Extracción del filtro gitter ...

Страница 54: ...a limpieza regularmente El filtro metálico debe limpiarse por lo menos cada dos semanas El filtro de carbón debe ser regenerado cada 2 3 meses La regeneración debe hacerse en hornos normales a una temperatura de 200 C durante aproximadamente 1 2 horas dependiendo del grado de suciedad y del tiempo de utilización del filtro Advertencia el umbral de combustión espontánea se alcanza a los 300 350 C A...

Страница 55: ... seguir la secuencia de manera contraria Per preservar la higiene el cartucho filtrante está envuelto en una película que debe ser eliminada antes de la instalación Iluminación LED Las luces LED defectuosas deben ser absolutamente reemplazados Las luces LED pueden ser sustituidas únicamente por el servicio al cliente Sujeto a modificaciones técnicas ab 04 2016 conexiones eléctricas ...

Страница 56: ...riales de embalaje se utilizan cartón y lámina de polietileno PE Estos materiales deberán ser desechados de un modo ecológico y conforme a las normas locales vigentes Campana extractora de humos L o s c e n t r o s m u n i c i p a l e s correspondientes le informarán gustosamente del procedimiento de eliminación ecológica de los aparatos domésticos usados I n d i c a c i o n e s medioambientales T...

Страница 57: ...TMANN dampkap te kopen Lees de volgende informatie en uitleg voor een vakkundig gebruik van uw nieuw dampkapmodel van de firma GUTMANN voor de eerste inbedrijfstelling aandachtig Volg eveneens onze bedienings en onderhoudshandleiding evenals de daarin vervatte reinigingsaanbevelingen zodat u lang plezier aan uw toestel heeft ...

Страница 58: ...rdelen moeten worden vervangen door originele onderdelen Reparaties mogen alleen door gekwalificeerd personeel worden uitgevoerd Gevaar voor vergiftiging Wanneer de kap als afzuigapparaat wordt gebruikt samen met andere zuigapparaten bijv zuigers gedreven door gas vloeibare brandstof of steenkool bestaat er het gevaar dat zich dodelijke gassen ontwikkelen door decompressie die zich in het vertrek ...

Страница 59: ...in het land van installatie en uitsluitend aangesloten aan contacten met aarding om elektrische schokken te voorkomen Zorg ervoor dat de stekkers en grondkabel gemakkelijk te bereiken zijn zodat het apparaat in geval van nood of voor het onderhoud gemakkelijk kan worden ontkoppeld Gevaar voor elektrocutie Maak de kap nooit schoon met stoomreinigers of hogedrukreinigers Koppel de elektrische voedin...

Страница 60: ...haam vastgehouden door middel van magneten De metalen filters zijn gemakkelijk bereikbaar door het draaien van het glas aan de voorzijde zonder gereedschap De zuigfunctie en andere extra functies worden geactiveerd via het bedieningspaneel zoals ook de verlichting De verlichting is zowel aan de onderkant van de kap als achter het glas aan de voorzijde en heeft een technologie van LED spots Dankzij...

Страница 61: ...akelen gaat de vleugelventilator 4 automatisch uit Gevaar tijdens de werking nooit met het lichaam de afzuigkap benaderen Verlichting Door op de toets met het lichtsymbool te drukken wordt het licht aangezet Door opnieuw te drukken gaat het licht uit Door de functie ventilatie te activeren gaat automatisch het omgevingslicht aan Het licht van de kap kan niet met een dimmer geregeld worden Filter r...

Страница 62: ...ijke behuizingdelen van afgezet vet ontdoen Daardoor wordt brandgevaar voorkomen en blijft de optimale werking behouden Voor de reiniging van de dampkap hete spoelloog of een zacht poetsmiddel voor vensters gebruiken De opgedroogde vervuiling niet afkrassen maar deze met een vochtige doek zacht maken Geen schurende middelen of krassende sponsen gebruiken Opmerking Alcohol spiritus niet op kunststo...

Страница 63: ... zeer voorzichtig Het metalen filter moet minstens om de twee weken gereinigd worden Het koolstoffilter moet om de 2 3 maanden worden geregenereerd in normale ovens bij een temperatuur van 200 C voor ongeveer 1 2 uur afhankelijk van de vervuilingsgraad en de gebruikstijd van het filter Waarschuwing De drempel van zelfontbranding ligt bij 300 350 C Waarschuwing Gebruik nooit de pyrolyse functie van...

Страница 64: ...nl 64 Art Nr 3641 ab 07 2016 Filter verwijdering gitter ...

Страница 65: ...aarop gekookt wordt We raden aan dit minstens om de 2 3 maanden te doen bovendien raden we aan om de 1 2 maanden het koolstoffilter met een vochtig doek te reinigen De hoge opnamecapaciteit van het actieve koolstoffilter Gutmann wordt op zijn best behouden als de zuigkracht 2 wordt geselecteerd Filter verwijdering Verwijder het afvoerrooster Verwijder de schroeven uit het actieve koolstoffilter Ve...

Страница 66: ...n gaat de vleugel van het voorste glas automatisch dicht Neem direct contact op met onze klantenservice indien de afzuigkap vreemde geluiden maakt en als na een controle van de afvoerleiding er geen problemen zijn waargenomen bijvoorbeeld vreemde geluiden defecten of storingen van de motor worden waargenomen het ontstekingscircuit niet goed werkt Technische wijzigingen voorbehouden elektrische aan...

Страница 67: ...de huishoudtoestellen krijgt u bij uw gemeente Milieu instructies Alle modellen van de firma GUTMANN zijn volgens de Europese richtlijn over elektrische en elektronische toestellen waste electrical and electronic equipment WEEE gekenmerkt De richtlijn beschrijft het kader voor een EU wijde geldige terugname en recyclage van oude toestellen Vraag informatie aan uw vakman over de actuele verwijderin...

Страница 68: ...formationen ohne schriftliche Genehmigung der Exklusiv Hauben GUTMANN GmbH ist untersagt We accept no liability for changes resulting from technical variations performed to the purpose of developments or improvements to our products or owing to slight deviations in dimensions and or in colour shades to possible differences in grinding patterns and or micrographs due to the fabrication processes as...

Страница 69: ...de Montageanleitung en Installation instructions fr Notice de montage it Istruzioni per il montaggio es Instrucciones de montaje nl Montagehandleiding Amplia ...

Страница 70: ...Sie nachfolgende Informationen und Erläuterungen zur fachgerechten Montage Ihrer neuen Haube aus dem Hause GUTMANN sorgfältig durch bevor die Inbetriebnahme erfolgt Bitte beachten Sie gleichfalls unsere Bedienungs und Mon tageanleitung sowie die darin enthaltenen Reinigungsempfehlungen so dass Sie lan ge Freude an Ihrem Gerät haben ...

Страница 71: ...nstallierte Schutzkontaktsteckdose anschließen Die Steckdose muss nach der Montage leicht erreichbar sein um die Dunstabzugshaube bei Bedarf von der Netzspannung trennen zu können Bei Festanschluss z B wenn eine entsprechende Steckdose nicht vorhanden ist darf die Dunstabzugshaube nur von einer Elektrofachkraft an die Netzspannung angeschlossen werden Für den Festanschluss muss die Dunstabzugshaub...

Страница 72: ...wenn die Haube in einer Höhe von min 400mm ab Oberkante Arbeitsplatte montiert wird Bei Gas sind es auch min 400mm Um Kondensatbildung zu verhindern muss eine Rückstauklappe direkt am Luftaustritt außen montiert werden Bei Gas Kochgeräte sind jeweils die gültigen Einbauvor schriften und die Einbauhinweise der Gas Gerätehersteller zu beachten Über Gas Kochstellen ist die Montage der Dunstabzugshaub...

Страница 73: ...icht 35 KG ohne Turm Spannung 230 V 50 Hz Integrierter Motor Luftleistung freiblasend 850 m h Leistung 240 Watt Bedienelement Touchpanel Beleuchtung LED Beleuchtung Arbeitsplatzbeleuchtung Ambiente Beleuchtung Filter 1 Stück 530 x 235 mit Magnetband Turm teleskopisch Wandturm 304 x 260 mm Option ...

Страница 74: ...de 6 3 PRODUKTBESCHREIBUNG A Haubenkörper B Aufhängepunkte C Glasfront aufklappbar D Glasschanier E Stutzen Schlauchanschluss F elektrischer Anschluss G Unterturm H Oberturm I Turmhaltewinkel ...

Страница 75: ...bel Diese haben in Abhängigkeit vom Untergrund folgende Werte Dübel Ø 10 mm Beton B25 9 4 KN Mauerziegel Z20 5 2 KN Kalksandvollstein KSV20 4 8 KN Bei anderen unsicheren Untergründen ist für die sichere Montage der Dunstabzugshaube ein Fachmann für Bauangelegenheiten z B ein Statiker oder Architekt zu befragen ...

Страница 76: ... dessen Aufbau Sie sollte aber mindestens 12 Stunden betragen Bitte tragen Sie während der Montage Schutzhandschuhe um eine Verletzungsge fahr auszuschließen Vor der Montage der Haube benötigte Werkzeuge herrichten Für die Montage der Haube sind bauseitige Voraussetzungen für eine reibungslose Montage der Haube zu schaffen Küchengeräte abdecken Geeignete Abluftführung in der Decke vorbereiten Zwis...

Страница 77: ...de 9 600 Ansicht von oben 6 ABMESSUNG Ø 6 Ansicht von hinten Ansicht Turmhaltewinkel ...

Страница 78: ...bmessun gen festlegen Fehlende Abmessungen sind modellabhängig und müssen an der Haube gemessen werden Auf Mindestabstand zwischen Kochstelle und Unterkan te der Dunstabzugshaube achten 2 Löcher Ø10 mm für die Befestigung der Dunstabzugshaube oben 2 Löcher Ø 8 mm für die Befestigung der Dunstabzugshaube unten 2 Löcher Ø6 mm für die Aufhängung des Oberturms Turmhaltelasche Option Nur bei Hauben mit...

Страница 79: ...Dübel Ø10 mm einschrauben dass noch ca 20 mm hervorstehen 5 Dunstabzugshaube aufhängen und Muttern locker befestigen 6 Dunstabzugshaube ausrichten Montagemaße prüfen Muttern anziehen 7 Glasfront öffnen Metallfilter herausnehmen und die beiden unteren Schrauben zur Wandbefestigung anbringen ...

Страница 80: ...de 12 9 Bei Abluftbetrieb Abluftschlauch anbringen und mittels Schlauchklemme befestigen auf Knickfreiheit achten 10 Den elektrischen Anschluss herstellen Bei Wandhaube ohne Turm siehe ab Punkt 15 ...

Страница 81: ...andseitigen Flächen abziehen NUR BEI HAUBEN MIT TURM 12 Oberturm in die Haltelasche der Turmaufhängung einschieben bis dieser einrastet 13 Unterturm ein wenig nach außen weiten und über den Oberturm und das Modul der Dunstabzugshaube aufsetzen Der Unterturm muss auf der Haube ruhen ...

Страница 82: ...einiger mit der Art Nr 05999704 Für Alumi niumoberflächen verwenden Sie bitte ein weiches Mikrofasertuch keine trockenen Tücher Benutzen Sie unbedingt ein mildes Fensterreinigungsmittel und keine aggressiven säure oder laugenhaltigen Reiniger Keine Scheuermittel verwen den 15 Hinweis Bei Umlufthauben und Einsatz von Carbonfiltern separate Bedienungs anleitung beachten Ansicht von hinten Amplia mit...

Страница 83: ......

Страница 84: ...eseitigung veralteter Haushaltsgeräte berät Sie auch ger ne Ihre Gemeinde Umwelthinweise Alle Modelle aus dem Hause GUTMANN sind entsprechend der europäischen Richtli nie 2002 96 EG über Elektro und Elektronikgeräte waste electrical and electronic equipment WEEE gekennzeichnet Diese Richtlinie gibt die Rahmenbedingungen für eine EU weit gültige Rücknahme und Verwertung von Altgeräten vor Bitte inf...

Страница 85: ...fully read the following information and explanations on the proper use of your new GUTMANN hood before using the appliance for the first time Please also read our operating and installation instructions as well as the cleaning recommenda tions to ensure that you enjoy many years of service from your appliance ...

Страница 86: ...ck risk The mains voltage must correspond to the one indicated on the plate located in the filter area in the inner part of the hood Connect the hood only to a properly installed safety socket The socket after installation should be easily accessible so that you can disconnect the hood from the current in case of emergency For fixed connec tions e g if you don t have a proper outlet the hood can b...

Страница 87: ... placing the hood at a minimum height of 400mm above the hob measuring from the top edge of the hood This distance of 400mm is recommended also for gas cookers To avoid condensation a flap gate must be installed directly on the external air vent In the case of gas cookers you must observe the indications and installation instructions given by the manufacturer of the appliance The installation of t...

Страница 88: ...55 mm Weight 35 kg without column Voltage 230 V 50 Hz Integrated motor Ventilation Free 850 m h Power 240 Watt Control Panel touch panel Lighting LED Lighting Work area lighting Environment Lighting Filter 1 Piece 530 x 235 with magnetic stripe Telescopic column Wall column 304 x 260 mm optional ...

Страница 89: ...en 21 3 PRODUCT DESCRIPTION A Hood body B Wall attachment points C Extendible front glass D Glass hinge E Nozzle hose fitting F Electrical connection G Lower tower H Upper tower I Tower bracket ...

Страница 90: ...mounting wall they have the following values Ø 10 mm inlay Concrete wall B25 9 4 KN Brick wall Z20 5 2 KN Solid brick wall KSV20 4 8 KN For other wall types in order to guarantee a secure mounting of the hood it is advis able to consult construction work specialists such as a static construction specialist or an architect ...

Страница 91: ... it into ser vice The times of acclimatization depend on temperature range on the device and on the structure of the same In any case it can never be less than 12 hours During assembly wear protective gloves to avoid any risk of injury Before installing the hood prepare the necessary tools To ensure proper installation of the hood it is necessary to prepare adequately the environment covering all ...

Страница 92: ...en 24 6 MEASUREMENTS 600 Ø 6 View from behind View from above ...

Страница 93: ...dge of the hood and the hob 2 holes Ø10 mm for fixing the hood above 2 holes Ø 8 mm for fixing the hood below 2 holes Ø6 mm for hanging the upper column support clamp of the TOWER Caution Only for hoods with Tower Caution place the hood in a central position as to the hob 2 Drill the holes and place the inlays 7 INSTALLATION INSTRUCTIONS Dübel Ø 8mm 3 Mount the support bracket for the upper column...

Страница 94: ...m until they are not projected out of the hole for around 20 mm 5 Hang the hood and tighten the nuts previously left loose 6 Align the hood check the installation measurements tighten the nuts 7 Open the front glass remove the metal filter and fix both lower screws to the wall ...

Страница 95: ...en 27 8 For the aspiration mode place the aspiration tube and secure it with clamp taking care to avoid any creases 9 Connect to the power For wall hoods without column see paragraph 14 ...

Страница 96: ...e for approximately 2 3mm Remove the film from the side surfaces 11 Insert the upper part of the columns into the column support clamp until it is blocked 12 Widen the lower tower a little and place it over the upper tower and the extractor hood module The lower tower must rest on the hood ...

Страница 97: ...lass surfaces we recommend Cleaner Art No 05999704 For aluminum surface use a damp microfiber cloth do not use a dry cloth In any case for surfaces use a mild detergent and not an ag gressive one acids or alkaline Do not use abrasive cleaners 14 Warning For filtering hoods and use of activated carbon filters follow the specific separate operating instructions View from behind Amplia with activated...

Страница 98: ...en 30 ...

Страница 99: ...ity will also be happy to advise you on the environmentally sound disposal of old household appliances Environmental information All models manufactured by GUTMANN are identified in accordance with European Directive 2002 96 EC on waste electrical and electronic equipment WEEE This di rective specifies the framework for the EU wide return and disposal of used appli ances Please ask your dealer for...

Страница 100: ...rouve dans la zone du filtre dans la partie intérieure de la hotte Brancher la hotte à une prise de sécurité bien installée La prise après montage doit être facilement ac cessible de sorte à pouvoir débrancher la hotte du courant en cas de besoin Pour les connexions fixes par ex s il n y a pas de prise adéquate la hotte peut être rac cordée à la ligne d alimentation que par un électricien qualifié...

Страница 101: ...rieure de la hotte Cette distance de 400 mm est conseillée aussi pour les cuisinières à gaz Pour éviter la formation de condensation il faut installer une paroi à ventilateur directement sur la prise d air extérieure Dans le cas de cuisinières à gaz il faut respecter les consignes et les instructions de pose du fabricant de l appareil L installation de la hot te au dessus de plan de cuisson à gaz ...

Страница 102: ...Poids 35 KG sans colonne Tension 230 V 50 Hz Moteur intégré ventilation libre 850 m h puissance 240 Watt Panneau de contrôle écran tactile Éclairage éclairage LED Éclairage du poste de travail Eclairage pièce Filtre 1 Pièce 530 x 235 avec bande magnétique Colonne télescopique Colonne mur 304 x 260 mm en option ...

Страница 103: ...ON DU PRODUIT A Corps de la hotte B Points de fixation murale C Verre avant ouvrable D Charnière du verre E Bec Embout de tuyau F raccordement électrique G colonne inférieure H colonne supérieure I support de la colonne ...

Страница 104: ...roi de fixation ils ont les valeurs suivantes cheville Ø 10 mm béton B25 9 4 KN briques Z20 5 2 KN briques pleines KSV20 4 8 KN Pour d autres typologies de paroi pour garantir un montage solide de la hotte il est conseillé de consulter du personnel spécialisé dans les travaux de construction com me un spécialiste de la construction statique ou un architecte ...

Страница 105: ...cursion thermique du dispositif et de la structure de ce dernier Ceux ci dans tous les cas elles ne peuvent jamais être inférieures à 12 heures Lors du montage porter des gants de protection pour éviter tout risque de blessure 5 PRÉPARATION POUR LE MONTAGE Avant d installer la hotte préparer les outils nécessaires Pour assurer une bonne installation de la hotte il faut préparer le local de façon a...

Страница 106: ...fr 38 Vue du dessus 6 MESURES 600 Ø 6 ...

Страница 107: ... mm pour la fixation de la hotte dessus 2 trous Ø 8 mm pour la fixation de la hotte dessous 2 trous Ø6 mm pour pendre la colonne supérieure mâchoire de soutien de la colonne Attention Seulement pour hottes avec colonne Attention placer la hotte en position centrale par rapport au plan de cuisson 7 INSTRUCTIONS POUR LE MONTAGE Dübel Ø 8mm Dübel Ø 6 2 Pratiquer des trous et encastrer les chevilles r...

Страница 108: ...jus qu à ce qu ils sortent du trou d environ 20 mm 5 Accrocher la hotte et serrer les écrous précédemment dévissés 6 Aligner la hotte vérifier les mesures d installation serrer les écrous 7 Ouvrez la vitre avant extraire le filtre métallique et fixer les deux vis inférieures à la paroi ...

Страница 109: ... Pour la modalité aspiration placer le tube d aspiration et le fixer avec la bride en prenant soin d éviter les plis 9 Effectuer le branchement électrique Pour les hottes au mur sans colonne voir paragraphe 14 ...

Страница 110: ...la mâchoire de soutien de la colon ne jusqu à la bloquer SEULEMENT POUR HOTTES AVEC COLONNE 12 lntroduisez le conduit superieur dans les pattes de fixation de la Suspension de conduit jusqu ä ce que ce dernier encrante Ecartez legerement le conduit inferieur vers l exterieur puis placezle audes sus du conduit superieur et du module de hotte Le conduit inferieur doit reposer sur la hotte ...

Страница 111: ......

Страница 112: ...éf 05999704 Pour les surfaces en aluminium utiliser un chiffon humide en microfibre ne pas utiliser de chiffon sec Dans tous les cas utiliser un détergent pour surfaces délicates et pas des agents de nettoyage agressifs aci des ou alcalins Ne pas utiliser de produits abrasifs 14 Avertissement Pour les hottes filtrantes et utilisation de filtres au charbon suivre les instructions de fonctionnement ...

Страница 113: ...it ie cadre pour une reprise et une recuperation des appa reils usages appiicables dans les pays de la CE Pour connattre les circuits actuels de mise au rebut veuillez consulter votre reven deur Elimination des déchets Emballage L emballage de l appareil est recyclable Le matériel d emballe est composé de carton et de feuilles PE Eliminez ces matériaux de maniere écologique et en tenant compte des...

Страница 114: ...amente le seguenti informazioni e spiegazioni per un utilizzo corretto del Suo nuovo modello di cappa GUTMANN prima di metterla in fun zione La preghiamo di osservare inoltre le nostre istruzioni per l uso e per il montag gio oltre ai consigli per la pulizia in esse contenuti Le permetteranno di godersi il Suo nuovo acquisto più a lungo ...

Страница 115: ...ata La presa dopo il montaggio deve esse re facilmente raggiungibile in mo do da poter scollegare la cappa dalla corrente in caso di necessità Per allacciamenti fissi ad es se non è disponibile una presa adeguata la cappa può venire collegata alla linea di tensione solo da un elettricista specializzato In caso di allacciamento fisso la cappa deve essere collegata ad un circuito singolo dotato di d...

Страница 116: ...sa deve essere installata una paratoia a ventola direttamente sullo sfiato esterno dell aria Nel caso di cucine a gas debbono essere osservate le indicazioni e le istruzioni di installazione dell azienda produttrice dell elettrodomestico L instal lazione della cappa sopra piani di cottura a gas possibile solo se la cappa viene montata ad un altezza minima di 400mm dal piano cottura e se non si sup...

Страница 117: ...ollo pannello touch Illuminazione Illuminazione LED Illuminazione della postazione di lavoro Illuminazione ambiente Filtro 1 Pezzo 530 x 235 con banda magnetica Colonna telescopica Colonna a parete 304 x 260 mm opzionale Motore integrato ventilazione libera 850 m h potenza 240 Watt 2 DATI TECNICI E REQUISITI DI ALIMENTAZIONE ...

Страница 118: ...ONE DI PRODOTTO A Corpo cappa B Punti di attacco parete C Vetro frontale apribile D Cerniera del vetro E Ugello raccordo del tubo F collegamento elettrico G colonna inferiore H colonna superiore I staffa della colonna ...

Страница 119: ... di pare te di fissaggio essi hanno i seguenti valori tassello Ø 10 mm calcetruzzo B25 9 4 KN mattoni forati Z20 5 2 KN mattoni pieni KSV20 4 8 KN Per altre tipoogie di pareti per garantire un montaggio sicuro della cappa è consiglia bile interpellare personale specializzato in lavori edili ad esempio uno specialis 7 ta in sta tica edile o un architetto ...

Страница 120: ...o e struttura dello stesso Essi in ogni caso non possono mai essere inferiori alle 12 ore Durante il montaggio indossate guanti di protezione per evitare pericolo di even tuali ferimenti Prima del montaggio della cappa predisporre gli attrezzi necessari Per assicurare un corretto montaggio della cappa è necessario predisporre adegua tamente il lo cale coprendo gli elettrodomestici della cucina Pre...

Страница 121: ...it 53 6 MISURE Vista da sopra 600 Ø 6 ...

Страница 122: ...sizioni dei seguenti fori di fissaggio con l aiuto delle dimensioni indicate Le misure mancanti dipendono dal modello e devono essere misurate sulla cappa aspirante Fare attenzione a rispettare la distanza minima fra fornelli e bordo inferiore della cappa aspirante 2 fori 6 mm per sospendere la torre superiore 2 fori 10 mm per fissare la cappa aspirante 2 fori 8 mm per fissare la cappa aspirante 2...

Страница 123: ...è non sporgano fuori dal foro di ca 20 mm 5 Appendere la cappa e stringere i dadi lasciati precedentemente allentati 6 Allineare la cappa verificare le misure di installazione serrare i dadi 7 Aprire il vetro frontale estrarre il filtro metallico e fissare entrambe le viti inferiori alla parete ...

Страница 124: ...lità aspirazione posizionare il tubo di aspirazione e fissarlo con la fascetta prestando attenzione ad evitare eventuali pieghe 10 Effettuare il collegamento elettrico Per cappe da parete senza colonna vedere dal punto 14 ...

Страница 125: ...A 11 Piegare verso l esterno di ca 2 3mm le dentellature sulla colonna superiore Rimuovere la pellicola sulle superfici laterali 12 Inserire la parte superiore della colonna nella ganascia di sostegno della co lonna fino a bloccarla ...

Страница 126: ...territorio dell Unione Europea Informarsi presso il proprio rivenditore sulle attuali vie di smaltimento 13 Effettuare test di funzionamento Istruzioni per la cura del dispositivo Completate le operazioni di montaggio consigliamo la pulizia delle superfici in acciaio inox con il nostro speciale detergente TZ 710 Per la pulizia delle su perfici in vetro con sigliamo il detergente Art Nr 05999704 Pe...

Страница 127: ...it 59 ...

Страница 128: ... de la primera puesta en servicio lea detalladamente la información y las explicaciones siguientes sobre el uso adecuado de su nueva campana de la empresa GUTMANN Respete también nuestras instrucciones de uso y montaje así como las recomendaciones de limpieza incluidas en las mismas para que pueda disfrutar de su aparato durante mucho tiempo ...

Страница 129: ... placa que se encuentra en la zona del filtro en la parte interior de la campana Conectar la campana solamente a una toma eléctrica de seguridad correctamente instalada La toma después de la instalación debe ser fácilmente accesible en manera de poder desconectar la campana de la corriente eléctrica en caso de necesidad Para las conexiones fijas por ejemplo si no se dispone de una toma de electric...

Страница 130: ...ue colocando la campana a una altura mínima de 400 mm de la placa de cocción midiendo desde el borde superior de la campana Esta distancia de 400 mm también se aconseja para las cocinas a gas Para evitar la formación de condensación se debe instalar una puerta de ventilación directamente en la salida de aire externa En el caso de las cocinas a gas se deben seguir las indicaciones y las instruccion...

Страница 131: ...35 KG sin columna Voltaje 230 V 50 Hz Motor integrado ventilación libre 850 m3 h potencia 240 vatios Panel de control Panel táctil Iluminación Iluminación LED Iluminación del lugar de trabajo Iluminación del ambiente Filtro 1 pieza de 530 x 235 con banda magnética Columna telescópica Columna a pared 304 x 260 mm opcional ...

Страница 132: ...L PRODUCTO A Cuerpo de la campana B puntos de acoplamiento a la pared C vidrio frontal con posibilidad de apertura D Bisagra del vidrio E boquilla manguera del tubo F conexión eléctrica G columna inferior H columna superior ...

Страница 133: ... montaje estos tienen los siguientes valores Taco Ø10 mm Conglomerado B25 9 4 kN ladrillos agujerados Z20 5 2 KN ladrillos macizos KSV20 4 8 KN Para otros tipos de paredes y para garantizar un montaje seguro de la campana es aconsejable recurrir a personal calificado en trabajos de construcción tales como un especialista en estática de la construcción o un arquitecto ...

Страница 134: ...riación térmica modelo y estructura misma de la campana En cualquier caso nunca pueden ser inferiores a 12 horas Durante el montaje utilizar guantes de protección para evitar cualquier peligro de lesión Antes de instalar la campana preparar las herramientas necesarias Para garantizar una correcta instalación de la campana es necesario predisponer adecuadamente la habitación cubriendo los electrodo...

Страница 135: ...es 67 6 MEDIDAS 600 Vista desde atrás Vista desde arriba Ø ...

Страница 136: ...uenta las distancias mfnimas entre la zona de cocciòn y el borde inferior de la campana extractora Las cotas que faltaran dependen del modelo concreto y deberän medirse en la campana extractora Practique dos taladros de 8 mm para suspender el mödulo de revestimiento superior Practique dos taladros de 10 mm para fijar la campana extractora 2 Practique los taladros en cuestiön e introduzca los tacos...

Страница 137: ...bresalgan fuera del agujero de aproximadamente 20 mm 5 Colgar la campana y apretar las tuercas previamente dejadas sueltas 6 Alinear la campana verificar las medidas de instalación apretar las tuercas 7 Abrir el vidrio frontal retirar el filtro metálico y fijar los dos tornillos inferiores en la pared ...

Страница 138: ...modalidad de aspiración colocar el tubo de aspiración y asegurarlo con la abrazadera teniendo cuidado de evitar cualquier pliegue 9 Efectuar la conexión eléctrica Para campanas a pared sin columna ver desde el punto 14 ...

Страница 139: ...ior Retirar la película de las superficies laterales 11 Insertar la parte superior de la columna en el cilindro de apoyo de la columna hasta su bloqueo 12 Extender el tubo inferior un poco hacia fuera y poner encima del tubo superior y el módulo de la campana extractora El tubo inferior debe estar apoyado sobre la campana ...

Страница 140: ... vidrio recomendamos el detergente Nr 05999704 Para las superficies en aluminio utilizar un paño de microfibra húmedo se recomienda no utilizar paños secos De cualquier manera utilizar un detergente para superficies delicado y no detergentes agresivos ácidos o alcalinos No utilizar productos abrasivos 14 Advertencia Para campanas filtrantes y el uso de filtros de carbón siga las instrucciones espe...

Страница 141: ......

Страница 142: ...liminación de aparatos electrodomésticos Consejospracticosparalaprotecciöndelmedioambiente Este aparato cumple con la Directiva europea 2002 96 EG sobre aparatos electricos y electrönicos identificada corno waste electrical and electronic equipment WEEE La directiva proporciona el marco general välido en todo el ämbito de la Union Europea para la retirada y la reutilizaciön de los residuos de los ...

Страница 143: ...TMANN dampkap te kopen Lees de volgende informatie en uitleg voor een vakkundig gebruik van uw nieuw dampkapmodel van de firma GUTMANN voor de eerste inbedrijfstelling aandachtig Volg eveneens onze bedienings en onderhoudshandleiding evenals de daarin vervatte reinigingsaanbevelingen zodat u lang plezier aan uw toestel heeft ...

Страница 144: ...tspanning moet overeenkomen met de netspanning aangegeven op het typeplaatje bij de filters binnen de afzuigkap De wasemkap mag alleen op een goed geïnstalleerd geaard stopcontact worden aangesloten Na de montage moet de contactdoos gemakkelijk bereikbaar zijn om de kap indien nodig van het stroomnet te ontkoppelen Bij vaste aansluitingen bijv als er geen stopcontact aanwezig is kan de kap uitslui...

Страница 145: ... mm vanaf de kookplaat gemeten vanaf de bovenkant van de kap te plaatsen Deze afstand van 400 mm wordt ook aanbevolen voor gaskookplaten Om condensvorming te voorkomen moet een klepschuif direct op de externe ontluchter worden geïnstalleerd In het geval van gaskookplaten moeten de aanwijzingen en installatie instructies van de fabrikant van het apparaat worden opgevolgd De installatie van de kap o...

Страница 146: ...Gewicht 35 KG zonder kolom Spanning 230 V 50 Hz Geïntegreerde motor ventilatie vrij 850 m3 h vermogen 240 Watt Bedieningspaneel Touch Verlichting LED Verlichting Verlichting van de werkzone Omgevingsverlichting Filter 1 stuk 530 x 235 met magneetband Telescopische kolom Wandkolom 304 x 260 mm optioneel ...

Страница 147: ...nl 79 3 PRODUCTBESCHRIJVING A Kaplichaam B Wandaansluitpunten C Opklapbaar voorglas D Glasscharnier E Mondstuk buiskoppeling F Elektrische aansluiting G Onderste kolom H Bovenste kolom I Kolom staaf ...

Страница 148: ...k van het wandtype hebben ze verschillende waarden Plug Ø 10 mm beton B25 9 4 KN baksteen Z20 5 2 KN massieve kalzandsteen KSV20 4 8 KN Voor andere wandtypen en om een veilige montage van de kap te garanderen raden we aan deskundig bouwkundig personeel zoals een specialist in statische constructie of een architect te raadplegen ...

Страница 149: ...it minder dan 12 uur 5 MONTAGE VOORBEREIDING Tijdens de montage beschermhandschoenen dragen om het gevaar voor verwondingen te voorkomen Voordat u met de installatie begint leg de nodige gereedschappen klaar Voor een correcte montage van de afzuigkap dient het lokaal goed klaargemaakt te worden door de huishoudelijke apparaten van de keuken af te dekken Maak een opening in het plafond geschikt voo...

Страница 150: ...nl 82 600 Ø Achteraanzicht 6 AFMETINGEN Bovenaanzicht ...

Страница 151: ... van deaangegeven maten Ontbrekende maten zijn afhankelijk van het model en moeten op de kap worden gemeten Let daarbij op de minimumafstand tussen de kookplaat en de onderkant van de afzuigkap 2 gaten 6 mm voor het ophangen van de boventoren 2 gaten 10 mm voor de bevestiging van de afzuigkap 2 gaten 8mm voor de bevestiging van de afzuigkap Dübel Ø 6 Turmhaltewinkel Option Dübel Ø 8mm 2 Boor de ga...

Страница 152: ...tdraaien totdat ze nog ca 20 mm uitsteken 5 De afzuigkap ophangen en de vooraf losgedraaide moeren vastdraaien 6 De afzuigkap uitlijnen de montage afmetingen controleren de moeren aandraaien 7 Het voorglas openen het metalen filter verwijderen en beide onderste schroeven aan de wand bevestigen ...

Страница 153: ...nl 85 8 Voor de zuigmodus de afzuigslang plaatsen en met een bandje bevestigen eventuele knikken voorkomen 9 De elektrische aansluiting maken Voor wandkappen zonder kolom zie vanaf punt 14 ...

Страница 154: ...veer 2 3mm naar buiten toe vouwen Verwijder de filmlaag van de zijvlakken 11 Het bovenste deel van de kolom in de kolomhouder invoeren totdat deze geblokkeerd wordt 12 Buig de ondertoren iets open en plaats hem over de boventoren en de afzuigkap De ondertoren moet op de afzuigkap rüsten ...

Страница 155: ...reiniger Art Nr 05999704 aan Voor de oppervlakken in aluminium gebruik een vochtig microvezel doek gebruik geen droge doeken In ieder geval altijd een reinigingsmiddelen gebruiken voor delicate oppervlakken en nooit agressieve zure of alkalische reinigingsmiddelen gebruiken Geen schuurmiddelen gebruiken 14 Waarschuwing Voor filterende apparaten en bij gebruik van koolstoffilters de specifieke inst...

Страница 156: ...nl 88 ...

Страница 157: ...wijze en volgens de plaat selijk geldende voorschriften Milieu Dit apparaat is gekenmerkt in overeenstemming met de EuropeseMI richtlijn 2002 96 EG betreffende afgedankte elektrische en elektronische apparatuur waste electrical and eiectronic equipment WEEE De richtlijn geeft het kader aan voor de in de EU geldige temgneming en verwerking van oude apparaten Vraag uw speciaalzaak om actueie inlorma...

Страница 158: ......

Страница 159: ......

Страница 160: ...Hauben GUTMAN GUTMAN GUTMAN GUTMAN GmbH Mühlacker Straße 77 D 75417 Mühlacker Deutschland info gutmann exklusiv eu www gutmann exklusiv eu HRB 705602 Amtsgericht Mannheim DE263391836 Index 03 17 Artikel Nr 3251 ...

Отзывы: