background image


User Manual


68

per need. To switch between the two memory media, you can either set UFlash for 

Storage here or click the icon shown in the memory media bar under the image screen.   


Y/M/D: 

To set date for the camera. After setup, date of the camera will automatically 

update.   


H/M/S:

 To set time for the camera. After setup, time of the camera will automatically 

update. 

  Choose button OK or press the joystick directly to save the change; choose button Cancel 

or press button C directly to cancel change. Then the dialog box will be closed and the 

original image status will be resumed.           


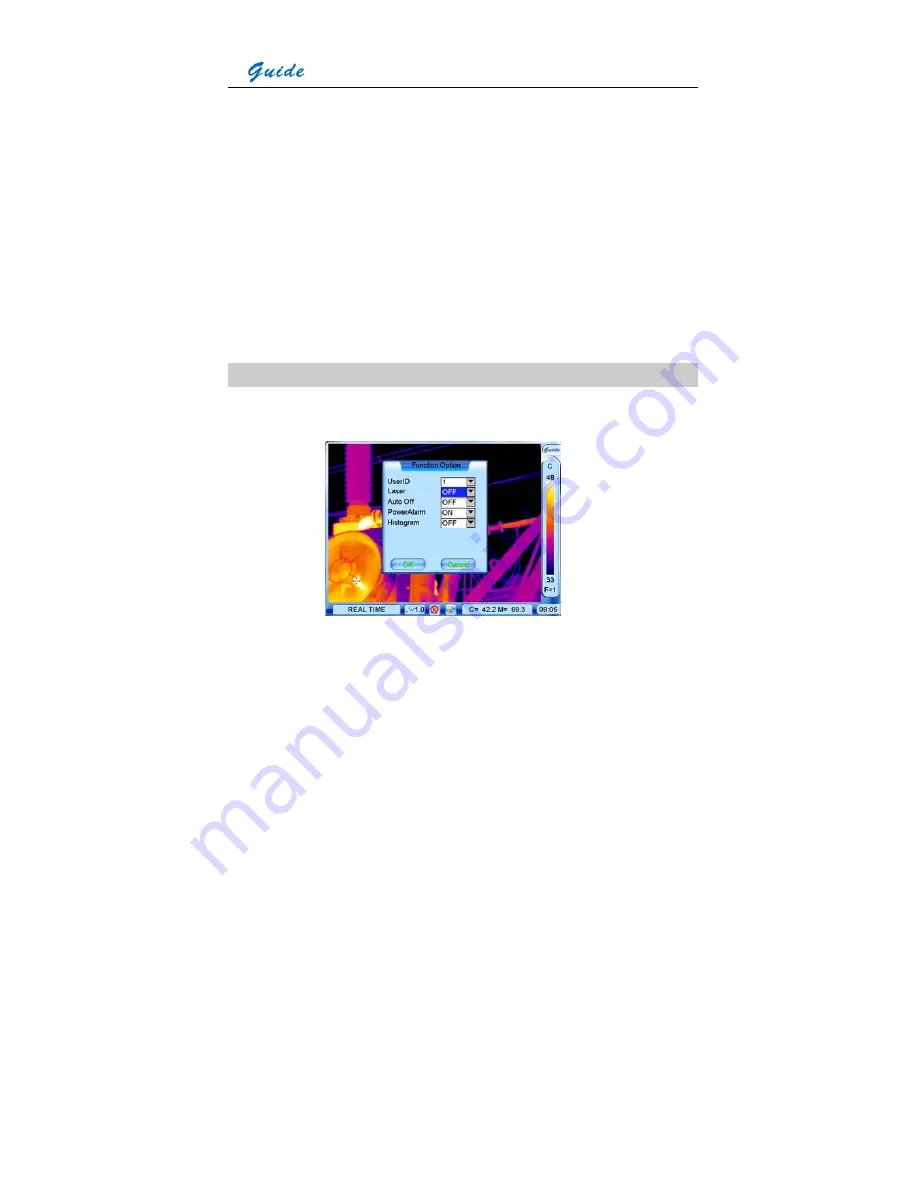
Option Function   


  Click option Function with the touch pen or press the joystick to select it. Then the 

Function dialog box appears on the screen. 


  Clicking each option box with the touch pen or pressing button S can toggle between the 

options. Clicking each value respectively with the touch pen or moving the joystick up or 

down can alter values of the option.   


UserID:

 To choose one from 4 users for speech template. When setting its value to be 1, 

the user is No. 1 user and the speech template is that of No.1 user’s. Then after activating 

Содержание ThermoPro TP8S

Страница 1: ...nology Co Ltd No 26 Shucheng Rd Hongshan District Wuhan 430070 P R China Telephone 86 27 8767 1991 Facsimile 86 27 8767 1927 Email overseas guide infrared com Internet www guide infared com Wuhan Guid...

Страница 2: ...ting to electromagnetic compatibility and safety EMC directive 89 336 EEC Low voltage directive 73 23 EEC Copyright Wuhan Guide Infrared Technology Co Ltd 2007 All rights reserved worldwide No parts o...

Страница 3: ...Parts Described 13 Attaching and Detaching the LCD Screen 21 Inserting Removing the SD Memory Card 21 Inserting Replacing the Battery 22 Battery Charging 24 Introduction to Buttons Joystick 26 Quick...

Страница 4: ...ecautions must be adhered to at all times and must be considered in addition to any advised precautions issued at the relevant worksite or work area Keep the THERMOPRO TM TP8S IR Thermal Camera steady...

Страница 5: ...adhered to at all times to ensure the safe use of this equipment Do not disassemble or attempt to open the battery under any circumstances Do not expose the battery to fire or high temperatures Do not...

Страница 6: ...over of this User Manual or by email to the following addresses overseas guide infrared com Caution The THERMOPRO TM TP8S IR Thermal Camera does not incorporate any user serviceable parts Never attemp...

Страница 7: ...S is another ingenious solution Wuhan Guide provides for professional IR thermographers around the world In a rugged compact and durable magnalium casing ThermoPro TM TP8S offers a wide assortment of...

Страница 8: ...USB driver Guide IrAnalyser Software User manual Carry case strap Options Remote control handle Tele lens Wide angle lens Extended temperature range Technical Specification Imaging Performance THERMAL...

Страница 9: ...ine Communication Touch Screen Present and receive operator s commands given by touch Remote Control Handle optional Respond as per operators operation Joystick Buttons Respond as per operators operat...

Страница 10: ...n individual file consists of infrared image visual image voice annotation and text annotation if any Voice Annotation Up to 60 seconds per file Text Annotation Selected from preset texts Optional Len...

Страница 11: ...sfer to PC RS232 communication Control of camera on PC Physical Characteristics Housing Magnalium Weight 0 85kg excluding battery LCD 1 1kg including battery LCD Size 186mm 106mm 83mm Standard Model T...

Страница 12: ...agnalium camera casing raises reliability and operation easiness Robust on board analysis enhances operators efficiency productivity Hot shoe technology enables hot swap of the VGA LCD screen and non...

Страница 13: ...zen images comprising radiometric data infrared image visual image voice annotation and text annotation can be saved into 2GB SD card or the built in flash memory in standard JPEG format Up to 60 seco...

Страница 14: ...User Manual 14 1 VGA LCD touch screen 2 IR lens 3 Visual focusing gear 4 VGA video interface 5 USB2 0 interface 6 Battery door 7 Buckle for neck strap 8 Viewfinder 1 8 3 4 5 6 7 2 6 5 3 1 2 4...

Страница 15: ...crophone to record voice annotation 3 F1 F4 function buttons and power button 4 Status display screen for power status USB SD card memory status 5 Joystick 6 Button S Button C and Button A 1 RS232 TV...

Страница 16: ...User Manual 16 1 Laser locator 2 Visual camera 1 LCD mount 1 2 1...

Страница 17: ...ontact pins at the LCD screen foot RS232 and TV Video cable Interfaces from the top down are respectively RS232 interface to PC TV Video interface to a TV Video display device TV Video RS232 interface...

Страница 18: ...wn are respectively VGA video interface to the VGA interface on camera VGA interface to a VGA display device USB extension cable Interfaces from the top down are respectively Interface to the camera U...

Страница 19: ...ctively Interface to be inserted to the power interface on camera plug to be connected to a socket or wall outlet Camera with cables from the top down and from left to right the camera is connected wi...

Страница 20: ...ace and running the corresponding menu commands of Guide IrAnalyser software e g sub command Device Video of command Video under menu File you can view the live thermal video on PC control the camera...

Страница 21: ...lizes hot shoe technology it is still advisable to switch off the camera before attaching or detaching the LCD screen Do not force the LCD screen into or out of the mount to avoid damage of the contac...

Страница 22: ...es for the SD memory cards Ensure that saving or opening of images is complete before removing the SD memory card Do not use the SD memory card as a common removable disk for storing other information...

Страница 23: ...n Keep the pop up button depressed release the battery then the battery will bounce and you can pull it from the camera When pulling the battery please still keep the pop up button depressed Replace a...

Страница 24: ...steady Charging in an external battery charger Insert the battery into the battery charger This is done by aligning the end surface of the battery pack to the edge of the terminal shutter of this uni...

Страница 25: ...e camera Additional Information All rechargeable batteries gradually lose their charge over time when they are left in storage If the battery is to be left in storage or for a period of non use a top...

Страница 26: ...r menu options or to alter values of different parameters When there is a dialog box displayed in thermal image press the joystick to confirm selection and close the box When an option in the toolbar...

Страница 27: ...tically in the two auto modes and can be adjusted manually in manual mode When there is no menu displayed in live zoomed thermal image press button A for an instant to select the temperature setup men...

Страница 28: ...F4 then the camera will automatically focus till getting a clear image of the target Quick Start Guide Ensure that the battery is fully charged and the SD memory card is inserted in the camera Insert...

Страница 29: ...image Press button S to freeze the live image Press button S to store the frozen image into SD memory card or built in flash memory of the camera Press button C to return to the live thermal image Usi...

Страница 30: ...wn below is displayed with Guide logo and temperature setup menu lying at the right side status bar zoom bar memory media bar temperature display bar and time bar lying at the bottom Icon Significance...

Страница 31: ...mperature and the maximum temperature of the current image Time bar Show the current time of the camera Non Uniformity Calibration NUC After powering on the camera and the boot screen flash disappears...

Страница 32: ...thermal image To manually focus aim the lens at the target and then move the joystick up or down To automatically focus keep button F4 depressed till a frame appears in the image aim the frame at the...

Страница 33: ...an instant to select the temperature setup menu at the right side of the image Then the menu flickers indicating you change its option values now Move the joystick up or down to toggle between its opt...

Страница 34: ...to save the change and exit the menu Using the touch pen can also do the above operation Click the temperature setup menu with the pen first move the joystick left or right to change option values an...

Страница 35: ...s the center temperature the value of M indicates the maximum scene temperature Static Temperature Measurement This method is available when there is no menu displayed in frozen or saved thermal image...

Страница 36: ...played in the frozen or saved thermal image press button A for an instant to select the temperature setup menu at the right side of the image Move the joystick up or down to toggle between its options...

Страница 37: ...then press Button S to freeze the live image Now the image status changes to be frozen Prompt Frozen is shown in the status bar under the image screen Pressing button S again can save the frozen image...

Страница 38: ...al image display recording and playback of voice annotation adding text annotation histogram analysis etc When there is no menu displayed on the frozen image you can do static temperature measurement...

Страница 39: ...lysis Do spot analysis on the frozen image Line analysis Do line analysis on the frozen image Area analysis Do area analysis on the frozen image Isotherm analysis Do isotherm analysis on the frozen im...

Страница 40: ...ecording with the touch pen Or move the joystick up down left or right to toggle between the icons highlight the icon Start recording and then press the joystick to select it Now you can start recordi...

Страница 41: ...notation with the touch pen Or move the joystick up down left or right to toggle between the icons highlight the icon Text annotation and then press the joystick to select it Then the annotation dialo...

Страница 42: ...r in the status bar under the image screen when you try to store a new image If failing to save an image the prompt Save error will appear in the status bar under the image screen Replaying saved imag...

Страница 43: ...ss button S to highlight the icon first and then press the joystick to select the icon To toggle between each icons of the file toolbar click them with the touch pen or press button S After highlighti...

Страница 44: ...chosen either by clicking with the touch pen or by pressing button S to highlight first and then pressing the joystick to select or by moving the joystick left or right to highlight first and then pr...

Страница 45: ...nd Histogram analysis respectively To do the left analysis listed above bring up the replay toolbar by clicking icon Guide at the right top corner of the screen with the touch pen or pressing the joys...

Страница 46: ...oose it to open the previous image Replay text annotation Replay the text annotation added to the replayed image Exit command Exit the replay toolbar Spot line area and isotherm analysis is the same a...

Страница 47: ...n Then the recorded text will be displayed in a dialog box on the image screen To close the dialog box choose the button OK by clicking it with the touch pen or pressing the joystick To exit the repla...

Страница 48: ...not include text annotation Visual image The camera offers visual imaging function Visual image can be switched from its corresponding thermal image either in dynamic live status or static zoomed fro...

Страница 49: ...front of the camera To switch to thermal image press button F2 again or press button C Picture in Picture This function is available in live or zoomed or frozen or saved images Bring up the main menu...

Страница 50: ...matically switch to the mode Thermal image alone Pressing function button F2 again will switch to either the mode Picture in picture again or the mode Visual image alone To turn off this function brin...

Страница 51: ...e camera offers a user friendly Windows style main menu The main menu is brought up on the screen by either clicking the icon Guide at the right top corner of the screen or pressing the joystick when...

Страница 52: ...s are navigated by either clicking with the touch pen or moving the joystick left or right The highlighted option is confirmed by clicking with the pen or pressing the joystick To exit the menu system...

Страница 53: ...ystick In frozen images bring up the frozen toolbar with the touch pen or joystick Click the icon Spot analysis with the touch pen to select it Or move the joystick to highlight the icon Spot analysis...

Страница 54: ...and marked from A to H Clicking with the touch pen or pressing button S can toggle between them Temperature of the selected spot is displayed in the status bar under the image screen To move each spo...

Страница 55: ...lable in the spot analysis Press button C to exit and return to the live or zoomed or frozen or save image Line Analysis Line Analysis can be performed on live or zoomed or frozen or saved images In l...

Страница 56: ...then press the joystick to select it Then the cursor representing the starting point of the line is displayed in the image At this moment two methods are available to draw a line Method 1 Click and d...

Страница 57: ...nfirm the line At the meantime the line profile is displayed in the image as well with the Max and Min temperature of the line displayed in the coordinate system The default coordinate system is a hor...

Страница 58: ...an be performed on live or zoomed or frozen or saved images In live or zoomed images bring up the main menu select option Area under submenu File either by the touch pen or by pressing the joystick In...

Страница 59: ...n them Temperature of the selected area as well as the temperature measurement type Minimum Average or Maximum will be displayed in the status bar under the image screen To move each area after select...

Страница 60: ...by setting the value of sub option AreaFunc in option Analysis under submenu Parameter and then choosing button OK to confirm the setup It is possible to change the area number from 1 to 10 This is do...

Страница 61: ...analysis with the touch pen to select it Or move the joystick to highlight the icon Isotherm analysis first and then press the joystick to select it In saved images isotherm analysis can be done when...

Страница 62: ...et the minimum temperature of the isotherm band There are three isotherm colors to choose from This is done by setting the value of sub option IsoColor in option Analysis under submenu Parameter and t...

Страница 63: ...am to be Off In frozen or saved images press function button F3 Then histogram of the image will be displayed at the right bottom corner of the image Pressing button F3 again will close the histogram...

Страница 64: ...on Analysis Click option Analysis with the touch pen or press the joystick to select it Then the Analysis dialog box appears on the screen Clicking each option box with the touch pen or pressing butto...

Страница 65: ...S first and then pressing the joystick IsoColor To choose a certain color for isotherm black white or green SpotNum To set the number of spots for spot analysis up to 10 spots are available AreaNum To...

Страница 66: ...Moving the joystick left or right can toggle between each digit of the option values Emiss To set emissivity value between 0 01 and 1 00 RelHum To set relative humidity percentage value between 0 and...

Страница 67: ...ues if the values contain several digits TempUnit To set the temperature unit for measurement degrees Celsius or Fahrenheit FrameAver To set the number of frames for frame averaging algorithm to freez...

Страница 68: ...ss button C directly to cancel change Then the dialog box will be closed and the original image status will be resumed Option Function Click option Function with the touch pen or press the joystick to...

Страница 69: ...minutes or 60 minutes No operation indicates in live or zoomed images there is no click on the VGA LCD screen no operation of joystick or buttons and no menu or dialog box displayed in the screen Pow...

Страница 70: ...ing button No or pressing button C can give up the command To toggle between the buttons Yes and No press button S or move the joystick left or right To select them respectively click them with the to...

Страница 71: ...ect button Start to start adjustment The a cursor appears at the left top corner of the screen click its center with the touch pen then a cursor appears in the center of the screen click its center wi...

Страница 72: ...the pen and cursor will respond each other accurately Select button Exit or press button C to exit the interface and return to the live thermal image Note In the adjustment process improper adjustmen...

Страница 73: ...it Then the copyright dialog box appears on the screen Press button C or press the joystick to close the dialog box and return to the live thermal image Powering off the camera To power off the camera...

Страница 74: ...ve image Now you can view the live VGA video on LCD screen OLED viewfinder and the VGA display device VGA PAL output or VGA NTSC output When the camera and the TV video display device to be used are p...

Страница 75: ...ra insert it into the card reader and then insert the reader to a USB2 0 interface of the PC Then PC will identify the card as a removable hard disk With the help of corresponding menu commands in Gui...

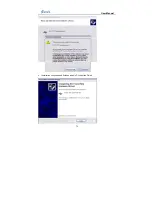
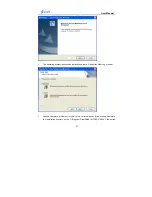
Страница 76: ...menu in the live thermal image properly connect the USB interfaces of the camera to a USB2 0 port of your PC with the USB extension cable Microsoft Windows launches a Found New Device Wizard to guide...

Страница 77: ...User Manual 77 Installation starts When getting to the step as shown below choose Continue anyway to proceed further...

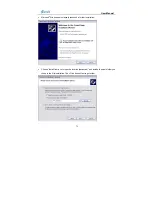
Страница 78: ...User Manual 78 Installation continues and finishes quickly Click button Finish...

Страница 79: ...rosoft Windows automatically launches a further installation Choose Install from a list or specific location advanced and include the same folder you chose in the first installation Then Click button...

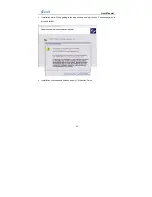
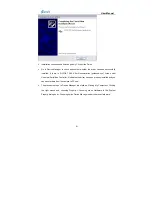
Страница 80: ...User Manual 80 Installation starts When getting to the step as shown below choose Continue anyway to proceed further Installation continues and finishes quickly Click button Finish...

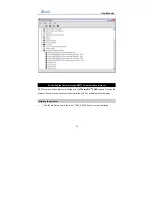
Страница 81: ...umeration guideusb sys listed under Universal Serial Bus Controller it indicates the driver has been properly installed and you can transfer data from the camera to PC now The procedures to go to Devi...

Страница 82: ...RS232 communication protocol is offered with the ThermoPro TM TP8S camera Through the protocol the camera can be conveniently controlled on PC at a remote monitoring place Installing the protocol y Cl...

Страница 83: ...em launches an installation wizard Click button Next to go further y Choose Complete or Custom to install it in a certain manner If you choose Complete the installation directory will be C Program Fil...

Страница 84: ...User Manual 84 Next to go further y The operating system is ready to install the protocol Click button Install to continue Then the installation will automatically progress...

Страница 85: ...used Using the protocol y Before using the protocol please ensure the camera and your PC have been properly connected by the RS232 video cable offered together with the camera Then click on the short...

Страница 86: ...ual 86 Parts Described y Three ports in PC for RS232 communication y Buttons for operating the camera y Display data that is corresponding to each operation and is exactly transmitted in PC Using the...

Страница 87: ...e joystick to select this option and execute the command corresponding to it y While doing spot analysis pressing it will navigate through the spots y While doing area analysis pressing it will naviga...

Страница 88: ...s moving the joystick up and down y When there is no menu displayed in live thermal image pressing them to zoom in or out the image continuously y While the main menu is displayed press them to toggle...

Страница 89: ...mory or SD memory card y Press it to toggle between spots and areas while doing spot and area analysis on live or frozen or saved thermal images y Press it to switch between horizontal and vertical co...

Страница 90: ...ght at the back of the camera shine steady Button F2 y Function is the same as button F2 on the camera y Press it in live frozen or saved thermal images to switch to visual image Button F3 y Functions...

Страница 91: ...defective Replace battery Image is blurry The target is not in focus Adjust focus Brightness and contrast are inappropriate Adjust Tmin and Tmax Visual image is blurry The target is not in focus Adjus...

Страница 92: ...calibration Emissivity What Is Emissivity The standard of radiation is blackbody radiation which exists in any enclosure whose walls are at a uniform temperature The shape of the enclosure and the wa...

Страница 93: ...ng on the value of emissivity and the characteristics of the thermometer This temperature is known as the apparent or brightness temperature of the surface If the emissivity is constant this temperatu...

Страница 94: ...are usually very wavelength dependent being higher at shorter wavelengths The appropriate settings for the ThermoPro TM TP8S IR Thermal Cameras are given in the following tables It must be remembered...

Страница 95: ...90 Graphite 0 85 Alloys Soot 0 95 Brass 0 10 Cement Concrete 0 90 Oxidized 0 61 Cloth 0 85 Metals Aluminium 0 05 Oxidized 0 30 Chromium 0 15 Cobalt 0 18 Gold 0 02 Iron Steel 0 18 Oxidized 0 85 Lead 0...

Страница 96: ...User Manual 96 Oxidized 0 11...

Отзывы: