background image

Store the cleaning cloths and other combustible 
material in sealed metal containers. These containers 
must be disposed according to local, national and 
regional provisions. 
When the appliance is operated the air pressure MUST 
NOT exceed 6.3 bar. Use a pressure regulator that will 
reduce the air pressure to 6.3 bar. 
ALWAYS use the appliance in a safe distance from 
people and animals. 
Make sure the speed of rotating of accessories parts 
corresponded to the speed of rotating of the impact 
tightener or was higher.


Before starting 

 
Air supply 

Important information on the appliance can be found in 
model specifications. 

Lubricate the appliance before putting it into 
operation (see the Maintenance part). 


Assembly 

Always disconnect the air supply hose when you want 
to assembly socket nuts or extensions on the 
appliance or disassemble them from the appliance.  


Operation  


Safety notice!  
Wear protective glasses! Wear ear 
protectors!   


Always empty water from the compressor tank and 
blow condensation out of the air hose before everyday 
operation. 


Now start your compressor. The maximum service 
pressure of air is 6.3 bar. 
The power (torque) of impact tighteners under primary 
working conditions is especially determined by three 
factors: 
a) service pressure used 
b) time of working step on the threaded joint. A normal 
work time for a threaded joint is 3-5 seconds on 
average.


c) setting of the switching lever, in relation to the 
threaded joint in proportion to the impact time. 
Due to the use of threads and materials of various 
hardness there is an increased friction, which causes 
higher torque without the thread being tightened more 
firmly. At rust-stained threaded joints, use appropriate 
agents dissolving rust before using the impact 
tightener. If the threaded joints still fail to unloose after 
3 to 5 seconds of impact time it is necessary to use a 
one lever bigger impact tightener. Do not overload the 

impact tightener above the specified power limit as it 
dramatically shortens the service life of the appliance. 
NOTE: The tightening torque on the threaded joint is 
directly connected with the thread firmness, appliance 
revolutions, condition of the power socket nuts used 
and time of use of the impact tightener at the given 
screwing. Use as direct and simple connection 
between the appliance and power socket nut as 
possible. Any extra connection and extension absorb 
and reduce the power. 


Picture 2 shows setting of enabling torques 


Pic. 2 A:

   Full enabling torque 

1,500 Nm


Pic. 2 B:

   Tightening torque, partial load 

300 Nm 

Pic. 2 C:

   Tightening torque, half load 

800 Nm


Pic. 2 D:

   Tightening torque, full load 

1,000 Nm


Maintenance and treatment 


Lubrication 


1.  Disconnect the impact tightener from air 

supply. 

2.  Add 4-6 drops of GUDE pneumatic oil, Order 

No. 40060 (we recommend the GÜDE mist 
lubricator, Order No. 41354) or corresponding 
oil to air inlet with the starter being pressed. 

3.  Now reconnect the appliance with air supply 

and leave it run for app. 30 seconds so that 
the surplus oil flowed out. 


This lubricating process corresponds to the reduction 
of humidity, dust and impurities that are in course of 
time deposited, when the appliance is used, in each 
compressor and thus reduce its power. This is best 
prevented by integrated oil tanks. 


Safety notice! Leaked oil can cause 
serious injuries. Cover the top of oil outlet 
after cloth greasing and leave the 
appliance run for several seconds so that 
surplus oil could safely flow out. Keep the 
cloth in a safe distance from the rotary 
parts! 


The air hose must be disassembled and larger volume 
of pneumatic oil poured to the air inlet each three 
months or if the impact tightener is used only 
sometimes. Reconnect the air hose and leave the 
impact tightener run for app. 30 seconds so that the 
compressor engine was cleaned. Follow the lubrication 
instructions after cleaning. 


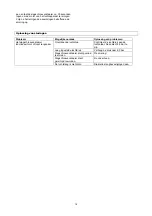
Failure removal 


Problem 

Possible cause 

Solving the problem 

Insufficient air pressure 

Check the air pressure on the air 
inlet. It must be 6.3 bar. 

Air pressure set low 

Increase the pressure to 6.3 bar  

Impact tightener must be oil-
lubricated 

See the Lubrication 

Impact tightener must be cleaned 

See the Maintenance 

Impact tightener is not working or is 
running slowly 

Air hose not tight 

Tighten all hose screwed joints 


22

Содержание 1/2" PRO

Страница 1: ... PRO Copyright Güde GmbH Co KG Birkichstrasse 6 74549 Wolpertshausen Germany 75130 Deutsch 3 Magyar 7 Čeština 10 Slovenčina 13 Nederlands 16 English 20 Français 23 Italiano 27 ...

Страница 2: ...1 1 2 3 4 2 2 ...
Страница 3: ... Warnung Warnung Achtung Gebote Vor Gebrauch Bedienungsanleitung lesen Tragen Sie einen Gehörschutz Tragen Sie eine Schutzbrille Tragen Sie eine Atemschutzmaske Umweltschutz Abfall nicht in die Umwelt sondern fachgerecht entsorgen Verpackungsmaterial aus Pappe kann an den dafür vorgesehen Recycling Stellen abgegeben werden Schadhafte und oder zu entsorgende elektrische oder elektronische Geräte mü...

Страница 4: ... dass der Kraftstecknüsse vor dem Einsatz sicher auf dem Antriebsvierkant des Werkzeuges angebracht ist Gewährleisten Sie immer einen stabilen und sicheren Stand und Arbeitsposition vor Benutzung des Werkzeuges Prüfen Sie vor jedem Einsatz dass die Leistungsregulierung richtig eingestellt ist Eine falsche Einstellung kann zum Brechen oder Abreißen der Schraubverbindung führen sowie zu unkontrollie...

Страница 5: ...r Die Leistung Drehmoment von Schlagschraubern unter primären Arbeitsbedingungen wird hauptsächlich durch drei Faktoren bestimmt a der verwendete Betriebsdruck b die Dauer des Arbeitsvorganges an der Schraubverbindung Normale Arbeitszeit für eine Schraubverbindung ist durchschnittlich 3 5 Sekunden c die Einstellung des Umschalthebels bezogen auf eine Schraubverbindung im Verhältnis zur Schlagdauer...

Страница 6: ...folgen Sie nach der Reinigung die Anweisungen zur Schmierung Störungsbeseitigung Problem Mögliche Ursache Lösung des Problems Unzureichender Luftdruck Prüfen Sie den Luftdruck am Lufteinlass Er muss 6 3 Bar betragen Niedrig eingestellter Luftdruck Erhöhen Sie den Druck auf 6 3 bar Schlagschrauber muss geölt werden Siehe Schmierung Schlagschrauber muss gereinigt werden Siehe Wartung Der Schlagschra...

Страница 7: ...ékszerek viselése Figyelmeztetés Figyelmeztetés vigyázz Utasítások Használat előtt figyelmesen olvassa el a használati utasítást Viseljen fülvédőt Viseljen védő szemüveget Viseljen respirátort Természetvédelem A hulladékot úgy semmisítse meg hogy ne károsítsa meg a környezetet A karton csomagolást adja át megsemmísítésre a hulladékgyűjtőbe A hulladékot úgy semmisítse meg hogy ne károsítsa meg a kö...

Страница 8: ...ító üzemeltetési szelep megfelelő állapotban legyen Tilos a gépet üzembe helyezni addig amig az erővel rátolható szerszámcsonkok nincsenek szilárdan és szabály szerint felerősítve a csavarfejre vagy az anyára A pneumatikus csövet és a csatlakozásokat rendszeresen ellenőrizze nincsenek e elkopva A gyorscsatlakozót kizárólag a szerelési utasítás szerint használja A gépet a fogantyúnál fogva szállíts...

Страница 9: ...rővel rátolható kulcsoktól és az illetékes esetben a kulcs használati idejétől függ A berendezéshez az erővel rátolható szerszámcsonkokkal használja a legközvetlenebb és a legegyszerübb csatlakozást Tudniillik minden csatlakozás és további meghosszabbítás csökkenti a szerszám teljesítményét A 2 ábra bemutatja a lazító erő beállítását 2 A ábra 1500 Nm teljes lazító erő 2 B ábra 300 Nm szorító erő r...

Страница 10: ...ošení šperků Výstraha Výstraha pozor Příkazy Před použitím si přečtěte návod k obsluze Noste chrániče uší Noste ochranné brýle Noste respirátor Ochrana životního prostředí Odpad zlikvidujte odborně tak abyste neškodili životnímu prostředí Obalový materiál z lepenky lze odevzdat za účelem recyklace do sběrny Vadné a nebo likvidované elektrické či elektronické přístroje musí být odevzdány do přísluš...

Страница 11: ...poje jakož i k nekontrolovatelným pohybům přístroje Před uvedením do provozu se ujistěte zda se přepínací ventil pro chod vpravo a vlevo nachází ve správné poloze Přístroj neuvádějte do provozu dříve než budou silové nástrčné ořechy pevně a správně usazeny na hlavě šroubu nebo matici Pneumatickou hadici a všechny přípojky kontrolujte pravidelně z hlediska opotřebení Rychlospojku používejte jen pod...

Страница 12: ...oje POZNÁMKA Utahovací točivý moment na šroubovém spoji přímo souvisí s pevností šroubu otáčkami přístroje kondicí použitých silových nástrčných klíčů a dobou použití rázového utahováku při daném případu šroubování Použijte nejpřímější a nejjednodušší spojení mezi přístrojem a silovým nástrčným ořechem Každé spojení a prodloužení navíc absorbuje a snižuje výkon Obrázek 2 ukazuje nastavení povolova...

Страница 13: ...šperkov Výstraha Výstraha pozor Príkazy Pred použitím si prečítajte návod na obsluhu Noste chrániče uší Noste ochranné okuliare Noste respirátor Ochrana životného prostredia Odpad zlikvidujte odborne tak aby ste neškodili životnému prostrediu Obalový materiál z lepenky je možné odovzdať s cieľom recyklácie do zberne Chybné a alebo likvidované elektrické či elektronické prístroje musia byť odovzdan...

Страница 14: ...evádzky sa uistite či sa prepínací ventil pre chod vpravo a vľavo nachádza v správnej polohe Prístroj neuvádzajte do prevádzky skôr ako budú silové nástrčné orechy pevne a správne usadené na hlave skrutky alebo matice Pneumatickú hadicu a všetky prípojky kontrolujte pravidelne z hľadiska opotrebenia Rýchlospojku používajte len podľa odporúčaní pre montáž Prístroj noste za rukoväť a nie za hadicu V...

Страница 15: ...iamo súvisí s pevnosťou skrutky otáčkami prístroja kondíciou použitých silových nástrčných kľúčov a dĺžkou použitia rázového uťahováka pri danom prípade skrutkovania Použite najpriamejšie a najjednoduchšie spojenie medzi prístrojom a silovým nástrčným orechom Každé spojenie a predĺženie navyše absorbuje a znižuje výkon Obrázok 2 ukazuje nastavenie povoľovacích momentov Obr 2 A Plný povoľovací mome...

Страница 16: ...bod op het dragen van sieraden Waarschuwing Waarschuwing Let op Aanwijzingen Vóór gebruik gebruiksaanwijzing lezen Draag een gehoorbeschermer Draag een veiligheidsbril Draag een mondkapje Milieubescherming Afval niet in het milieu maar vakkundig verwijderen Verpakkingsmateriaal van karton bij de daarvoor bestemde recyclingplaatsen afleveren Beschadigde en of verwijderde elektrische of elektronisch...

Страница 17: ... versleten is of zelfs haarscheuren vertoont Stel vast dat de opzetnippel voor het gebruik juist op het aandrijfvierkant van het werktuig is geplaatst Zorg altijd voor een stabiele en veilige standplaats en werkpositie voor het gebruik van het werktuig Controleer voor ieder gebruik of de vermogensregulering juist ingesteld is Een onjuiste instelling kan tot breken of afscheuren van de schroefverbi...

Страница 18: ...normale werktijd voor een schroefverbinding is gemiddeld 3 5 seconden c De instelling van de omschakelhendel betrokken op een schroefverbinding in de verhouding tot de slagduur Door het gebruik van schroeven en materialen van de meest verschillende hardheden komt een hogere wrijving tot stand die een hoger draaimoment veroorzaakt zonder dat de schroef vaster wordt aangetrokken Gebruik bij vastgero...

Страница 19: ...k Oplossing van problemen Onvoldoende luchtdruk Controleer de luchtdruk aan de luchtinlaat Deze dient 6 3 bar te zijn Laag ingestelde luchtdruk Verhoog de druk naar 6 3 bar Slagschroevendraaier dient geolied te worden Zie smering Slagschroevendraaier dient gereinigd te worden Zie onderhoud Het slagschroevendraaier functioneert niet of loopt langzaam De luchtslang is niet dicht Draai alle slangbeve...

Страница 20: ...y Warning Warning Attention Commands Read the Operating Instructions before use Wear earphones Wear protective glasses Wear a respirator Environment protection Dispose the waste professionally in order not to pollute the environment Packing cardboard material may be delivered to collecting centres for recycling Any damaged or disposed electric or electronic devices must be delivered to appropriate...

Страница 21: ...d left run is in a correct position Do not put the appliance into operation before the power socket nuts are firmly and correctly seated on the screw head or nut Regularly check the pneumatic hose and all connectors for wear Use the quick acting coupling as recommended for assembly only Carry the appliance with its handle not the hose In such cases your hand must not be near the operating button e...

Страница 22: ...The tightening torque on the threaded joint is directly connected with the thread firmness appliance revolutions condition of the power socket nuts used and time of use of the impact tightener at the given screwing Use as direct and simple connection between the appliance and power socket nut as possible Any extra connection and extension absorb and reduce the power Picture 2 shows setting of enab...

Страница 23: ...it Avertissement Avertissement attention Consignes Lisez le mode d emploi avant l utilisation Portez une protection auditive Portez des lunettes de protection Portez un masque Protection de l environnement Liquidez les déchets de manière à ne pas nuire à l environnement Déposez l emballage en carton au dépôt pour recyclage Déposez les appareils électriques ou électroniques défectueux et ou destiné...

Страница 24: ...nt de l appareil Adoptez une posture stable et sûre et une position de travail avant d utiliser l appareil Contrôlez avant chaque utilisation si la puissance est correctement réglée Un réglage incorrect peut engendrer la fissuration ou la rupture du raccord à vis ou des mouvements incontrôlables de l appareil Avant de mettre l appareil en marche assurez vous si le bouton de commutation pour la mar...

Страница 25: ... la durée de choc L utilisation des vis et matériaux de diverses duretés engendre l augmentation de la friction ce qui provoque l augmentation du moment de torsion sans serrer plus fort la vis Si le raccord à vis est rouillé veuillez utilisez un produit adéquat pour dissoudre la rouille avant d utiliser la clé à choc Si le raccord à vis ne cède pas après 3 à 5 secondes il est nécessaire d utiliser...

Страница 26: ...d air Elle doit s élever à 6 3 bars Pression d air réglée trop bas Augmentez la pression à 6 3 bars La clé à choc doit être graissée à l huile Voir Graissage La clé à choc doit être nettoyée Voir Entretien La clé à choc ne fonctionne pas ou fonctionne au ralenti Le tuyau d air n est pas étanche Serrez tous les raccords à vis du tuyau 26 ...

Страница 27: ...o leggere il Manuale d Uso Utilizzare sempre la protezione dell udito Utilizzare gli occhiali di protezione Utilizzare il respiratore Tutela dell ambiente Smaltire i rifiuti in modo professionale che non sia inquinato l ambiente Il materiale d imballo di cartone può essere consegnato al Centro di raccolta allo scopo di riciclo Gli apparecchi elettrici elettronici difettosi e o da smaltire devono e...

Страница 28: ... sul dado Controllare periodicamente il flessibile pneumatico e tutti raccordi dal punto di vista dell usura Il raccordo rapido utilizzare solo secondo i consigli per montaggio Trasportare l apparecchio reggendolo sul manico invece sul flessibile La Vostra mano in tal caso non si deve trovare né in vicinanza al pulsante di funzione Non tentare di reggere l apparecchio oppure guidare sulle noci fem...

Страница 29: ...ella bullonatura Tra l apparecchio e noce femmina di potenza utilizzare un collegamento più retto e più semplice Ogni collegamento ed allunga in più assorbe e diminuisce la potenza La figura 2 illustra l impostazione delle coppie d allentamento Fig 2 A Massima coppia d allentamento 1500 Nm Fig 2 B Coppia di serramento carico parziale 300 Nm Fig 2 C Coppia di serramento semicarico 800 Nm Fig 2 D Co...

Отзывы: