background image


GT-SL1 

Installation                                           

1. 

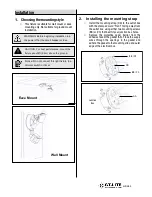
  Choosing the mounting style     


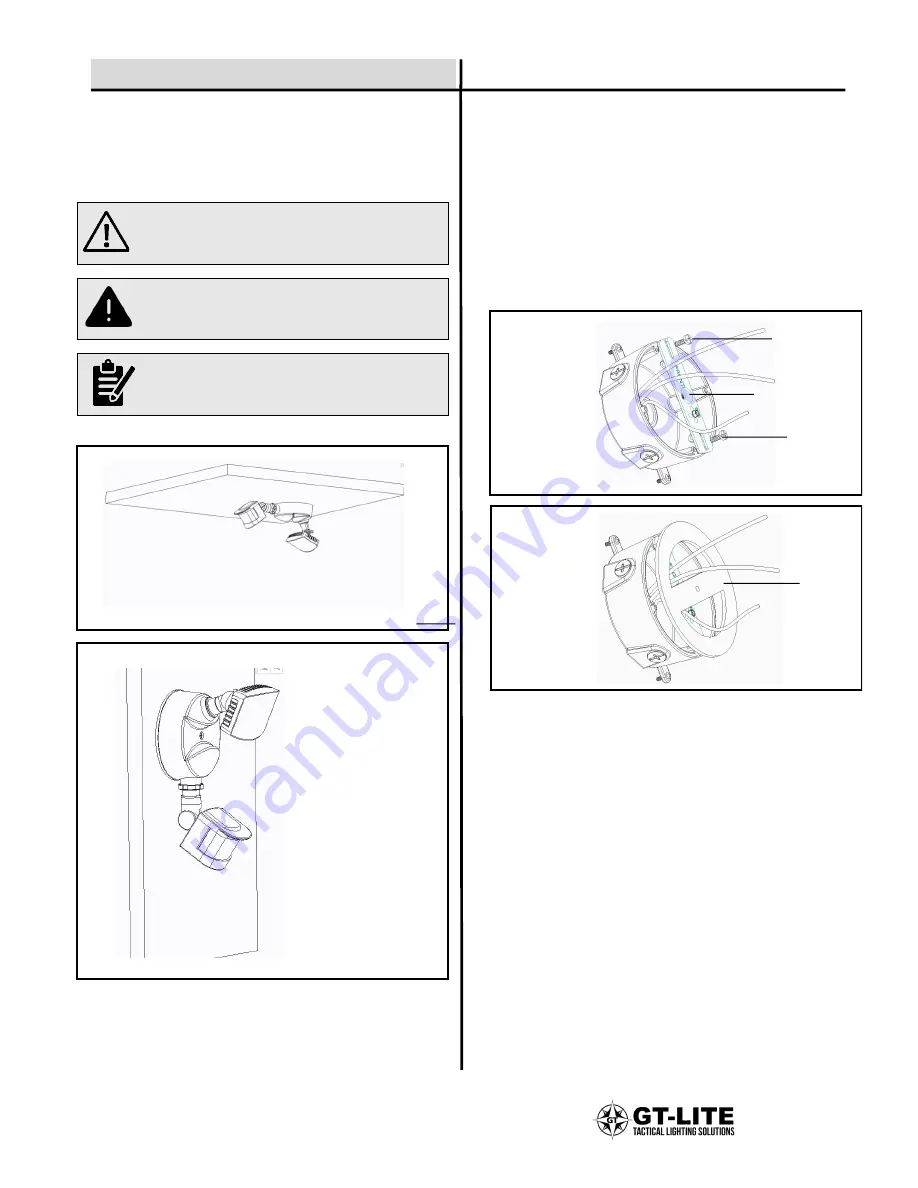
This fixture is suitable for wall mount or eave   

mounting only. Not suitable for ground mount   

installation. 


WARNING: Before beginning installation turn 
the power off at the circuit breaker or fuse. 

CAUTION: For best performance, mount the 
fixture about 8ft (2.4m) above the ground. 

Notice: Do not connect this light fixture to a 
dimmer switch or timer 

Eave Mount 

2.    Installing the mounting strap 

Install the mounting strap (DD) to the outlet  box 

with the stamped word “Front” facing away from 

the outlet box, using either two mounting screws 

(BB) or (CC) that best fit your junction box holes. 

Remove  the  protective  paper  barrier  from  the 

adhesive face of the gasket (AA). Trace the supply 
wires  through  the  openings  in  the  gasket  and 

adhere the gasket to the mounting strap and outer 
edge of the electrical box.


Wall Mount 

AA 

Junction 

Box 

BB / CC 

DD 

BB / CC 

Содержание GT-SL1

Страница 1: ...estions problems missing parts Please contact 1 800 865 6799 THANK YOU WARNING TO AVOID RISK OF ELECTRICAL SHOCK BE SURE TO SHUT OFF POWER WHILE INSTALLING OR SERVICING THIS FIXTURE WARNING TO AVOID RISK OF ELECTRICAL SHOCK BE SURE TO SHUT OFF POWER BEFORE INSTALLING OR SERVICING THIS FIXTURE ...

Страница 2: ...nclosure For proper operation and protection against damage the motion sensor head adjustment knobs must be facing the ground DO NOT mount below 5 feet IMPORTANT SAFETY INFORMATION When using product basis precautions should always be followed including the following Read and follow these instructions Heed all warnings including below warnings AND those included on product Save these instructions ...

Страница 3: ...ol the dusk to dawn sensor into thinking it is daylight TOOLS REQUIRED HARDWARE INCLUDED Part Description Quantity AA Gasket not to Scale 1 BB 6 32 3 4 in junction box screw 2 CC 8 32 3 4 in junction box screw 2 DD Mounting Strap 1 EE Wire Nut 3 FF Fixture Mounting Screw 1 GG O Ring 1 Philips Screwdriver AA BB CC DD EE FF GG ...

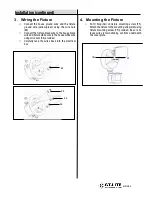
Страница 4: ...nnect this light fixture to a dimmer switch or timer Eave Mount 2 Installing the mounting strap Install the mounting strap DD to the outlet box with the stamped word Front facing away from the outlet box using either two mounting screws BB or CC that best fit your junction box holes Remove the protective paper barrier from the adhesive face of the gasket AA Trace the supply wires through the openi...

Страница 5: ...use black wire and fixture white wire to the house white wire using wire nuts EE provided Carefully tuck the wires back into the electrical box 4 Mounting the Fixture Put O Ring GG on fixture mounting screw FF Attach the fixture to the mounting strap DD using fixture mounting screw FF provided Be sure no loose wires remain sticking out from underneath the cover plate EE EE EE EE FF GG ...

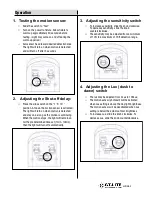
Страница 6: ...is continuing When the motion stops the light will remain on for the predetermined time set 1min 10min then the light will turn off automatically 3 Adjusting the sensitivity switch To increase sensitivity slide the knob clockwise To decrease sensitivity slide the knob counterclockwise The sensitivity may be adjusted from a minimum of 10ft to a maximum of 70ft detection range 4 Adjusting the Lux du...

Страница 7: ...t from the bulbs may be turning the motion sensor on and off Heat is being reflected from other objects and may be turning the motion sensor on and off Reposition the lamp heads away from the motion sensor Decrease the sensitivity setting or reposition the motion sensor The lights stay on continuously The motion sensor may be picking up a heat source such as an air conditioner dryer vent or bright...

Страница 8: ...inst tarnishing flaking and discoloration If the original purchaser ceases to own the GT Lite Lighting product this warranty and any implied warranty will be void This warranty does not cover damage caused by misuse or abuse including but not limited to improper installation improper usage accident negligence unauthorized repair unauthorized modifications or unauthorized maintenance of the fixture...

Отзывы: