background image


- 21 - 

STIM 1916 CT


102

  In the 

IP Address

 column, type the multicast IP address of the IP stream 

that you want to receive.

—>  Multicast IP addresses must NOT be used twice.


103

  In  the 

Port

  column,  type  the  port  to  the  multicast  IP  address  of  the  IP 

stream.


104

  The TS and ON IDs of the stream are displayed in the 

TS / ON ID

 column.


105

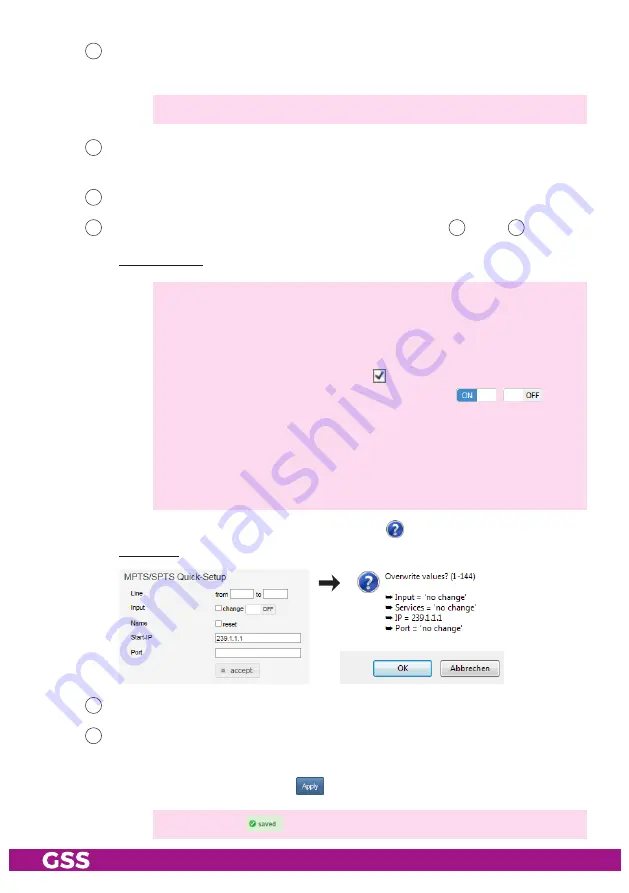
  Herein you can perform a quick setup for columns 

100

 up to 

103

.


Quick Setup:

—>  By entering "Line - from - to" you can select the lines for which you 

want to make changes. If you do not enter a value, programming 
is carried out from line 1 to line 144, but only for those columns for 
which you have entered changes.

—>  If you set a check mark at "Input   change", the corresponding inputs 

are switched on or off depending on selection 

/

.


You can delete the contents of column "Name" when selecting "re-
set".


In the "Start IP" field, you can enter the output IP address for the first 
row. This address is then increased by 1 in each additional row.


An Entry in field "Port" is transferred to all fields in the column.


• 

Click on "accept", check the information   and confirm with "OK".


Example:


106

  Sum of the input data rates of all activated input lines.


107

  Before leaving the menu, changes must be transferred to the head-end 

station!


• Therefore click on button 

.

—>  After that 

 is displayed for a short time in the upper right corner.

Содержание STIM 1916 CT

Страница 1: ...Assembly Instruction STIM 1916 CT Default access data 192 168 0 120 User admin Password geheim ...

Страница 2: ...ging a Case Fan 13 4 Configuration Updates 14 4 1 Initial configuration 14 4 2 Configuration 17 Overview window 17 Perform changes 19 Number format 19 Configuration menus 20 Input 20 Output 22 Multiplex 26 NIT 28 LCN Logical Channel Numbering 32 System menus 34 Logbook 34 Notification 35 Network 37 OpenVPN 38 Security 39 Firmware 40 Output Modulation of Head end Station 40 System settings 41 Firmw...

Страница 3: ...d out without difficulties The head end station should only be installed in a room where the permis sible ambient temperature range 0 C 50 C can be maintained even during fluctuations in climatic conditions To avoid too strong interacted heating of the head end stations it is not admissible to mount them one upon the other without using thermic precau tions e g permanently air recirculation ventil...

Страница 4: ...exclusive right of use for the Open Source Software by the respective right holders used the conditions stipulated by the respective valid license terms apply The license terms of this license only apply to the components which are not listed as Open Source software In relation to the licensor the regulations on liability and warranty in these license terms apply for the whole software The liabili...

Страница 5: ... The product fulfils the guidelines and standards for CE labelling page 45 Unless otherwise noted all values are specified as typical Input data Maximum over all input data rate lines 1 32 900 MBit s Buffer memory 1 GBit corresponds e g at 16 x 50 MBit s to approx 16 x 50 ms buffer IGMP V2 Protocols UDP User Data Protocol RTP Real Time Transport Protocol Multiplex Services max 256 PCR Corrections ...

Страница 6: ...5 Ω LAN interfaces for HTML control update Standard 100 BASE T Connections LAN for data 1000 BASE T 1 RJ45 socket LAN for control 100 BASE T 2 RJ45 sockets RF output 1 F socket RF test output 25 dB 1 F socket General Mains units 2 redundant can be replaced separately during operation Mains voltage 100 240 V 50 60 Hz Power consumption max 50 W Cooling fans 3 can be replaced separately during operat...

Страница 7: ...m as 16 QAM or 16 COFDM modulated transponders General The station is equipped with one LAN input one RF output and one test output 25 dB RF OUT Modulator 1 Combiner TEST 25dB MUX LAN Data 16 x MPTS 128 x SPTS IN Modulator 16 The configuration of the station is to be done via an HTML user interface via a PC and a standard HTML browser connected to the configuration input Con trol ...

Страница 8: ...e terminals dependent on your mobile contract additional connection costs data transfer costs may also be incurred here 16 LEDs provide an indication of the status of the 16 output lines based on their colour and indicate if the respective modulator is switched on LED illumi nates or off The LEDs are blinking red green during data overflow The station is powered by two independent power supplies r...

Страница 9: ...tors 12 Fan screws 13 PSU releases 14 PSU brackets 15 IEC connectors C14 connectors for mains cables 16 PSU status LEDs 17 Connector for potential equalisation 20 RF output 21 RF test output 25 dB Reset IP address host name password hold depressed for more than 5 seconds to 192 168 0 120 gss geheim Green good signal red no signal red green blinking data overflow off modulator off Power off no faul...

Страница 10: ... nuts 26 at the installation site We recommend the use of lateral slide rails component carriers in order to relieve the front panel 26 Screw the unit with the mounting screws 28 and the washer 27 to the four cage nuts 26 27 27 28 28 3 3 Potential equalisation PE Equalise the potential PE in accordance with IEC EN DINEN60728 Connect the PE connection terminal 17 to a PE rail supplied by customer u...

Страница 11: ...or con nections Thereby note the voltage specified on the device This device has no primary power switch and is in standby mode im mediately after connecting the operating voltage Power ON OFF 8 switches only the secondary DC voltages For a complete disconnection from the mains both mains plugs must be pulled out of the mains sockets Ensure that the mains plugs can be pulled out without difficulti...

Страница 12: ...OL input to the Internet is established and warning e mails are configured in the device settings 14 15 16 13 14 15 16 13 Caution Dangerous voltage Separate all power sources A defective power module can be exchanged during operation Remove the mains cable from the defective power module Move release 13 in direction of the arrow and pull the power module out of the device by bracket 14 Insert the ...

Страница 13: ...Mount the new fan screws 12 An arrow on the fan housing indicates the flow direction Mount the fan so that the air stream is passed into the device Shorten if necessary connecting cables in accord ance The cable ends must be stripped 6 7mm Push the connecting cables in the space between the fan and case ground Attach the stripped ends of the connecting wires to the appropriate termi nals pressure ...

Страница 14: ...ble directly to a configuration input 7 The PC and the head end station must be within the same network same IP address range Cookies must be accepted and JavaScript must be active Use current browser versions Example for IP address setting with Windows 7 operating system For the initial setup open the properties for TCP IPv4 of the PC Control Panel Network and Sharing Center LAN connection Proper...

Страница 15: ... 1916 CT Internet Protocol Version 4 TCP IPv4 Properties Activate point Use the following IP address Enter e g 192 168 0 2 for the IP address Enter for the Subnet mask 255 255 255 0 Confirm the setting with OK ...

Страница 16: ...ord and click on button Login The default password is geheim For further logins observe the menus System Network and System OpenVPN The Overview window is displayed First an empty table is displayed as with all menus While the data is read from the device is displayed Changes in the menus are only transmitted to the head end station when you click the button before leaving a menu ...

Страница 17: ...tion you have access to the menus of the Configuration settings Input page 20 Output page 22 Multiplex page 26 NIT page 28 LCN page 32 53 Herein the installed firmware version is displayed 54 This location text can be modified arbitrary in menu System User If you remote control head end stations at different locations herein you can enter the location and a local contact person 55 Select menu lang...

Страница 18: ...put lines 17 144 name multi cast IP address port and included services Via the background colour of column Line you are informed about the quality of the input signals good no signal or whether the input is switched off If in menu Configuration Input page 20 stream names are NOT as signed the name of the station of each stream is displayed 61 Overview of the transponders set for the output lines 1...

Страница 19: ...be transmitted to the head end station Therefore click on button After that is displayed for a short time in the upper right corner Number format For entering indication of the different IDs the number format can be set to hexadecimal or decimal in menu System Firmware ...

Страница 20: ...good no signal or whether the input is switched off 100 101 102 103 104 100 102 103 104 107 106 105 100 In column Input you can deactivate the input of not used lines This prevents unwanted unnecessary data traffic on the network If the sum of the input data rates of all input lines ex ceeds 900 MBit s 106 you must switch off corre sponding input lines 100 101 In column Name you can enter a person...

Страница 21: ... to line 144 but only for those columns for which you have entered changes If you set a check mark at Input change the corresponding inputs are switched on or off depending on selection You can delete the contents of column Name when selecting re set In the Start IP field you can enter the output IP address for the first row This address is then increased by 1 in each additional row An Entry in fi...

Страница 22: ...olour of column Line you are informed about the quality of the input signals good no signal a possible exceeding the output data rate or whether the modulator is switched off 150 The upper value shows the current needed data rate The lower value shows the maximum possible output data rate depend ing on the output settings The background colour in column Line indicates an output data overflow In th...

Страница 23: ...cy rang es below them we recommend starting with frequency 306 MHz going back in steps of 8 MHz see frequency table on page 44 Please note thereby that many DVB T receivers cannot receive the channel ranges S21 S41 306 466 MHz 153 Only if the RF output is set to QAM page 40 In column SR kS s enter the desired output symbol rate of the individual lines The background colour in column Line indicates...

Страница 24: ...column CR During a transmission data can be lost or changed To recover this data redundancy is added to the signal to be transmitted forward error cor rection The factor of the quantity of redundancy contained in the bits transmitted is called code rate Using the setting C7 8 you can get the highest output data rate at low est redundancy 159 Only if the RF output is set to COFDM page 40 Setting of...

Страница 25: ...0dB unchanged level 31dB 31dB attenuation off Level 0 no output signal Changes must be transmitted to the head end station Therefore click on button 180 Before leaving the menu changes must be transferred to the head end station Therefore click on button After that is displayed for a short time in the upper right corner ...

Страница 26: ...reviously achieved peak value max maximum possible data rate depending on the settings in the Output menu With button Reset hold value reset the previously achieved peak values of the data rate max hold 223 The input lines are displayed in the Line column 224 The individual services are displayed in the Service column 225 The DR column displays the current data rates of the individual services Thi...

Страница 27: ...Multiplex mode Selected services are output on one line with additional services from other sources multiplex or on multiple lines Unknown PIDs are NOT output Data overflow a data overflow after changes in the table can not be displayed until the changes have been saved with button Make sure not to exceed the maximum data rate output line 222 max which is depending on the modulation settings in th...

Страница 28: ...present at the inputs is output deactivate No NIT is output 241 Herein you can change the Network ID For entering indication of the different IDs the number format can be set to hexadecimal or decimal in menu System Firmware 242 Herein you can enter a NIT version The maximum possible value is 1F 31 243 Herein you can enter a network name 244 Button Load resets the network ID the version and the ne...

Страница 29: ...ated In column Options the button for Edit and Delete are displayed if transponders are added manually 249 250 or if an error occurs Edit a QAM transponder Edit a COFDM transponder If you delete an entry all related LCNs will also be deleted 246 Indication of Code rate Guard interval Bandwidth and Mode of COFDM transponders 247 Create the NIT Manually added 249 250 or imported 252 transponders wil...

Страница 30: ...nts are indicated by a warning icon Added transponders of a second station are marked in column Line by a For entering indication of the different IDs the number format can be set to hexadecimal or decimal in menu System Firmware 251 Here you can export the NIT and LCN You can add these to a second station or use it as a backup 252 Herein you can restore a NIT and LCN from a backup or e g add the ...

Страница 31: ...Now finally you must export the revised NIT Then load this file into the second station like a backup Now both stations have identical NITs Restore a backup First delete the NIT 248 Thereby the LCNs are also deleted This ensures that all stations play out the same NIT and LCN Click on button Upload 252 and select the backup file bin In the selection window click on button Open The data is added Cl...

Страница 32: ... SD receivers will use the service in SD quality 260 Herein enter the LCNs for SD receiving devices Via button the next free LCN is suggested a click then assigns them 261 Herein enter the LCNs for HD receiving devices also SD channels Ensure that the receiving devices support HD LCN error free Other wise we recommend to use exclusively SD LCNs 262 Herein you can switch on or off the Private Data ...

Страница 33: ...nes if required 265 Herein you can add services manually Only TS ON IDs are available which are regis tered in the NIT For entering indication of the different IDs the number format can be set to hexadecimal or decimal in menu System Firmware 266 Via this button you can delete all SD LCNs 267 Via this button you can delete all HD LCNs 268 Via this button you can export LCNs as a bin file The expor...

Страница 34: ...ble troubleshooting 300 Herein you can select whether only one line is displayed or all lines are displayed 301 Via this button you can clear the logbook 302 Via this button you can refresh the indication Please also note the items 310 and 311 in the Notification menu page 35 The logbook is included in the protocol file page 17 ...

Страница 35: ... central syslog server here in order to have the logbook entries sent there Therefor the configuration interface must have access to the Internet 312 314 316 313 317 310 311 315 318 320 319 321 310 Enter the duration in seconds that an input signal or data overflow error must occur for an entry to be made in the logbook 311 Enter here the duration in seconds which must be a signal OK again for an ...

Страница 36: ... e mail the contact details which are stored in menu System User are displayed to identify the head end station 319 Enter here how long new e mails will not be sent In order to prevent you e g in case of changing reception condi tions from being flooded with e mails the function is blocked for 1 hour after sending an e mail The lock can be removed by deleting the logbook 320 Here you can enter the...

Страница 37: ...rk you must enter different names here Write down the IP addresses and the Host name Further access to the device is only possible via the IP address of the configuration interface or the host name If you have forgotten your IP address you can reset the network settings and the password by the reset button 3 page 9 For remote access it is important to setup a gateway with Internet access The MAC a...

Страница 38: ...pened e g at the router Open menu System OpenVPN Copy the Personal Link http into the address line of your browser and store it as favourite As there is no Internet connection at the system start for the initial configura tion you need to reboot the device after configuration System Firmware Restart If there is no Internet connection at the system start the OpenVPN service is deactivated temporari...

Страница 39: ...ess to the station For authorisation enter the old password and after that the new pass word twice Before leaving the menu changes must be transferred to the head end station Therefore click on button After that is displayed for a short time in the upper right corner If you have forgotten your password you can reset the network set tings and the password by the reset button 3 page 9 ...

Страница 40: ...restart warm start can be done The manager allows you to store different configura tions in the head end station 332 331 333 337 330 334 335 336 338 341 344 340 339 343 342 Output Modulation of Head end Station 330 Herein select the kind of output modulation for the whole head end sta tion QAM or COFDM By default QAM modulation is set for the output and confirm a change in the output modulation by...

Страница 41: ... the head end station Therefore click on button After that is displayed for a short time in the upper right corner Firmware update 336 Herein the firmware version of the head end station is displayed Start the firmware update via button Load firmware update from PC Select the new firmware file tar in the appearing pop up menu Therefor the firmware must be previously stored on your PC The current f...

Страница 42: ...he configuration with the Save actual config but ton Load a configuration stored in the manager 340 In the Saved configurations field select a saved configuration and load it with the Load config button Delete a configuration stored in the manager 341 In the Saved configurations field select a saved configuration and de lete it with the Delete config button Reset to factory defaults 342 Reset the ...

Страница 43: ...ming interface eth1 Enter the IP address you want to ping and click the Ping button User In section User you can adjust the location based data that is displayed in the header of the menus accordingly If you remotely manage multiple head end stations you know at any time at which station you just work In the Notes field you can enter any text that will be displayed in the overview as a reference B...

Страница 44: ...00 C 32 562 00 C 33 570 00 C 34 578 00 C 35 586 00 C 36 594 00 C 37 602 00 C 38 610 00 C 39 618 00 C 40 626 00 C 41 634 00 C 42 642 00 C 43 650 00 C 44 658 00 C 45 666 00 C 46 674 00 C 47 682 00 C 48 690 00 C 49 698 00 C 50 706 00 C 51 714 00 C 52 722 00 C 53 730 00 C 54 738 00 C 55 746 00 C 56 754 00 C 57 762 00 C 58 770 00 C 59 778 00 C 60 786 00 C 61 794 00 C 62 802 00 C 63 810 00 C 64 818 00 C...

Страница 45: ...er Straße 43 D 90471 Nuremberg CLASS CLASS KLASSE KLASSE Phone 49 0 911 633 240 0 Fax 49 0 911 633 240 98 www gss de en info gss de Service Phone 49 0 911 633 240 90 service gss de Alterations reserved Technical data E O E by GSS Grundig Systems GmbH V42 006 2019 ...

Отзывы: