Trio Touch
5
Carefully remove your
DAB+ Micro System
from the box. You may wish to keep the packaging for future use.
In the Box
Inside the box you will find:
DAB+ Micro System (Main Unit)
Power Adapter
Remote Control
iPod/iPhone docking cradles 5pcs
Stripped Speaker cable x 2sets (20cm and 200cm length)
User Guide
Positioning your DAB+ Radio
Place your
DAB+ Receiver
on a flat and stable surface. Make sure it is not subject to vibrations or movement.
Avoid the following locations:
Where it will be close to heat radiating sources
Where humidity is high and/or there will be poor ventilation
Where it will be dusty
Where it will be damp or a possibility of water dripping or splashing onto the unit.
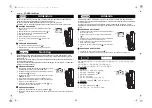
Adjusting the Antenna
The aerial should be extended to ensure good reception in both DAB+ and FM radio modes. It may be necessary to
alter the position of the
DAB+ Radio
and /or aerial to achieve the best signal.
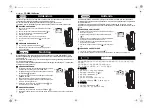
Using Headphones
To listen to your DAB+ Radio via Headphones, you will require headphones with a 3.5 mm diameter stereo plug (not
included). The Headphone Socket is located on the back of the unit. Plug the Headphone Jack into the Headphone
socket and the speaker sound will automatically turn off once the headphones are plugged in.
Turning the Unit On/Off
Connect the power adaptor to the DC jack on the back of the unit. Then insert the power adaptor into the desired wall
outlet. Press and hold the Volume Knob to turn on the unit. To turn off the unit press and hold the Volume Knob
again.
TRIO TOUCH Micro System