background image

- 21 - 

PVR File System (only for DTV) 

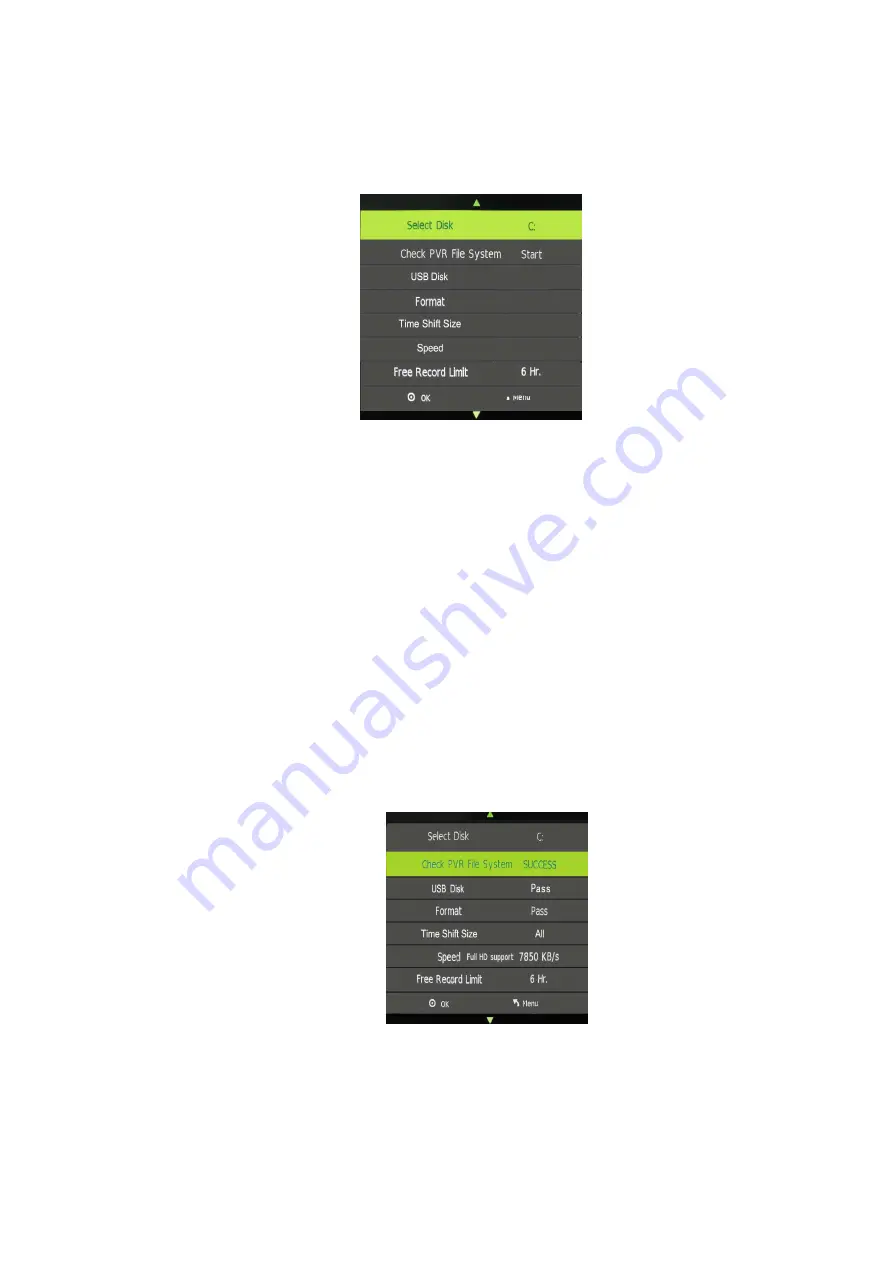
Press the UP or DOWN Buttons to select PVR File System, then press the OK Button to enter sub-Menu 

and then use the UP or DOWN Buttons to scroll through the options. Select Check PVR File System and 

then press the OK Button to enter. This function will check the USB speed. 


Select Disk 

If you are using a Hard Disc Drive for recording and your Hard Disc Drive has more than 2 partitions, you 

are able to select ONE Partition for recording. You can press the OK Button and then the Right or Left 

Button to select the particular partition for recording. For example C or D partition, etc. The recording file 

will be saved in the partition you selected. If you are using a USB device for recording, you can only select 

USB for recording.     

Check PVR File System 

Here is where you are able to check your USB or Hard Disc Drive format and see if the USB or Hard Disc 

Drive you are using is compatible. If your USB or Hard Disc Drive is not compatible, you will see FAIL on the 

screen. You will then need to format the device. If it is compatible then "SUCCESS" will be displayed.   

Note: 

You will ONLY be able to perform program recording when your Hard Disc Drive or USB device is 

shown as compatible.   


Format 

There are two types of format: FAT32 and Hi Speed Format. Press the Right or Left Navigation Buttons to 

All manuals and user guides at all-guides.com

Содержание Meglio series

Страница 1: ...All manuals and user guides at all guides com a l l g u i d e s c o m...

Страница 2: ...ead the instructions relevant for your model Your safety is very important Please ensure you read the Safety Instructions before you operate this unit The MEGLIO range has been designed to give you ma...

Страница 3: ...NS 11 TELETEXT 12 MAIN MENU OPERATIONS 13 CHANNEL MENU 13 PICTURE MENU 15 SOUND MENU 16 TIME MENU IN TV MODE ONLY 17 LOCK MENU 18 SETUP MENU 20 EPG MENU 23 DTV RECORDING 25 MULTI MEDIA OPERATION 26 PC...

Страница 4: ...are missing from the below list please contact the warranty line on 1800 509 394 LED LCD TV Remote Control Operation Manual DC Adaptor Power Cord GLED2211HDV W only RCA Cable RF Input Adaptor Lead GLE...

Страница 5: ...cessively warm locations to prevent damage to the cabinet or component failure Do not cover the ventilation openings when using the TV TV STAND INSTALLATION Please see the below instructions of how to...

Страница 6: ...l retailer To attach your bracket use the 4 holes provided to screw your bracket to your TV Please note that you will also have to remove the base stand and neck Before mounting your TV onto wall you...

Страница 7: ...4 VIEW OF THE TV AND FUNCTIONS Front View Back View GLED2211HDV W Back View GLED3211HDV W All manuals and user guides at all guides com...

Страница 8: ...2 HDMI1 Input The HDMI Input allows you to connect your HDMI Cable for greater definition 13 HDMI2 Input The HDMI Input allows you to connect your HDMI Cable for greater definition 14 Y Input The Y In...

Страница 9: ...tor or view movies 17 RF IN To connect the external aerial 18 Coaxial Output The Coaxial Out allows you to connect the TV to your surround sound system 19 USB Input The USB Input enables you to insert...

Страница 10: ...7 REMOTE CONTROL All manuals and user guides at all guides com...

Страница 11: ...11 VOL Button Press this button to decrease the volume level 12 Teletext Button Press this button to enter the Teletext Menu 13 DVD M Button Press this button to display the DVD Disc Menu 14 REWIND Bu...

Страница 12: ...DVD SETUP Button Press this button to display the Set Up Menu in DVD mode Press it again to exit DVD setup menu 34 SUB Button Press this button to turn ON or OFF the subtitle feature In DVD mode pres...

Страница 13: ...rent type 4 If you don t intend to use the remote control for an extended period remove the batteries to prevent possible leakage and corrosion PLEASE NOTE Do not drop shake or step on the remote cont...

Страница 14: ...at matches the power specifications AC 100 240 Volts 50 60 Hz of this TV PLEASE NOTE After AV YPBPR or HDMI is selected ensure the Video Output from your connected accessory for example DVD player is...

Страница 15: ...ICTURE Button repeatedly to cycle through the available video picture modes 9 Press the SOUND Button repeatedly to cycle through the available sound modes 10 Press the INFO Button to display the infor...

Страница 16: ...WN Buttons to select a below sub Menu and then press the OK Button to confirm To exit the Channel Menu press the Menu Button Auto Tuning Once Auto Tuning is selected you will see an OSD below Tune Typ...

Страница 17: ...ess the OK Button to begin search Press the MENU Button to return to previous Menu or press the EXIT Button to exit Programme Edit Press the UP or DOWN Buttons to select Programme Edit in the Channel...

Страница 18: ...Standard Dynamic Mild and Personal You are only able to set the Contrast Brightness Colour or Sharpness in Personal mode To change the Picture Mode press the OK Button to enter the sub menu and then...

Страница 19: ...then press the UP or DOWN Buttons to scroll through the sounds modes Press the OK Button to confirm Treble Press the LEFT or RIGHT Button to adjust the treble Bass Press the LEFT or RIGHT Button to a...

Страница 20: ...t the Time Zone here The default is New South Wales GMT 10 Sleep Timer You can set the Sleep Timer to OFF 10mins 20min 30min 60mins 90mins 120mins 180mins or 240mins press the UP or DOWN button to scr...

Страница 21: ...tation rescan or to restore the TV to its factory settings The following lock options Block Program Parental Guidance and Key Lock can only be turned on when you set Lock System to ON Set Password To...

Страница 22: ...s the OK Button to enter Then press the LEFT or RIGHT Buttons to turn the feature ON or OFF You need to set Hotel Mode to ON to enable Hotel Lock Source Lock This option allows you to lock specific so...

Страница 23: ...p Menu press the MENU Button then press the LEFT or RIGHT Button to select the Option Menu and press OK Button to confirm Press the UP or DOWN Buttons to scroll through the options in the Setup Menu P...

Страница 24: ...r example C or D partition etc The recording file will be saved in the partition you selected If you are using a USB device for recording you can only select USB for recording Check PVR File System He...

Страница 25: ...lank partition on your Hard Disk to ensure you don t lose any data Do NOT unplug your Hard Disc or your USB device during formatting or it will damage your device Speed If the speed of your Hard Disc...

Страница 26: ...e cleared This should be used if you experience any issues with your TV Software Updated USB Press the UP or DOWN Buttons to select Software Update USB Then press the OK Button to update software by u...

Страница 27: ...Auto the start time and end time of recording are depended on the broadcasting program When the recording has been set to Once Everyday or Weekly you will be able to set the start time and end time f...

Страница 28: ...currently watching press the REC Button and a red icon will appear on the screen The record time length and remaining record Time will be displayed in the menu below To conceal or reveal the menu pres...

Страница 29: ...ear at the left of the screen which shows that time shift is being performed To conceal or reveal the menu press EXIT Button To stop time shifting press the Stop Button or move the cursor to select th...

Страница 30: ...d the below Screen Menu will appear Only available when Inputting PC RGB signal Press the UP or DOWN Button to select the option that you want to adjust in the Screen Menu and press the Button to adju...

Страница 31: ...player from the right side It will start to read the disc automatically Press the EJECT Button on the remote control the disc will automatically eject Note Insert the disc with reflective data side f...

Страница 32: ...E This Menu enables you to select one of the three aspect ratios 4 3 PS 4 3LB 16 9 It is depended on your disc PASSWORD This is used to lock and unlock the RATING setting The default setting is locked...

Страница 33: ...y be modified from this menu DYNAMIC RANGE The Dynamic Range allows you to adjust the compression ratio for different audio effect When you select FULL the peak signal value is smallest and when you s...

Страница 34: ...been connected firmly Check that the Mute setting is not on and that your Audio Settings are correct Conduct a restore setting to return settings back to the factory default and clear any incorrect s...

Страница 35: ...emodulator COFDM OFDM Mod 2K 8K FFT SFN and MFN Packed Carries 2K 8K Guard Interval 1 4 1 8 1 16 1 32 Tuner Integrated and frequency synthesis USB Compatible with DivX MPEG4 MPEG2 MPEG1 BMP JPEG MP3 M...

Страница 36: ...e mod Demodulator COFDM OFDM Mod 2K 8K FFT SFN and MFN Packed Carries 2K 8K Guard Interval 1 4 1 8 1 16 1 32 USB Compatible with DivX MPEG4 MPEG2 MPEG1 BMP JPEG MP3 MP4 WMA MOV AVI MKV WMV AC3 AAC Ter...

Страница 37: ...0X480 37 500 75 000 800X600 37 879 60 317 800X600 48 077 72 188 800X600 46 875 75 000 1024X768 48 363 60 004 1024X768 56 476 70 069 1024X768 60 023 75 029 1152X864 67 500 75 000 1280X1024 63 981 60 02...

Страница 38: ...does not correspond with the usual standard This is not however an error You can improve this situation by altering any automatic setting or by manually changing the phase setting and the pixel freque...

Страница 39: ...normally or has been dropped 8 The TV should not be exposed to dripping or splashing water no objects filled with liquids such as vases should be placed on the TV 9 If the TV is to be built into a co...

Страница 40: ...re does not amount to a major failure In the unlikely event that your product fails to work normally please contact Grundig Warranty on 1800 509 394 Australia or 0800 450 259 New Zealand and have your...

Отзывы: