
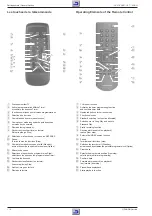


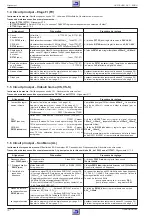

GV 27 EURO, GV 7… EURO
Partie générale / General Section
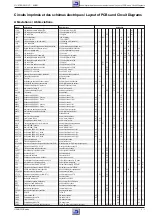
GRUNDIG Service
1 - 11
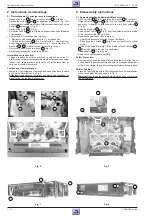
Instructions pour la maintenance
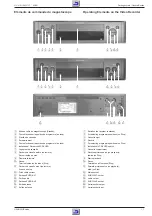
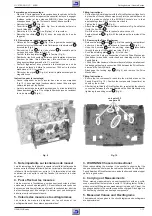
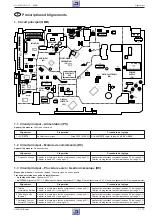
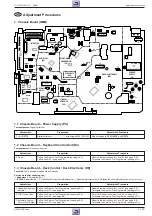
1. Démontage de l'ensemble du boîtier
1.1 Couvercle du boîtier
– Dévisser les 4 vis
A
(Fig. 1).
– Défaire les crochets
B
(Fig. 1), soulever l'arrière du couvercle et
pousser celui-ci de 1cm vers l'arrière.
– Ecarter légèrement avec précaution les côtés du couvercle puis
retirer celui-ci.
Remarque pour le remontage:
Le couvercle doit être engagé dans
la rainure
C
du dos du boîtier (Fig. 1).
1.2 Blindage inférieur
– Pour des raisons de sécurité le blindage inférieur ne doit pas être
enlevé (les ressorts de masse peuvent sectionner les pistes du
circuit imprimé).
1.3 Façade
– Défaire les crochets
D
(Fig. 2 / 3) et retirer la façade.
Remarque pour le remontage: Lors du montage de la façade par-
devant l'appareil, le volet du logement
de cassette doit être poussé vers
l'intérieur de sorte que le levier
E
s'engage dans le guidage (Fig.4) du
volet de cassette.
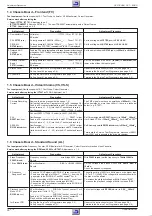
Service Instructions
1. Removing the Cabinet Parts
1.1 Cabinet Upper Part
– Undo 4 screws
A
(Fig. 1).
– Release catch
B
(Fig. 1), lift the cabinet upper part on the rear edge
and push it backwards by 1cm.
– Remove the cabinet upper part by pressing its side panels carefully
apart.
Reassembly: The cabinet upper part must fit into the groove
C
on the back panel (Fig. 1).
1.2 Bottom Panel
– For reasons of safety the bottom panel must not be removed (by
pushing the bottom panel the earthing springs cut the circuit tracks).
1.3 Front Panel
– Release the catches
D
(Fig. 2 / 3) and remove the front panel.
Note: When attaching the front panel from the front to the video
recorder press the cassette lid inwards so that the lever
E
engages with the guide (Fig. 4) of the cassette lid.
Fig. 4
Fig. 3
Fig. 1
Fig. 2
A
A
B
C
D
G
D
D
D
F
H
E
S
voir point 1.2
see para 1.2


