Grundig GRA-D1104B Скачать руководство пользователя страница 79

8.2. Search Settings

8.2.1. Time Search

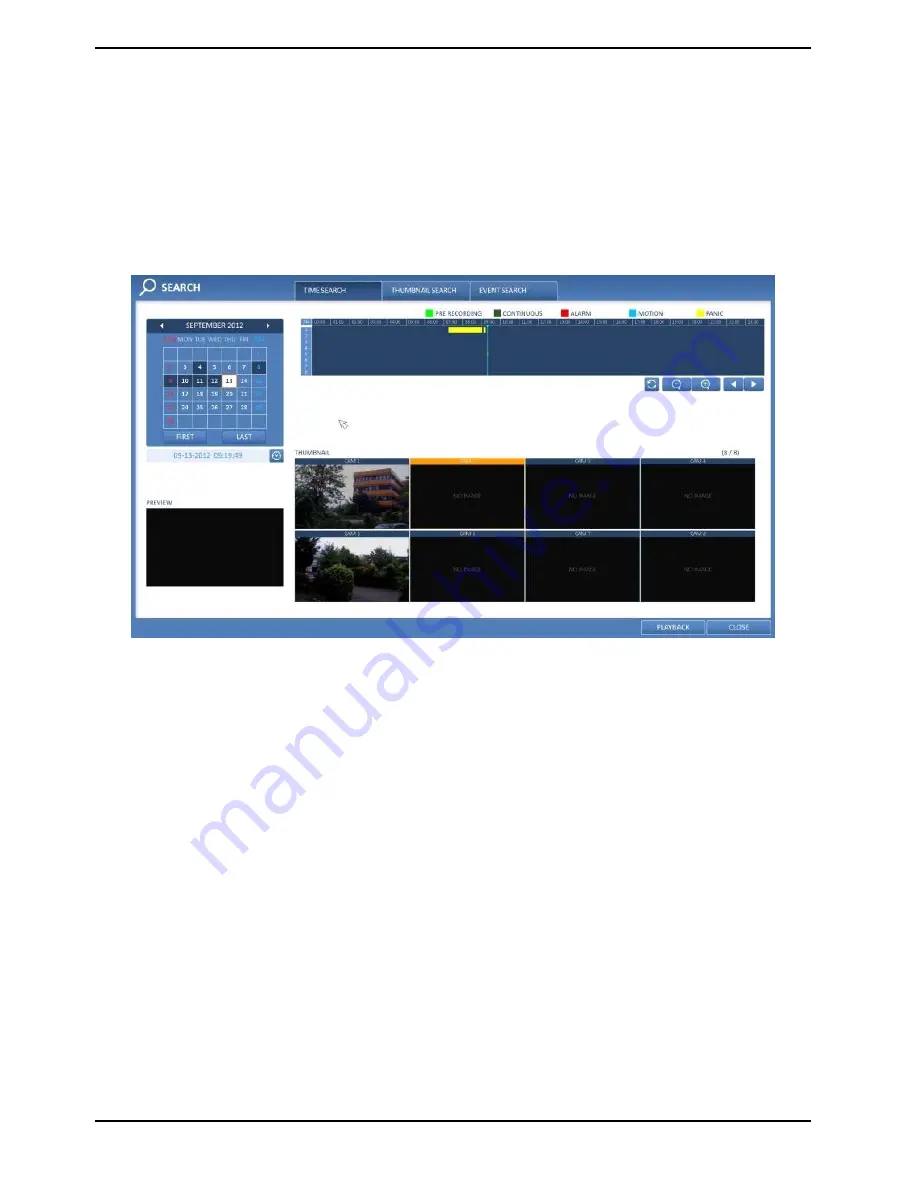
With the calendar, you can search for recording data by the recorded date.

1. From the <SEARCH> menu, select <TIME SEARCH>.
2. Use the [

▲▼

◀▶

] buttons or use the mouse to specify the search date and time from the calendar in the left

corner of the screen.

> FIRST : The first date of recording is automatically selected.
> LAST : The last date of recording is automatically selected.
> ‘Clock’ Button : Press this to display the time selection menu where you can specify the time and date.

3. You can identify the type of the recording data by the colour in the bar.

> Light Green (Pre-recording): This video data is marked as pre-recording data and has been recorded with the  
recording settings of the subsequent recording mode.
> Dark Green (Continuous): This video data has been recorded with the continuous recording settings.
> Red (Alarm): This video data has been recorded with the alarm recording settings.
> Blue (Motion): This video data has been recorded with the motion recording settings.
> Yellow (Panic): This video data has been recorded with the panic recording settings.

77

English

Содержание GRA-D1104B

Страница 1: ...GRA D1104B 121 1 06 08 2013 Owner s Manual ASP AG Analogue Recorders GRA D1104B 4 Ch Standalone DVR 960H H 264 GRA D2208B 8 Ch Standalone DVR 960H H 264 GRA D4416B 16 Ch Standalone DVR 960H H 264...

Страница 2: ......

Страница 3: ...ng To The System Setup 28 2 Camera Setup 28 3 Display Setup 36 4 Audio Setup 40 5 User Setup 42 6 Network Setup 45 7 System Setup 48 8 Storage 54 9 Event Setup 57 7 Record Setting 68 1 Starting the Re...

Страница 4: ...Malfunction caused by using an unrecommended HDD Malfunction due to HDD failure and not due to a problem in the DVR The warranty period for the Fan is one year after purchase This product is not for e...

Страница 5: ...e product are properly earth grounded During installation To prevent an accident or physical injury and to operate the DVR properly please comply with the following Secure at least 18 centimeter of di...

Страница 6: ...3 Package Contents These parts are included 4 Installation 4 1 Connections and Control Keys Front View Rear View of the recorder model GRA D1104B Rear View of the recorder model GRA D2208B 4 English...

Страница 7: ...Rear View of the recorder model GRA D4416B 5 English...

Страница 8: ...Remote Control 6 English...

Страница 9: ...f the remote control ID is set properly by manipulating the remote control 4 To reset the ID to 00 press and hold the ID button 4 2 HDD Specifications Replacement Specifications of compatible HDDs Max...

Страница 10: ...3 Install the HDD on the bracket and fix it by fastening the 4 screws on its sides When installing the HDD make sure to install it in the correct direction 4 Insert back the bracket with the HDD insta...

Страница 11: ...a DVI monitor Or use a VGA cable to connect the product with a VGA monitor Once the product is set to NTSC or PAL output connect only cameras of the corresponding video standard for proper operations...

Страница 12: ...D port 3 To ensure a secure connection release the button and try to pull the wire to check if it is firmly seated in the port 4 To remove the wire pull it out while holding the upper button Connectin...

Страница 13: ...DVR to GND of the keyboard controller NOTE For RS 485 connection please refer to the user manual of the keyboard controller RS 232 Connection You can connect a text in device such as POS or ATM For co...

Страница 14: ...in the address bar web browser of the local PC or of the dedicated software program in the format of http IP address web service port Ex http 192 168 0 23 8080 The web service port is set to 8080 by d...

Страница 15: ...ogo appears on the screen 3 When the booting process is completed first the live screen then the login screen appears 5 2 Login To edit or access the menu of the DVR you should be logged in 1 When the...

Страница 16: ...m left corner of the screen and then click on LOG OUT to log out or press the LOGOUT button on the remote control 2 Once logged out access to Search Backup System Setup Record Setup System Shutdown wi...

Страница 17: ...Be sure to turn off the power switch in the rear panel ATTENTION If you turn off the system in an abnormal manner such as removing the power cord while the system is in operation the disk will have or...

Страница 18: ...16 English...

Страница 19: ...5 5 1 Video Window Icons used in the video window 5 5 2 Quick Menu 17 English...

Страница 20: ...y the status bar 5 5 4 Timeline Press the button on the remote control or move the mouse cursor to the right of the screen to display the timeline Double click the timeline to move to the video screen...

Страница 21: ...ence button in the status bar or press the SEQ button on the remote control to perform the specified sequence mode You can configure the sequence settings under the menu item SEQUENCE For details plea...

Страница 22: ...ust the camera s focus automatically If the connected camera supports manual iris adjustment you can adjust the iris setting You can also control the zoom and focus by using the ZOOM and FOCUS buttons...

Страница 23: ...Control the Camera s PTZ while watching the video Press the SET button to append the preset Click the shortcut icon to move to the corresponding PTZ preset position Click on the Delete icon to delete...

Страница 24: ...specified speed and interval for back and forth monitoring 4 Select TOUR and click on the ON button 5 Click on the Cogwheel button 6 Select a user defined preset and register it DWELL Sets the dwell...

Страница 25: ...ext menu Select ZOOM You can also press the ZOOM button on the remote control 2 Move to the zoom control screen When the menu bar appears in the right bottom use the buttons to control the zooming Cha...

Страница 26: ...the playback screen How to select an audio input channel Click on the Audio Input icon and select a channel from which the audio signal will be received CH Produces the selected channel s audio regar...

Страница 27: ...DVR How to check the alarm status Click on the Alarm Status Icon and check here the alarm status of each camera Click on OK to close the window How to check the network status Click on the Network St...

Страница 28: ...on OK to close the window NOTE For more information please refer to Chapter 6 8 1 Disk Information Saving captured snapshots You can capture the current video screen and save or export to a connected...

Страница 29: ...the TAG NAME and the MEMO and press the BURN or ERASE BURN button A progress bar appears and indicates the progress of the export to a storage device BURN The snapshot is stored in the connected USB...

Страница 30: ...e GRA D2208B therefore 8 frames channels are mostly shown in the pictures 6 1 Moving To The System Setup How to use the mouse How to use the remote control 1 How to use the remote control 2 6 2 Camera...

Страница 31: ...tively simply double click on the camera name to rename from the top left corner NOTE Allows input of up to 8 uppercase lowercase alphanumeric characters 3 With the virtual keyboard that appears enter...

Страница 32: ...the camera between 0 and 100 CONTRAST Adjust the contrast level of the camera between 0 and 100 HUE TINT The Hue value is not supported by ONVIF command at the moment please use the direct configurati...

Страница 33: ...ANAGER USER If you set them to ON the selected channels will be covert from the applicable user account LOGOUT Set it to ON When the user logs out the current channel will be set to a covert channel 3...

Страница 34: ...EXIT button on the remote control or click on CLOSE in the lower screen The confirmation message appears and you will return to the previous menu NOTE The above options such as SENSITIVITY and how to...

Страница 35: ...ocks for motion detection SENSITIVITY While the pop up window is displayed select SENSITIVITY to set the motion detection sensitivity of the channel currently selected then another pop up window will...

Страница 36: ...screen Once clicked on the APPLY button after changing the settings a restarting message pops up Click on Yes to restart the system automatically 4 Once the setup is complete press the EXIT button of...

Страница 37: ...sappear TIMELINE IN FULL SCREEN MODE Select to show or hide the timeline in full screen mode AUTO HIDE Place the cursor in the right corner to display the timeline If moving the cursor to the left the...

Страница 38: ...to 1 sec 60 sec SPOT DWELL Sets the time interval between two view types can be set to 1 sec 60 sec 3 To apply the change click on APPLY in the bottom of the screen 4 When done press the EXIT button...

Страница 39: ...om of the screen 4 When done press the EXIT button on the remote control or click on CLOSE in the lower screen The confirmation message will appear and you will return to the previous menu How to add...

Страница 40: ...to the previous screen 9 Right click on the new sequence or press the ENTER button on the remote control to edit or delete it How to edit a sequence 1 Select a sequence that you want to edit from the...

Страница 41: ...select EDIT 6 When done click CLOSE to close the window 7 To apply your changes click on APPLY 6 3 4 Spot Out You can configure the Spot Out to display a Live channel as needed in various live view t...

Страница 42: ...ndow appears click on the MODIFY button 3 When the View Type selection window appears click on the ADD VIEW TYPE button 4 Select the desired View Type and configuration and click on the CONFIRM button...

Страница 43: ...the change click on APPLY in the bottom of the screen 4 When done press the EXIT button on the remote control or click on CLOSE in the lower screen The confirmation message appears and you will return...

Страница 44: ...Management You can add one or more user account s that can be edited at a later time 1 From SYSTEM SETUP USER select MANAGEMENT 2 Use the ENTER buttons on the remote control or use the mouse to add a...

Страница 45: ...he virtual keyboard enter the password GROUP Select a group that the user belongs to from ADMIN MANAGER and USER EMAIL Type in the e mail address to which the DVR will send a notification of an event...

Страница 46: ...ck on OK 3 To delete the user account click on DELETE NOTE The ADMIN account cannot be changed or edited just the password 6 5 2 Group Authority You can grant different user groups different permissio...

Страница 47: ...ton on the remote control or click on CLOSE in the lower screen The confirmation message will appear and you will return to the previous menu 6 6 Network Setting Specify the IP address the DDNS and Em...

Страница 48: ...ss the EXIT button on the remote control or click on CLOSE in the lower screen The confirmation message will appear and you will return to the previous menu 6 6 2 DDNS You can configure the DDNS setti...

Страница 49: ...a server that does not support SSL USER Provide the email account ID of the sender PASSWORD Provide the password of the sender TEST EMAIL ADDRESS Enter an email address for the test purpose TEST Send...

Страница 50: ...ess the Blue Arrow in a Circle Button next to the status to try to register the DDNS address forcibly EXTERNAL IP ADDRESS Indicate the IP address for the Internet accessible from the DVR The DVR can b...

Страница 51: ...er Click on the Arrows in a Circle Button to get the current time AUTO TIME SYNC Automatically synchronise the time with the time server at a specific time SYNC AT Set the time to synchronise with the...

Страница 52: ...the mouse to set each option of the system management FW UPDATE You can update the current software with the latest version FACTORY DEFAULT Set the DVR settings to factory default SYSTEM DATA Save th...

Страница 53: ...ADMIN account will be working and access to all menus will be restricted EXPIRED TERM FOR PASSWORD You will be prompted to change the current password after a certain period of time AUTO LOGOUT If th...

Страница 54: ...2 Click on USB 3 Select one or several ones from the updatable files listed in F W LIST NOTE The Firmware should be located in the root directory of the USB storage device Do not place it under a cer...

Страница 55: ...ct or data If required consult your nearest service center for professional assistance 6 7 3 System Information You can check the current system version and system related settings 1 From SYSTEM SETUP...

Страница 56: ...e DVR so that the keyboard controller can identify it PROTOCOL Set up the protocol of the keyboard controller BAUD RATE Specify the RS485 communication speed REMOTE CONTROLLER ID Set the ID of the rem...

Страница 57: ...apacity of the disk MODEL Indicates the disk model S M A R T STATUS Read the S M A R T information of the disk and check to display if the current disk is in normal operation NORMAL The disk is in a n...

Страница 58: ...The recording data will be deleted after a specific time of reservation If it is set to OFF this function will be disabled Example If the Record Time Limit is set to 1 day this means that even if ther...

Страница 59: ...mmended that you replace the disk immediately ERROR The disk fails or is unable to be used due to an error of the disk or the cable The disk should be replaced immediately Contact the retailer or the...

Страница 60: ...pen DURATION Specify the duration of the alarm output TRANSPARENT Keep the alarm out for as much time as the event lasts UNTIL KEY Keep the alarm out until a mouse or remote control button is pressed...

Страница 61: ...synchronisation with the event 4 Click on COPY SCHEDULE to check the checkbox of the date that you want to copy the schedule at 5 When done click on OK to apply the settings 6 To apply the change clic...

Страница 62: ...EXIT button on the remote control or click on CLOSE in the lower screen The confirmation message will appear and you will return to the previous menu Buzzer output You can notify the user of the event...

Страница 63: ...t related video channels exist the video pop up will be displayed in the maximum split screen mode rather than the single split screen mode OSD POPUP This will notify the user of the event with a pop...

Страница 64: ...ne minute after the previous one NOTE Some email servers can block the sending of the email if the email delivery cycle is too short and classify it as spam Contact your email service provider to adju...

Страница 65: ...BUZZER Specify the output of the buzzer if an alarm is detected by the alarm sensor VIDEO POPUP Select to display the video pop up if an alarm is detected by the alarm sensor If there exist multiple...

Страница 66: ...4 When done press the EXIT button on the remote control or click on CLOSE in the lower screen The confirmation message will appear and you will return to the previous menu 6 9 5 Video Loss You can sp...

Страница 67: ...e mode to OVERWRITE this event occurs when the disk is full and the overwriting begins accordingly DISK FULL EVENT If you set the disk write mode to ONCE this event occurs when the disk is full 100 DI...

Страница 68: ...ic recording begins System BOOTING EVENT This event occurs when the DVR is booting LOGIN FAILURE This event occurs when the DVR fails to log in You can specify the number of failed registrations for t...

Страница 69: ...icking on the Arrow Down button FAILURE IN DDNS UPDATE This event occurs if the DVR tried to update the DDNS address but failed NOTE If the DDNS address fails to be updated the DVR may not connect to...

Страница 70: ...se the buttons or use the mouse to set RECORD SETUP MODE to AUTO CONFIGURATION or MANUAL CONFIGURATION 3 Set the recording options for each selected Record mode 4 To apply the change click on APPLY in...

Страница 71: ...ent occurs INTENSIVE MOTION RECORD Normally the recording will be performed in a low quality However the quality will switch to high if a motion is detected INTENSIVE ALARM RECORD Normally the recordi...

Страница 72: ...If it is set to MANUAL CONFIGURATION recording will continue until you turn it off manually 7 2 2 Continuous Recording You can configure here the settings of continuous recording time recording size...

Страница 73: ...ttons on the remote control to move to the cell and press ENTER Then use the buttons to move to a desired cell and press ENTER again 3 When the cell selection is complete the SIZE FPS QUALITY table ap...

Страница 74: ...again 3 When the time selection is complete you will be prompted to specify the use of the recording in the Record Setup window 4 To apply the change click on APPLY in the bottom of the screen 5 When...

Страница 75: ...ng NOTE For more information see Chapter 7 2 2 Continuous Recording 4 To apply the change click on APPLY in the bottom of the screen 5 When done press the EXIT button on the remote control or click on...

Страница 76: ...ck on APPLY in the bottom of the screen 5 When done press the EXIT button on the remote control or click on CLOSE in the lower screen The confirmation message will appear and you will return to the pr...

Страница 77: ...etwork streaming the NVR will reduce the size or FPS according to the network status speed before transferring the recording video 1 From the RECORD SETUP menu select NETWORK STREAMING 2 Use the ENTER...

Страница 78: ...s 8 Search You can search for the recording data in the HDD by criteria like time thumbnail event etc 8 1 Moving To The Search Menu 8 1 1 Moving to the Search menu while in monitoring How to use the m...

Страница 79: ...e selection menu where you can specify the time and date 3 You can identify the type of the recording data by the colour in the bar Light Green Pre recording This video data is marked as pre recording...

Страница 80: ...5 Click on a thumbnail channel or use the buttons on the remote control to move to a desired channel and press ENTER You can check the video in PREVIEW NOTE Click to move to a desired time or simply...

Страница 81: ...thumbnail search screen FIRST The first date of recording is automatically selected LAST The last date of recording is automatically selected CHANNEL Select a channel to search in DATE TIME Specify t...

Страница 82: ...move to the playback screen 4 If you want to stop playing and return to the search screen press EXIT or SEARCH on the remote control You can also click on MENU in the lower left corner and select a d...

Страница 83: ...ouble click on a desired event or click on PLAY in the lower right corner to move to the play screen 7 If you want to stop playing and return to the search screen press EXIT or SEARCH on the remote co...

Страница 84: ...in the timeline to start playing the video from that point Right click on this marking to perform a backup or an event search of this area Menu Split screen Selection Menu For more information about...

Страница 85: ...yback Bar Bookmarking During playback you can add a bookmark for reserving the video data You can view the bookmarked data in the Archive menu which can be saved to a connected device for backup purpo...

Страница 86: ...ust click on CONTINUE 6 Click on RESERVE You can export the reserved data to a connected storage device using the ARCHIVE menu What is the RESERVE function With the RESERVE function you can reserve da...

Страница 87: ...corner and select the ARCHIVE menu 2 Press the ARCHIVE button on the remote control 10 1 1 Archive You can archive the searched data or reserve it 1 From the ARCHIVE menu select NEW ARCHIVING 2 Select...

Страница 88: ...CLOSE 10 1 2 Reserved Data Management You can search for the reserved data and delete or import it to a storage device 1 From the ARCHIVE menu select RESERVED DATA MANAGEMENT The reserved data will be...

Страница 89: ...on the Document button next to the list Click on VERIFY INTEGRITY to check if the data is corrupt or incomplete 4 Select an item to play from the list and click PLAY 5 To exit the Archive menu click...

Страница 90: ...tatus 5 To apply the change click on APPLY in the bottom of the screen 6 When done press the EXIT button on the remote control or click on CLOSE in the lower screen The confirmation message will appea...

Страница 91: ...4 Network Status Enter the IP address and web service port in the address bar of the browser Ex http 192 168 1 200 8080 How to connect to the NVR from the inside Check the Network Status and verify th...

Страница 92: ...X control move to Tools Internet Options Security Custom Level Download unsigned ActiveX control and change its setting from Disable recommended to Enable and then click OK 3 Click on Install in the a...

Страница 93: ...11 2 Live 11 2 1 Live Screen At a Glance 91 English...

Страница 94: ...11 2 2 Switching the split mode Click on the Switch button to switch the mode as follows 92 English...

Страница 95: ...ving 2 The video from the selected channel will be saved to the PC in the AVI format Default path C SaveFolder Click on the Disk symbol button again to stop saving Click on ActiveX Setting to display...

Страница 96: ...ble the hardware acceleration 3 If you want to change the saving path click Save Folder and specify a new path The Windows Vista user cannot change the saving path 4 Change the streaming settings acco...

Страница 97: ...e operations of a PTZ camera Adjust the focus zooming and iris of the camera You can use the arrow buttons to control the operations of the camera Pattern Cruise You can configure various settings of...

Страница 98: ...11 3 1 Search Viewer At a Glance 96 English...

Страница 99: ...reload the changes PLAY Play the searched video Backup Archive the recorded video 11 3 3 Search by event You can sort the recording data items by event to facilitate your search 1 Mark the checkbox o...

Страница 100: ...ATTENTION If you change the settings remotely at will the major Record Settings of the DVR may be changed which is not recommended at all 11 4 1 Setup Viewer At a Glance 11 4 2 Camera Giving a camera...

Страница 101: ...olour value is 50 Brightness Contrast Tint Color If you change the default settings the video from the DVR or the video colour may not be displayed properly Exposure Adjust the exposure related settin...

Страница 102: ...tion for each camera Define the area and the sensitivity which are used for motion detection Activation Turn the motion detection On or Off for each camera and activate the Onscreen notification Area...

Страница 103: ...f the camera Activate the RS485 button if the camera id connected over the RS485 connection 11 4 3 Display OSD Setting Configure the settings for the time title boundary icon and language that will be...

Страница 104: ...active sequence Specify the interval and click on OK to apply it 11 4 4 Audio Audio Buzzer You can configure the settings of the voice and audio signal NOTE For details about each displayed item plea...

Страница 105: ...the password NOTE For details about each displayed item please refer to Chapter 6 5 User Setting To add a user click on Add and provide the user information If you want to delete the user click on DEL...

Страница 106: ...ck on OK to apply the changes NOTE For more information about the accessible menu items refer to Chapter 6 5 2 Group Authority 11 4 6 Network Network Setting You can check the network connection statu...

Страница 107: ...ange the DDNS settings and click on OK to apply the changes Email Setting You can register and test an email address so that an email notification is delivered at a specific interval or if an event oc...

Страница 108: ...nd time When done click on OK to apply the changes NOTE For more information about each item of the time and date settings refer to Chapter 6 7 1 Date Time System Management You can configure the acce...

Страница 109: ...tatus information of the network connection and alarm I O Control Device Setting Set the connection of both the remote control and the keyboard control Change the communication settings and click on O...

Страница 110: ...e DVR as well as the recording time information of each device S M A R T Status You can check the S M A R T status for each of the internal and external devices What is S M A R T It is a sort of HDD s...

Страница 111: ...utput Specify the alarm output conditions with the work schedule When done click on OK to apply the changes NOTE For more information about the alarm output and ON OFF schedule refer to Chapter 6 9 1...

Страница 112: ...OUT DISPLAY and EMAIL against an event alarm that occurs Specify the buzzer output time display time and email notification and click on OK to apply the changes NOTE For more information about the ev...

Страница 113: ...o apply the changes NOTE For more information about each of the alarm sensor actions refer to Chapter 6 9 3 Alarm Sensor Motion Sensor You can set an action to execute when a motion is detected When d...

Страница 114: ...ly the changes System Event You can set which action to perform if an event related to disk recording network or system happens You may want to notify the user of the event using the alarm output buzz...

Страница 115: ...11 4 10 Record Setup Record Setting You can set the recording options for Auto or Manual mode 113 English...

Страница 116: ...t each mode refer to 7 2 1 Operation Mode Continuous Recording You can configure the settings of continuous recording time recording size frame rate per second and quality Click on the Arrow pointing...

Страница 117: ...rmation about the continuous recording size and schedule refer to Chapter 7 2 2 Continuous Recording Motion Recording Set the SIZE FPS QUALITY AUDIO and the SCHEDULE to apply if a motion event occurs...

Страница 118: ...Alarm Recording Set SIZE FPS QUALITY AUDIO and SCHEDULE to apply if an alarm event occurs Click on the Arrow pointing to the bottom next to each item to display the list of values available Complete...

Страница 119: ...nformation about the manual record settings refer to Chapter 7 2 5 Panic Recording 11 4 11 About Click on the INFORMATION tab to check the model name of the DVR as well as the web viewer version 12 Ar...

Страница 120: ...3 Start the Backup Player 4 Click on the Open Folder button in the bottom left corner to display the file browser Select the archived file to play back 118 English...

Страница 121: ...5 Check the integrity of the archived file 6 When done the archived file will be played on the screen 119 English...

Страница 122: ...12 2 Backup Player At a Glance 120 English...

Страница 123: ...current video Screen Capture the visible portion of the current video Format Select a saving format BMP JPG PNG Path Specify the saving path Default location My Documents My Pictures 12 2 2 Print Out...

Страница 124: ...s You can check the version of the Backup Player Maintain the image aspect ratio Preserve the aspect ratio of the image If you do not mark this option the image will be adjusted to fit the screen Abou...

Страница 125: ...udio Inputs 4 CH 3 5mm Jack socket Audio Outputs 1 CH 3 5mm Jack socket Alarm Inputs 4 contact input N O or N C Alarm Outputs 1 Relay Network 1x 10 100Mbps RJ 45 Serial Interface s 2 x USB2 1 x RS485...

Страница 126: ...TB SATA Harddisk bay 2 x SATA II Recording Speed 400fps 352x288 400fps 704x288 400fps 704x576 400fps 960x576 Display Speed 400 fps Display Mode Full screen 4 6 8 9 16 PTZ Control Pan Tilt Zoom Focus P...

Страница 127: ...H 264 It is hereby certified that the products meet the standards in the following relevant provisions EC EMC Directive 2004 108 EC Applied harmonised standards and technical specifications EN 55022...

Страница 128: ...th modifications and or translated into another language Hereinafter translation is included without limitation in the term modification Each licensee is addressed as you Activities other than copying...

Страница 129: ...censee cannot impose that choice This section is intended to make thoroughly clear what is believed to be a consequence of the rest of this License 8 If the distribution and or use of the Program is r...

Страница 130: ...ry program is threatened constantly by software patents States should not allow patents to restrict development and use of software on general purpose computers but in those that do we wish to avoid t...

Страница 131: ...use this License to apply to the other parts of the aggregate 6 Conveying Non Source Forms You may convey a covered work in object code form under the terms of sections 4 and 5 provided that you also...

Страница 132: ...notice Termination of your rights under this section does not terminate the licenses of parties who have received copies or rights from you under this License If your rights have been terminated and...

Страница 133: ...IN WRITING WILL ANY COPYRIGHT HOLDER OR ANY OTHER PARTY WHO MODIFIES AND OR CONVEYS THE PROGRAM AS PERMITTED ABOVE BE LIABLE TO YOU FOR DAMAGES INCLUDING ANY GENERAL SPECIAL INCIDENTAL OR CONSEQUENTI...

Страница 134: ...rary and copy and distribute such modifications or work under the terms of Section 1 above provided that you also meet all of these conditions a The modified work must itself be a software library b Y...

Страница 135: ...ompliance 9 You are not required to accept this License since you have not signed it However nothing else grants you permission to modify or distribute the Library or its derivative works These action...

Страница 136: ...www openssl org THIS SOFTWARE IS PROVIDED BY THE OpenSSL PROJECT AS IS AND ANY EXPRESSED OR IMPLIED WARRANTIES INCLUDING BUT NOT LIMITED TO THE IMPLIED WARRANTIES OF MERCHANTABILITY AND FITNESS FOR A...

Отзывы: