


36
DISCLAIMER / WARNING
Some (simple) failures can be adequately
handled by the end-user without any
safety issue or unsafe use arising,
provided that they are carried out within
the limits and in accordance with the
following instructions (see the “Self-
Repair” section).
Therefore, unless otherwise authorized
in the “Self-Repair” section below,
repairs shall be addressed to registered
professional repairers in order to avoid
safety issues. A registered professional
repairer is a professional repairer that has
been granted access to the instructions
and spare parts list of this product by the
manufacturer according to the methods
described in legislative acts pursuant to
Directive 2009/125/EC.
However, only the service agent (i.e.
authorized professional repairers)
that you can reach through the phone
number given in the user manual/
warranty card or through your
authorized dealer may provide service
under the guarantee terms. Therefore,
please be advised that repairs by
professional repairers (who are not
authorized by Grundig) shall void the
guarantee.
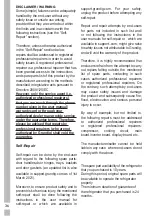
Self-Repair
Self-repair can be done by the end-user
with regard to the following spare parts:
door handles,door hinges, trays, baskets
and door gaskets (an updated list is also
available in support.grundig.com as of 1st
March 2021).
Moreover, to ensure product safety and to
prevent risk of serious injury, the mentioned
self-repair shall be done following the
instructions in the user manual for
self-repair or which are available in
support.grundig.com. For your safety,
unplug the product before attempting any
self-repair.
Repair and repair attempts by end-users
for parts not included in such list and/
or not following the instructions in the
user manuals for self-repair or which are
available in support..com, might give raise
to safety issues not attributable to Grundig,
and will void the warranty of the product.
Therefore, it is highly recommended that
end-users refrain from the attempt to carry
out repairs falling outside the mentioned
list of spare parts, contacting in such
cases authorized professional repairers
or registered professional repairers. On
the contrary, such attempts by end-users
may cause safety issues and damage
the product and subsequently cause fire,
flood, electrocution and serious personal
injury to occur.
By way of example, but not limited to,
the following repairs must be addressed
to authorized professional repairers
or registered professional repairers:
compressor,
cooling
circuit,
main
board,inverter board, display board, etc.
The manufacturer/seller cannot be held
liable in any case where end-users do not
comply with the above.
The spare part availability of the refrigerator
that you purchased is 10 years.
During this period, original spare parts will
be available to operate the refrigerator
properly
The minimum duration of guarantee of
the refrigerator that you purchased is 24
months.
Содержание GKN 27960 BIO
Страница 2: ......
Страница 72: ...C C B...
Страница 73: ...3 DE BG EN SK PL CZ C A B...
Страница 74: ...4 1 A A A A 1 1 5...
Страница 75: ...5 DE BG EN SK PL CZ 1 1 1...
Страница 76: ...6 1 1 1 HC R600a C 1 1 2 90 psi 620 kPa 80 psi 550 kPa...
Страница 77: ...7 DE BG EN SK PL CZ 33 F 0 6 C 100 F 38 C 1 2 10 1 3 1 4 2012 19...
Страница 78: ...8 1 5 2011 65 1 6...
Страница 79: ...9 DE BG EN SK PL CZ C 2 1 2 3 4 5 6 7 8 9 10 11 12 13 14 15 16 17 1 2 3 4 5 5 6 8 9 7 11 12 13 15 16 17 14 10 4...
Страница 80: ...10 3 3 1 B B A 30 5 5 5 C 5 5 5...
Страница 81: ...11 DE BG EN SK PL CZ B C 4 C 3 2 1 2 2 3 3 3 4 A...
Страница 82: ...12 4 4 1 A 3...
Страница 83: ...13 DE BG EN SK PL CZ 4 2 6 C C C 5...
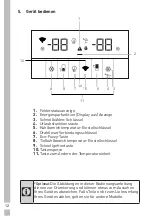
Страница 84: ...14 C 5 1 4 5 6 7 10 11 12 8 3 2 9 1 2 3 4 5 6 7 Eco fuzzy 8 9 10 11...
Страница 85: ...15 DE BG EN SK PL CZ 1 1 2 3 2 3 1 1 4 3...
Страница 87: ...17 DE BG EN SK PL CZ 10 eco fuzzy 3 eco fuzzy 3 11 3...
Страница 88: ...18 5 1 5 3 5 4 5 5 5 2 A...
Страница 89: ...19 DE BG EN SK PL CZ 5 6 1 K70560 2 3 90 3 135 4 5 mm 4 2 2 5...
Страница 90: ...20 5 7 3 5 8 5 9...
Страница 91: ...21 DE BG EN SK PL CZ 5 10 2 60 70 2 3 C...
Страница 92: ...22 5 11 Icematic Icematic Icematic 2 Icematic 90 5 12 C C 1 2 C...
Страница 93: ...23 DE BG EN SK PL CZ 5 13 1 2 3 C C C 3 5 14 1 2 3 45 C...
Страница 94: ...24 4 C 5 15...
Страница 96: ...26 5 18 C...
Страница 98: ...28 5 21 5 22 10 5 23...
Страница 99: ...29 DE BG EN SK PL CZ 6 B 6 1...
Страница 100: ...30 15 6 2 6 3 OH Li Na K Rb Cs Fr...
Страница 101: ...31 DE BG EN SK PL CZ 7 FLEXI ZONE 6...
Страница 102: ...32...
Страница 103: ...33 DE BG EN SK PL CZ A...
Страница 104: ...34 2009 125 Grundig support grundig com 1 2021 support grundig com support grundig com Grundig...
Страница 105: ...35 DE BG EN SK PL CZ 10 24...
Страница 106: ...37 DE BG SK PL CZ Notes...
Страница 107: ...38 Notes...


