


12
3.4 Electrical connection
A
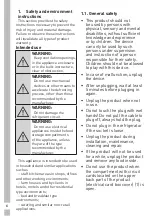
WARNING:
Do not make
connections via extension
cables or multi-plugs.
B
WARNING:
Damaged
power cable must
be replaced by the
Authorized Service Agent.
C
If two coolers are to be
installed side by side,
there should be at least
4 cm distance between
them.
•
Our company shall not be
liable for any damages that will
arise when the product is used
without grounding and electrical
connection in accordance with
the national regulations.
•
Power cable plug must be within
easy reach after installation.
•
Do not extension cords or
cordless multiple outlets
between your product and the
wall outlet.
C
Hot Surface Warning!
Side walls of your product
is equipped with refrigerant
pipes to improve the cooling
system. Refrigerant with
high temperatures may
flow through these areas,
resulting in hot surfaces
on the side walls. This is
normal and does not need
any servicing. Please pay
attention while touching
these areas.
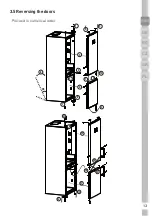
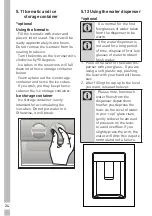
3.2 Installing the
plastic wedges
Plastic wedges supplied with the
product are used to create the
distance for the air circulation
between the product and the rear
wall.
1.
To install the wedges, remove the
screws on the product and use the
screws supplied together with the
wedges.
2.
Insert the 2 plastic wedges onto
the rear ventilation cover as
illustrated in the figure.
3.3 Adjusting the feet
If the product stands unbalanced
after installation, adjust the feet
on the front by rotating them to the
right or left.
Содержание GKN 27960 BIO
Страница 2: ......
Страница 72: ...C C B...
Страница 73: ...3 DE BG EN SK PL CZ C A B...
Страница 74: ...4 1 A A A A 1 1 5...
Страница 75: ...5 DE BG EN SK PL CZ 1 1 1...
Страница 76: ...6 1 1 1 HC R600a C 1 1 2 90 psi 620 kPa 80 psi 550 kPa...
Страница 77: ...7 DE BG EN SK PL CZ 33 F 0 6 C 100 F 38 C 1 2 10 1 3 1 4 2012 19...
Страница 78: ...8 1 5 2011 65 1 6...
Страница 79: ...9 DE BG EN SK PL CZ C 2 1 2 3 4 5 6 7 8 9 10 11 12 13 14 15 16 17 1 2 3 4 5 5 6 8 9 7 11 12 13 15 16 17 14 10 4...
Страница 80: ...10 3 3 1 B B A 30 5 5 5 C 5 5 5...
Страница 81: ...11 DE BG EN SK PL CZ B C 4 C 3 2 1 2 2 3 3 3 4 A...
Страница 82: ...12 4 4 1 A 3...
Страница 83: ...13 DE BG EN SK PL CZ 4 2 6 C C C 5...
Страница 84: ...14 C 5 1 4 5 6 7 10 11 12 8 3 2 9 1 2 3 4 5 6 7 Eco fuzzy 8 9 10 11...
Страница 85: ...15 DE BG EN SK PL CZ 1 1 2 3 2 3 1 1 4 3...
Страница 87: ...17 DE BG EN SK PL CZ 10 eco fuzzy 3 eco fuzzy 3 11 3...
Страница 88: ...18 5 1 5 3 5 4 5 5 5 2 A...
Страница 89: ...19 DE BG EN SK PL CZ 5 6 1 K70560 2 3 90 3 135 4 5 mm 4 2 2 5...
Страница 90: ...20 5 7 3 5 8 5 9...
Страница 91: ...21 DE BG EN SK PL CZ 5 10 2 60 70 2 3 C...
Страница 92: ...22 5 11 Icematic Icematic Icematic 2 Icematic 90 5 12 C C 1 2 C...
Страница 93: ...23 DE BG EN SK PL CZ 5 13 1 2 3 C C C 3 5 14 1 2 3 45 C...
Страница 94: ...24 4 C 5 15...
Страница 96: ...26 5 18 C...
Страница 98: ...28 5 21 5 22 10 5 23...
Страница 99: ...29 DE BG EN SK PL CZ 6 B 6 1...
Страница 100: ...30 15 6 2 6 3 OH Li Na K Rb Cs Fr...
Страница 101: ...31 DE BG EN SK PL CZ 7 FLEXI ZONE 6...
Страница 102: ...32...
Страница 103: ...33 DE BG EN SK PL CZ A...
Страница 104: ...34 2009 125 Grundig support grundig com 1 2021 support grundig com support grundig com Grundig...
Страница 105: ...35 DE BG EN SK PL CZ 10 24...
Страница 106: ...37 DE BG SK PL CZ Notes...
Страница 107: ...38 Notes...


