background image

17

Espa

ño

l (MX)

4. Instalación del producto

Enchufe el temporizador a un tomacorriente de 
115 V. Enchufe el cable de alimentación de la 
bomba a la tomacorriente de el temporizador. 
Asegúrese de situar el cable de alimentación de 
forma que no toque la salida o tubería de 
escape del calentador de agua a gas o aceite.

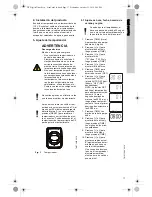
5. Ajuste del temporizador

Fig. 1

Temporizador

5.1 Ajuste de hora, fecha, horario de 

verano y región

ADVERTENCIA

Descarga eléctrica

Muerte o lesión personal grave
- No enchufe este temporizador en 

un cable de extensión.

- Siempre conecte el enchufe de 3 

clavijas directamente en un toma-
corriente conectado adecuada-
mente a tierra. Nunca intente anu-
lar esta característica de seguridad.

- No use el temporizador para con-

trolar dispositivos que pueden tener 
consecuencias peligrosas debido a 
la inexactitud de la

- temporización, tales como lámpa-

ras de rayos ultravioleta, sauna, 
calefactores, ollas eléctricas, etc.

- Cumpla con todos los códigos eléc-

tricos locales durante el uso.

No contiene piezas en el interior a las 
que le pueda realizar mantenimiento.

Antes del uso inicial, enchufe el tem-
porizador a un tomacorriente de CA al 
menos por 30 minutos para cargar la 
batería interna. Si no ve la pantalla, 
presione [RESET] para reiniciar el 
temporizador y borrar todos los ajus-
tes y eventos. Puede desenchufar el 
temporizador del tomacorriente de CA 
para ajustarlo más fácilmente.

T

M

07

 1

6

8

2

 20

18

Cuando ajuste el temporizador, si 
hace una pausa de más de 30 segun-
dos, este volverá automáticamente a 
la pantalla de hora del día normal.

1. Presione [TIME] (Hora). 

Aparecerá un año parpa-
deante de 4 dígitos.

2. Presione [+] o [-] para 

ajustar el año actual y 
luego presione [TIME].

3. Presione [+] o [-] para 

ajustar el mes 
("01"=Ene, "12"=Dic) y 
luego presione [TIME].

4. Presione [+] o [-] para 

ajustar el día del mes.

5. Presione [TIME] para 

ajustar la función de 
horario de verano (DST).

6. Presione [+] o [-] para 

seleccionar "AUTO" 
(ajuste AUTO DST habi-
litado) u "OFF" (DST 
deshabilitado).
NOTA: La función DST 
habilita al temporizador 
para adelantar automáti-
camente 1 hora el 
segundo domingo de 
marzo a las 02:00 a.m. y 
luego atrasar automáti-
camente 1 hora el primer 
domingo de noviembre a 
las 02:00 a.m.

7. Presione [TIME]. Los 

dígitos de la hora parpa-
dean.

8. Presione [+] o [-] para 

ajustar la hora actual y 
luego presione [TIME]. 
Los dígitos de los minu-
tos parpadean.

9. Presione [+] o [-] para 

ajustar los minutos y 
luego presione [TIME].

10. Presione [+] o [-] para 

ajustar su región actual. 
El siguiente mapa deter-
minará en qué zona se 
usará el temporizador. 
Una vez que seleccione 
la zona, el temporizador 
ajustará automática-
mente a hora de salida y 
puesta el sol.

TM

0

7

 1

683

 2

018


UP_DigitalTimerKit_w_LineCordLid.book  Page 17  Wednesday, October 31, 2018  5:49 PM

Содержание Digital timer kit

Страница 1: ...GRUNDFOS INSTRUCTIONS Digital timer kit Installation and operating instructions UP_DigitalTimerKit_w_LineCordLid book Page 1 Wednesday October 31 2018 5 49 PM...

Страница 2: ...2 UP_DigitalTimerKit_w_LineCordLid book Page 2 Wednesday October 31 2018 5 49 PM...

Страница 3: ...n must be sent freight prepaid documentation supporting the warranty claim and or a Return Material Authorization must be included if so instructed Grundfos will not be liable for any incidental or co...

Страница 4: ...eplacement terminal box cover installation and operating instructions DANGER Indicates a hazardous situation which if not avoided will result in death or serious personal injury WARNING Indicates a ha...

Страница 5: ...ox cover Fig 2 Cutting the black wire and the white wire Fig 3 Freeing the wires marked Ground N and L Removing the old line cord Before you can replace the line cord you must remove the old line cord...

Страница 6: ...the tab marked N or Neutral while inserting the end of the white wire into the slot Release the tab to lock the white wire into place 5 Press down the tab marked L or Line while inserting the end of...

Страница 7: ...gs and events You may unplug the timer from the AC outlet for easier setting TM07 1682 2018 When setting the timer if you pause for more than 30 seconds the timer will automatically return to normal t...

Страница 8: ...and AM or PM flashing The AM plus icons screen means this event will happen at sunrise The PM plus icons means this event will happen at sunset 8 Press PROGRAM to accept the sunrise sunset setting an...

Страница 9: ...TO OFF Automatic mode is selected and the device is OFF The device will stay OFF until the next ON event RDM OFF Random mode is selected and the device is OFF The device will stay OFF until the next O...

Страница 10: ...fos ou un atelier de maintenance doit tre exp di port pay la documentation rela tive la d claration de demande de garantie et une autorisation de retour de mat riel ven tuelle doit tre jointe si elle...

Страница 11: ...rise de 115 V Brancher le c ble d alimentation de la pompe dans la prise de la minuterie S assurer que le c ble d alimentation ne touche pas le conduit d vacuation du chauffe eau aliment au gaz ou au...

Страница 12: ...la minuterie s il s coule plus de 30 secondes d inacti vit la minuterie retourne automati quement l affichage normal de l heure de la journ e 1 Appuyer sur TIME L ann e 4 chiffres s affiche en cligno...

Страница 13: ...ue de la journ e pas ser directement l tape 9 Pour r gler l v nement sur le lever ou le coucher du soleil passer l tape 7 7 Appuyer sur ou pour avancer jusqu l un des 2 crans avec les ic nes de lune e...

Страница 14: ...nne dans une marche de 30 minutes par rapport aux r glages des v nements ON OFF afin de cr er une appa rence habit e OFF Le mode OFF manuel est s lec tionn L appareil reste l arr t OFF AUTO OFF Le mod...

Страница 15: ...ro de servicio autorizado para solicitar ins trucciones Cualquier producto defectuoso que deba ser devuelto a la f brica o a un centro de servicio deber enviarse con porte pagado incluyendo la documen...

Страница 16: ...aci n y operaci n PELIGRO Indica una situaci n peligrosa que de no corregirse dar lugar a un riesgo de muerte o lesi n personal grave ADVERTENCIA Indica una situaci n peligrosa que de no corregirse po...

Страница 17: ...iciar el temporizador y borrar todos los ajus tes y eventos Puede desenchufar el temporizador del tomacorriente de CA para ajustarlo m s f cilmente TM07 1682 2018 Cuando ajuste el temporizador si hace...

Страница 18: ...a una hora espec fica del d a vaya al paso 9 Para ajustar que este evento ocurra a la salida o puesta del sol contin e con el paso 7 7 Presione o para desplazarse a una de las dos pantallas que tiene...

Страница 19: ...ar por 30 minutos a partir de los ajustes de evento ON OFF programados para pro porcionar una apariencia habitada OFF Modo OFF manual seleccionado El dispositivo permanecer APAGADO Auto OFF Apagado au...

Страница 20: ...20 UP_DigitalTimerKit_w_LineCordLid book Page 20 Wednesday October 31 2018 5 49 PM...

Страница 21: ...21 UP_DigitalTimerKit_w_LineCordLid book Page 21 Wednesday October 31 2018 5 49 PM...

Страница 22: ...22 UP_DigitalTimerKit_w_LineCordLid book Page 22 Wednesday October 31 2018 5 49 PM...

Страница 23: ...righton Road Oakville Ontario L6H 6C9 Canada Phone 1 905 829 9533 Telefax 1 905 829 9512 www grundfos ca GRUNDFOS M xico Boulevard TLC No 15 Parque Industrial Stiva Aeropuerto C P 66600 Apodaca N L M...

Страница 24: ...fos the Grundfos logo and be think innovate are registered trademarks owned by Grundfos Holding A S or Grundfos A S Denmark All rights reserved worldwide Copyright Grundfos Holding A S UP_DigitalTimer...

Отзывы: