19
GROWSPAN
™
ROUND ECONOMY HIGH TUNNELS
Revision date: 10.25.21
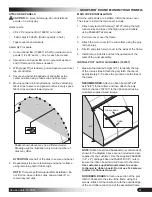
ROPE
#1
ROPE
#2
A
B
C
D
ANTI-BILLOW ROPE INSTALLATION
TO PREVENT DAMAGE AND POSSIBLE INJURY, INSTALL ANTI-BILLOW ROPES
IN SHORT LENGTHS
ALONG EACH SIDE. DO NOT INSTALL AS A SINGLE LENGTH TIED AT EACH END. DOING SO WILL RESULT
IN A LOOSE SIDE PANEL IF SINGLE ROPE BREAKS.
CONSULT THE SIDE PROFILE DIAGRAM FOR YOUR
FRAME LENGTH IN THE QUICK START SECTION FOR ROPE PATTERN AND ROPE HOOK LOCATIONS.
Follow these general steps to attach the 117063 rope hooks, FA2061
eyebolts, and install the anti-billow ropes:
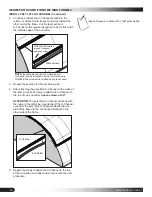
1. Determine the location of rope hooks, eyebolts, and the number of
anti-billow ropes for each side using the Side Profile diagram in the
Quick Start section for your frame length.
2. Attach the 117063 rope hooks using wood screws for wood and Tek
screws for metal. Be sure to note where one rope stops and the next
rope begins.
3. Take the CC5525 (1/4") rope and install it in short lengths along each
side. Pull tight to keep panels in place.
4. Test the operation of the roll-up side.
5. Repeat to install the anti-billow rope for the remaining side once the
panel is installed.
6. With all anti-billow ropes installed, continue with the next page.
INSTALL ANTI-BILLOW ROPES
C
D
A
B
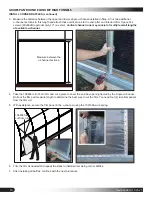
NOTE:
In those
instances when
two ropes
terminate at the
baseboard or
lower position (D),
install the rope
snaps and rope
as shown in these
photos.
Photos show
using optonal
hat channel for
baseboards.


