background image

7

Revision date: 01.28.20

Twin-Wall Single Swinging Door

SINGLE TWIN-WALL DOOR ASSEMBLY (continued)

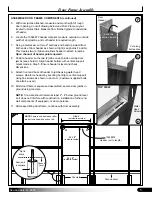
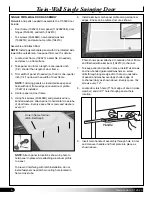
13. With assistance, set assembled door in door frame 

and secure hinges to door jamb 

using one Tek screw 

per hinge at this time

.

Locations of door hinges may vary.

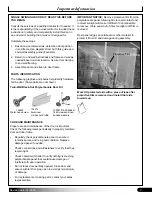
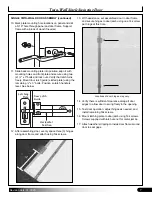
10. Mark plate mounting hole locations on panel and drill 

a 5/16" hole through panel and door frame. Support 

frame with a block of wood if needed.

11.  Slide back mounting plate into position, align it with 

mounting holes and front plate and secure using two 

(2) ¼" x 3" bolts and lock nuts. Verify that latch turns 

freely. Mount 

door latch guide

 (slotted plate) using the 

remaining ¼" x 3" bolts. Position so latch handle is 

level. See below.

Horizontal 

Position

Door Latch 

Guide

Latching

Plate

12. After assembling door, evenly space three (3) hinges 

along door frame and attach using Tek screws.

14. Verify there is sufficient clearance along all door 

edges to allow door to swing freely in the opening.

15. Test door operation, adjust hinges as needed, and 

install remaining Tek screws.

16. Mount latching plate to door jamb using Tek screws. 

Screws supplied with latch are not for metal jambs

.  

17. Attach weather stripping to inside door frame around 

door to seal gaps. 

12"

Содержание 115020

Страница 1: ...olycarbonate GrowSpan Single Swinging Door Black Out Door Kit ATTENTION Door kit includes materials for door only All other components shown in the diagram above and diagrams throughout this guide are...

Страница 2: ...work platforms and other machinery for lifting designed to work safely at door and door frame height ATTENTION Consult the services of a qualified professional contractor if you are not familiar with...

Страница 3: ...t or missing parts contact your sales representative SINGLE SWINGING DOOR KIT READ THIS BEFORE YOU BEGIN Consult the services of a qualified contractor if needed It is the responsibility of the owner...

Страница 4: ...nd C and Side View diagram ATTENTION Diagrams A D show left door jamb only Adjust cuts when cutting end for right jamb 4 Using diagrams as guides attach jambs to girts using 108553 wafer head screws p...

Страница 5: ...door jambs see photo H Align header bottom with vertical support marks made in Step 5 Ensure header is level and check dimensions 9 Attach front and back of header to jambs using wafer head screws Re...

Страница 6: ...lvanized neo bonded washers attach panel to horizontal cross tube of door frame Evenly space Tek screws and washers every 12 Photo shows panel attached to outside of door frame and finished with alumi...

Страница 7: ...e using two 2 x 3 bolts and lock nuts Verify that latch turns freely Mount door latch guide slotted plate using the remaining x 3 bolts Position so latch handle is level See below Horizontal Position...

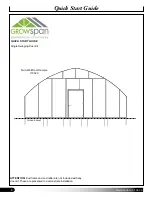
Страница 8: ...0 QUICK START GUIDE Single Swinging Door Kit Quick Start Guide Twin Wall Door Sample 115020 Ground Level ATTENTION End frame and end rafter are not included with any door kit These are presented to de...

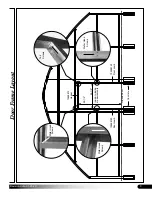
Страница 9: ...01 28 20 Door Frame Layout 48 1 2 92 1 2 inside to inside measurements 105488120 Door Jamb 105488120 Door Jamb Ground Level 10548872 Header Wafer Head Screws Wafer Head Screws Wafer Head Screws Tek S...

Отзывы: