2
Revision date: 01.28.20
READ THIS DOCUMENT BEFORE YOU BEGIN
Thank you for purchasing this GrowSpan™ door kit.
When properly assembled and maintained, this product
will provide years of reliable service. These instructions
include helpful hints and important information needed to
safely assemble and properly maintain the door. Please
read these instructions
before
you begin.
SAFETY PRECAUTIONS
• Wear eye protection.
• Wear head protection.
• Use a portable GFCI (Ground Fault Circuit
Interrupter) when working with power tools and cords.
WARNING:
Individuals assembling this door are
responsible for designing and furnishing all temporary
bracing, shoring, and supports during assembly.
For safety reasons, those who are not familiar with
recognized construction methods and techniques
must seek the help of a qualified contractor.
REQUIRED TOOLS
This list identifies the main tools needed.
Additional tools
and supports may be required depending on structure,
location, and application.
• Tape measure or measuring device
• Fine point marker to mark frame members
• Variable speed drill and impact driver (cordless with
extra batteries works best)
• Tool to cut polycarbonate panel
• Hammers, gloves, and eye protection
• Ladders, work platforms, and other machinery for
lifting designed to work safely at door and door frame
height.
ATTENTION:
Consult the services of a qualified,
professional contractor if you are not familiar with
construction of similar frame structures and components.
Important Information
UNPACK AND IDENTIFY PARTS
Complete these steps to ensure that you have all
necessary parts
:
1. Unpack shipment and place where you can easily
inventory parts. Refer to the Bill of Materials/Spec
Sheets.
2. Verify that all parts listed on Bill of Materials/Spec
Sheets are present. If anything is missing or you
have questions, consult parts guide and all diagrams
for clarification, or contact customer service.
NOTE:
At this time, do not open plastic bags
containing smaller parts such as fasteners and
clamps (if equipped).
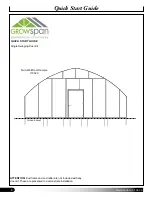
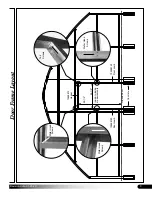
QUICK START DIAGRAMS
For a quick overview of door and door components,
consult the diagrams near the back of this guide.
ASSEMBLY PROCEDURE
Following instructions as presented will help ensure the
proper installation of end frame and door. These step
outline the assembly process:
1. Verify that all parts are included in the shipment.
Notify Customer Service for questions or concerns.
2. Read these instructions and all additional
documentation
before
you begin.
3. Gather the tools, bracing, and ladders (and lifts)
needed to install door and door frame.
4. Read the care and maintenance information on next
page.


