


9
OM-DEES(T)-40(C,A,C2T™) Domestic
JACKET FILLING
The jacket was charged at the factory with the proper amount of treated water.
You may need to restore this water, either because it was lost as venting steam or
by draining. If you are replacing water lost as steam, use distilled water. If you are
replacing treated water that ran out of the jacket, prepare more treated water as
directed in “Water Treatment Procedure,” below.
1. Allow the kettle to cool completely. The procedure will be easier with the kettle
under vacuum (pressure gauge reading below zero).
2. Allow the kettle to cool completely. Remove the pipe plug from the jacket fill
assembly. Pour in the distilled or treated water. Using a funnel will help you
in this process. Hold the pressure relief valve open while you pour, to let air
escape from the jacket. Continue adding water until the water level rises to the
center of the round sight glass.
3. Position a funnel in the opening and fill it with properly treated water.
4. Air that gets into the jacket during the filling operation must be removed,
because it will make heating less efficient. Follow the procedure in Jacket
Vacuum/Removing Air From Jacket above, to restore a negative pressure
reading.
WATER TREATMENT
1. Obtain water treatment compound and a pH test kit from your authorized parts
distributor.
2. Fill a mixing container with the measured amount of water required. (See
table). Distilled water is recommended.
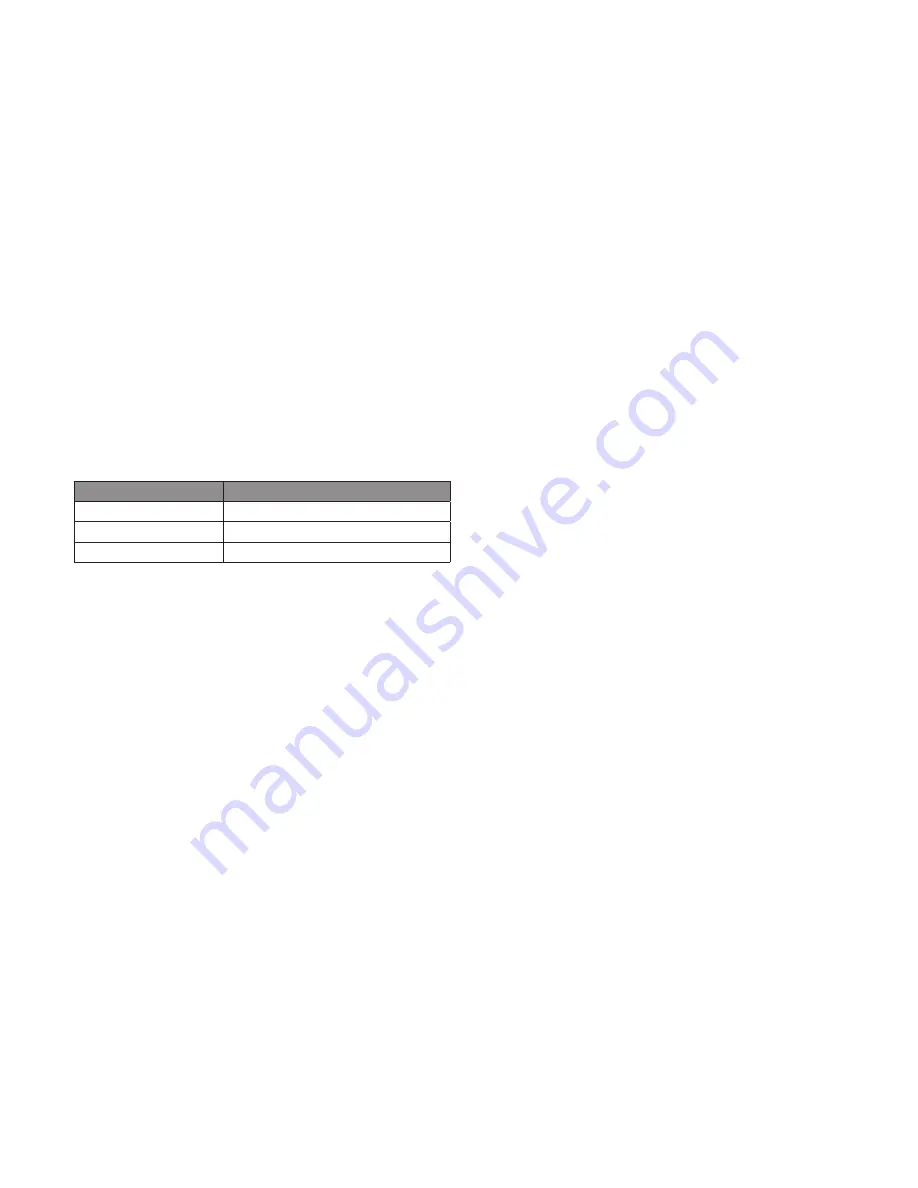
Kettle Model
Jacket Capacity
DEE/4-20(C,A,C2T)
3-1/4 Gallons (12.3 liters)
DEE/4-40(C,A,C2T)
4-1/2 Gallons (17.0 liters)
DEE/4-60(C,A,C2T)
5 Gallons (18.9 liters)
3. Hang a strip of pH test paper on the rim of the container, with about 1 inch of
the strip below the surface of the water.
4. Measure the water treatment compound (One way to do this is to add the
compound from a measuring cup.)
5. Stir the water continuously, while you slowly add water treatment compound,
until the water reaches a pH between 10.5 and 11.5. Judge the pH by
frequently comparing the test strip color with the color chart provided in the pH
test kit. If you are color blind use an electroanalytical instrument to measure
the pH level or have a person who is not color blind read the test strip color
level.
6. Record the exact amounts of water and treatment compound used. These
amounts may be used again, if the same water sources and compound are
used in the future. However, it is best to check the pH each time treated water
is prepared.
SEQUENCE OF OPERATION
The following “action-reaction” outline is provided to help understand how the
kettle works.
When the operator starts up the kettle by turning the power switch “ON” and
heat knob from “OFF” to a desired setting, the control relay closes. This lights up
the heating indicator light and causes the contactors to close, allowing power to
flow to heating elements.
When the temperature of the steam jacket reaches the value corresponding to
the heat setting, the control relay opens. This turns off the heating indicator light
and causes the contactors to open, stopping the power to the heaters.
As soon as the controller senses that the kettle is cooling below the set point, the
control relay closes, the heating indicator light comes on, the contactors close,
and the heaters come on again. On-off cycling continues, keeping the kettle at
the set temperature.
This is why the heating indicator light cycles on and off during normal operation.
Every time the kettle is tilted, the tilt cut-off switch interrupts the power supply to
the heaters, so that the heating elements will not operate while not submerged
in the jacket water.
If steam pressure greater than 50 PSI is generated in the jacket, the safety valve
will open and relieve the excess pressure.
If the jacket water level gets too low before the heating elements overheat, the high-
limit control will open and shut off power to the elements until the kettle cools.
Setting the power switch dial to “OFF” shuts down all control and heating
circuits.
The kettle has the following safety features:
1. Low water cutoff relay that will remove power from control and contactors
until the jacket water level is corrected.
2. High limit pressure switch, set to open at about 46 PSI and to shut down the
heat until jacket pressure is decreased.
3. Pressure relief valve, which will release steam if jacket pressure exceeds 50 PSI.
4. Tilt switch, which shuts off all heat when the kettle is tilted.
REPLACEMENT PARTS
To order parts, contact your Authorized Service Agent. Supply the model
designation, serial number, part description, part number, quantity, and when
applicable, voltage and phase.
CONTACT US
If you have questions pertaining to the content in this manual, contact Unified
Brands at 888-994-7636.
Содержание DEE/4-20 A
Страница 11: ...11 OM DEES T 40 C A C2T Domestic Parts List...
Страница 12: ...12 OM DEES T 40 C A C2T Domestic Parts List...
Страница 14: ...14 OM DEES T 40 C A C2T Domestic Wiring Diagram For Classic Control Models...
Страница 15: ...15 OM DEES T 40 C A C2T Domestic Wiring Diagram For Advanced Cook2Temp Control Models...


