Страница 1: ...C WARNING NO PORTION OF THIS MANUAL MAY BE REPRODUCED IN ANY SHAPE OR FORM WITHOUT THE WRITTEN APPROVAL OF GRIZZLY INDUSTRIAL INC CS20849 PRINTED IN CHINA V1 02 20 MODEL T30945 7 BENCHTOP TILE SAW OWN...
Страница 2: ...g grinding tool integrity and the usage of personal protective equipment The manufacturer will not be held liable for injury or property damage from negligence improper training machine modifications...
Страница 3: ...onnection 16 Lifting Moving 17 Test Run 17 SECTION 4 OPERATIONS 18 Operation Overview 18 Disabling Locking Switch 19 Cutting Tips 19 Changing Water 19 Making Rip Cuts 20 Making Miter Cuts 20 Making Be...
Страница 4: ...uous improvement also means that sometimes the machine you receive is slightly different than shown in the manual If you find this to be the case and the difference between the manual and machine leav...
Страница 5: ...ree of openings and grooves e Replacedamagedbladesbeforeoperating f Do not fill water bath above water fill line Like all machinery there is potential danger when operating this machine Accidents are...
Страница 6: ...L Overflow Drain Plug Drains excess water and removes to drain water bath Refer to the following figures and descriptions to become familiar with the basic controls and com ponents of this machine Un...
Страница 7: ...20V Single Phase 60 Hz Full Load Current Rating 6 5A Minimum Circuit Size 15A Connection Type Cord Plug Power Cord Included Yes Power Cord Length 6 ft Power Cord Gauge 18 AWG Plug Included Yes Include...
Страница 8: ...er Guide Aluminum Splash Hood Plastic Paint Type Finish Enamel Other Related Info Water Bath Capacity 2 3L Other Specifications Country of Origin Taiwan Warranty 1 Year Serial Number Location ID Label...
Страница 9: ...d proof DANGEROUS ENVIRONMENTS Do not use machinery in areas that are wet cluttered or have poor lighting Operating machinery in these areas greatly increases the risk of accidents and injury MENTAL A...
Страница 10: ...moving parts or flying debris Make sure they are properly installed undamaged and working correctly BEFORE operating machine FORCING MACHINERY Do not force machine It will do the job safer and better...
Страница 11: ...workpiece from behind blade Never move workpiece sideways or perform a free hand operation Always wait for blade to come to a complete stop before removing workpiece Do not force blade through workpie...
Страница 12: ...rsized circuit To reduce the risk of these hazards avoid over loading the machine during operation and make sure it is connected to a power supply circuit that meets the specified circuit requirements...
Страница 13: ...ord size gets longer and the gauge size gets smaller higher gauge numbers indicate smaller sizes Any extension cord used with this machine must be in good condition and contain a ground wire and match...
Страница 14: ...or Setup This machine was carefully packaged for safe transport When unpacking separate all enclosed items from packaging materials and inspect them for shipping damage If items are damaged please cal...
Страница 15: ...Model T30945 Mfd Since 12 19 13 Hardware Recognition Chart USE THIS CHART TO MATCH UP HARDWARE DURING THE INVENTORY AND ASSEMBLY PROCESS 5mm 5mm Flat Head Cap Screw...
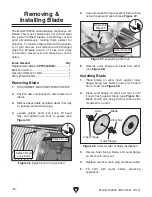
Страница 16: ...ood flange screws location 5 Attach splash hood assembly to table with flange screws so blade guard rests over blade see Figure 8 x 3 6 Loosen splash hood lock knob see Figure 8 and adjust hood until...
Страница 17: ...the Machine Data Sheet for the weight and footprint specifications of your machine Some workbenches may require additional rein forcement to support the weight of the machine and workpiece materials...
Страница 18: ...disconnecting the machine from the power supply 1 Turn the machine power switch OFF 2 Grasp the molded plug and pull it completely out of the receptacle DO NOT pull by the cord as this may damage the...
Страница 19: ...sing this machine BEFORE understanding its controls and related safety information DO NOT operate or allow others to operate machine until the information is understood To test run machine 1 Clear all...
Страница 20: ...o be an instructional guide To learn more about specific operations read this entire manual seek additional training from experienced machine operators and do additional research outside of this manua...
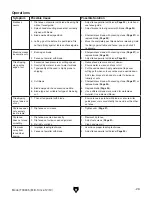
Страница 21: ...cting power from the machine when adjusting or servicing Padlock ON OFF Switch Cutting Tips Move tile slowly through the cut to reduce chipping Ensure blade is consistently wet at point of cut If blad...
Страница 22: ...at front of saw 3 Unlock rip fence by lifting rip fence lock lever adjust to desired width on scale and push lock lever down to secure see Figure 20 Figure 20 Rip fence lock lever location Figure 22 T...
Страница 23: ...iter cut Top view Tile 7 Ensure blade is wet then push tile through cut see Figure 26 Figure 25 Splash hood lock knob location 6 Connect machine to power and turn ON Splash Hood Lock Knob Making Bevel...
Страница 24: ...ng To make an L cut 1 DISCONNECT MACHINE FROM POWER 2 Mark bottom of tile with area to be cut 3 If making an angled cut loosen miter guide lock knob adjust to desired miter angle and tighten to secure...
Страница 25: ...contact second line drawn in Step 2 see Figure 34 7 Connect machine to power and turn ON Figure 33 Splash hood lock knob location Blade Guard Lock Knob Top view Tile Stop Line Figure 34 First cut com...
Страница 26: ...drain water from tray by pulling overflow drain plug 4 Loosen splash hood lock knob lift hood fully and tighten lock knob to secure see Figure 36 Figure 36 Splash hood in up position Splash Hood Remov...
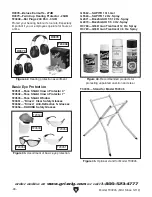
Страница 27: ...10456 Anti Fatigue Mat G5726 4 Pc Combination Square 12 This four piece Combination Square has cast iron square center heads and 12 blade with gradu ations down to 64ths Square head features spirit le...
Страница 28: ...otector 4 T20502 Face Shield Crown Protector 7 T20503 Face Shield Window T20451 Kirova Clear Safety Glasses T20452 Kirova Anti Reflective S Glasses T20456 DAKURA Safety Glasses Figure 43 Assortment of...
Страница 29: ...vely sharpens the blade To dress the blade slowly cut into a dressing stone as you would a tile until the entire band of abrasive passes through the stone Repeat as necessary Dressing Blade Sealed and...
Страница 30: ...n motor let cool and reduce workload 5 Unplug machine and free blade from workpiece 6 Replace switch 7 Fix broken wires or disconnected corroded connections 8 Test repair replace Machine stalls or is...
Страница 31: ...le used is highly prone to chipping 4 Dull blade 5 Blade warped or has excessive wobble 6 Blade type not suitable for type of tile being cut 1 Reduce feed pressure and cut slower 2 Ensure water is cle...
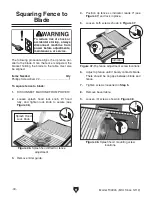
Страница 32: ...lock in place x 2 Squaring Fence to Blade To reduce risk of shock or accidental startup always disconnect machine from power before adjustments maintenance or service The following procedure aligns t...
Страница 33: ...s 2 3mm 1 Ea 1 DISCONNECT MACHINE FROM POWER 2 Remove miter guide from rip fence and unlock and remove rip fence from table Tightening Cam 4 Tighten cam by turning it towards lock lever see Figure 50...
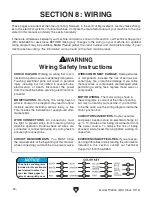
Страница 34: ...nt at the time of printing but may not match your machine If you find this to be the case use the wiring diagram inside the motor junction box CAPACITORS INVERTERS Some capacitors and power inverters...
Страница 35: ...ubber gasket between motor and switch Otherwise internal wiring may be exposed to water causing machine damage and increasing the risk of electrical shock 35MFD 250VAC Neutral Hot Ground 120 VAC 5 15...
Страница 36: ...9 18 5 8 3 2 1 3 2 4 6 7 38 39 41 37 42 42 40 72 74 86 104 81 73 82 66 65 67 78 47 50 48 43 51 50 44 44 45 45 46 49 52 44 50 60 58 59 55 44 53 54 57 56 45 45 48 49 50 51 62 71 74 89 104 1 104 2 104 3...
Страница 37: ...70 PT30945070 SWITCH REAR PANEL 23 PT30945023 FENCE LOCK CAM BRACKET 71 PT30945071 TAP SCREW M3 5 X 13 24 PT30945024 RUBBER PLATE 72 PT30945072 TABLE 25 PT30945025 PHLP HD SCR M4 7 X 6 73 PT30945073 G...
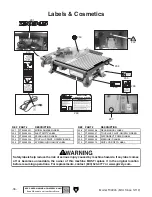
Страница 38: ...ouch or reach over behind moving blade 3 Always wear approved eye and ear protection and a respirator 4 Only connect power cord to grounded GFCI outlet 5 Always use splash hood for every operation for...
Страница 39: ...for incidental contingent special or consequential damages arising from the use of our products The manufacturers reserve the right to change specifications at any time because they constantly strive...
Страница 40: ......