


-24-
Model T28360 (Mfd. Since 11/18)
To reduce risk of shock or
accidental startup, always
disconnect machine from
power before adjustments,
maintenance, or service.
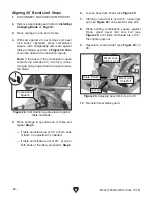
Figure 25. Aligning left fence to right fence.
Aligning Bevel Limit
Stops
1. DISCONNECT MACHINE FROM POWER!
2. Remove clear blade guard (refer to Installing/
Changing Blade on Page 18).
3. Move carriage to one end of table.
Aligning 0˚ Bevel Limit Stops
This procedure aligns the bevel limit stops, which
align the saw carriage to the table and allow it to
be quickly set to 45˚ and return to 0˚.
— If fences are parallel, no adjustment is
needed.
— If fences are not parallel, proceed to
Step 7.
7. Loosen hex nuts that secure left fence to
table, and adjust left fence as necessary until
left and right fences are parallel, then re-
tighten hex nuts.
6. Move carriage out of way and place long
side of square against left and right fence, as
shown in
Figure 25).
Item(s) Needed
Qty
Phillips Head Screwdriver #1 ............................. 1
Open-End Wrench 10mm .................................. 2
Small Machinist's Square .................................. 1
Combination Square .......................................... 1
Left
Fence
Right
Fence
Long Edge of
Square