


-68-
Model g0661/g0713 (Mfg. since 1/10)
Blade Tilt Stops
the table saw features set screws that stop the
blade exactly at 45° and 90° when tilting it with
the handwheel.
the stops have been set at the
factory and should require no adjustments, unless
you notice that your cuts are not accurate.
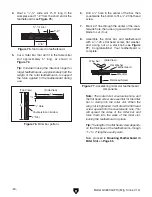
if you do need to adjust the blade tilt stops, you
can access the set screws from the top of the
table, in the holes shown in
Figure 108.
Figure 108. 90° stop bolt and jam nut.
90° stop
screw
Note:
The tilt scale reads "0" when the blade is
90° to the table.
Tools Needed
Qty
90
° square ........................................................ 1
45° square ........................................................ 1
hex Wrench 4mm .............................................. 1
phillips screwdriver ........................................... 1
Setting 90° Stop Bolt
1. disConnECt saW FroM poWEr!
2. raise the blade as high as it will go, then tilt
it toward 0° until it stops and cannot be tilted
any more.
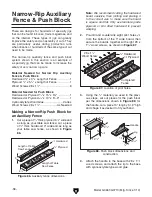
3. place a 90° square against the table and
blade so it contacts the blade evenly from
bottom to top, as shown in
Figure 109. Make
sure a blade tooth does not obstruct the
placement of the square.
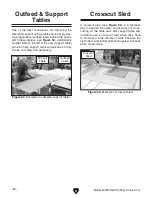
Figure 110. tilt indicator arrow.
phillips head
screw
indicator
—if the blade is not 90° to the table, you will
need to adjust the 90° stop screw. proceed
to the next step.
4. tilt the blade to about 5°, so there is room for
the set screw to move.
5. adjust the 90° set screw according to how far
off the blade was from 90°, then recheck the
blade and repeat the adjustment as neces-
sary until the blade stops at 90°.
—if the blade is 90° to the table, then adjust-
ments do not need to be made. Make sure
the tilt indicator arrow shown in
Figure 110
points to the 0° mark on the scale. adjust
the position by loosening the screw, mov-
ing the indicator with your fingers, then
tightening the screw.
Figure 109. Checking blade at 90°.
IVWaZ
.%HfjVgZ
7aVYZ
45° stop
screw


