


Model g0661/g0713 (Mfg. since 1/10)
-51-
Resawing Operations
the table saw motor is pushed to its limits when
resawing. if the motor starts to bog down, slow
down your feed rate. Motor overloading and blade
wear can be reduced by using a ripping blade.
ripping blades are designed to clear the sawdust
quickly.
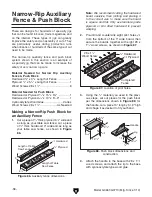
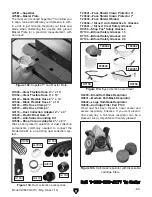
Components Needed for Resawing:
zero Clearance insert .........................................1
ripping Blade 10" ...............................................1
riving Knife ........................................................1
Clamps ...............................................................2
shop Made auxiliary Fence ...............................1
shop Made resaw Barrier .................................1
you may experience kickback during this
procedure. Stand to the side of the blade
and wear a full face shield to prevent injury
when resawing.
To perform resawing operations:
1. disConnECt saW FroM poWEr!
2. remove the standard table insert and the
blade guard/spreader assembly.
3. install a ripping blade, install the riving knife,
lower the blade below the table, then re-
install the standard insert.
do not use the standard insert if it has lost the
zero clearance feature by modification; if so
you must install the optional Model t21876.
4. attach the auxiliary fence to the standard
fence and set it to the desired width.
Note:
When figuring out the correct width,
don't forget to account for blade kerf and the
inaccuracy of the fence scale while the auxil-
iary fence is installed.
The danger of kickback increases relative to
the depth of a cut. Reduce the risk of kick-
back by making multiple passes to achieve
the desired depth of cut. Failure to follow
these warnings could result in serious per-
sonal injury.
Always use push sticks or push paddles to
increase safety and control during opera-
tions which require that the blade guard
and spreader must be removed from the
saw. ALWAyS replace the blade guard after
resawing is complete.
6. lower the blade completely below the table
and slide the workpiece over the blade
to make sure it moves smoothly and fits
between the resaw barrier and fence.
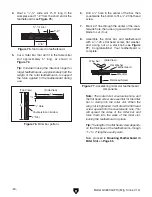
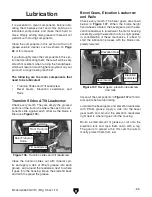
7. raise the blade approximately an inch, or
close to half the height of the workpiece
(
Figure 73), whichever is less.
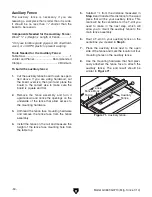
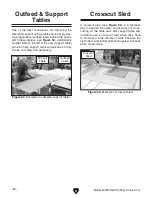
6jm^a^Vgn
;ZcXZ
;ZcXZ
GZhVl
7Vgg^Zg
Ldg`e^ZXZ
(Front View)
Figure 72. ideal resaw workpiece setup.
5. place the workpiece against the auxiliary
fence and slide the resaw barrier against
the workpiece, as shown in
Figure 72. now
clamp the resaw barrier to the top of the table
saw at both ends.


