


G0641 Double Miter Saw
-17-
Test Run
Once the assembly is complete, test run your
machine to make sure it runs properly. The test
run consists of verifying the following: 1) The saw
motors power up and run correctly, and 2) the
front guard safety feature works correctly.
If, during the test run, you cannot easily locate the
source of an unusual noise, vibration, or action,
stop using the machine immediately, then review
the
Troubleshooting
on
Page 31
.
If you still cannot remedy a problem, contact our
Tech Support at (570) 546-9663 for assistance.
To test run the machine:
1.
Make sure you have read and understand
the safety instructions at the beginning of the
manual and that the machine is setup prop-
erly.
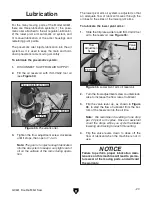
2.
Check for proper lubrication (refer to
Lubrication
on
Page 27
).
3.
Make sure the saw blades are firmly secured
by the arbor bolts and flanges (refer to
Replacing Blades
on
Page 22
for detailed
instructions).
4.
Make sure all tools and objects used during
set up are cleared away from the machine.
5.
Connect the machine to the power and air,
correctly adjust the air pressure on both regu-
lators, then turn the machine
ON
.
6.
Listen to and watch for abnormal noises or
actions. The machine should run smoothly
with little or no vibration or rubbing noises.
— Strange or unusual noises should be inves-
tigated and corrected before operating the
machine further. Always disconnect the
machine from power when investigating or
correcting potential problems.
7.
Turn the power
OFF
.
8.
Press the foot pedal actuator—the hold-
downs and blades should lower. Lift your foot
from the pedal—the blades and hold-down
should raise.
9.
Remove the two thumb screws securing the
front guard (see
Figure 14
) and swing the
guard up, as shown in
Figure 15
.
Figure 14.
Front guard thumb screws.
Front Guard
Thumb Screws
10.
Standing away from the front of the saw, turn
the machine
ON
.
—If the machine
DOES
NOT
start, the front
guard safety feature is working correctly.
Lower the front guard and secure it with the
two thumb screws before proceeding.
—If the machine
DOES
start (with the front
guard raised up), immediately disconnect
power to the machine. The front guard
safety switch (
Figure 15
) is not working
correctly. This safety feature must work
properly before proceeding with the rest of
the test run. Call Tech Support for help.
Figure 15.
Front guard in the upper position.
Safety Switch
Содержание G0641
Страница 2: ......
Страница 5: ...G0641 Double Miter Saw 3 Machine Data Sheet machine data sheet...
Страница 7: ...G0641 Double Miter Saw 5 Safety Instructions for Machinery...
Страница 8: ...6 G0641 Double Miter Saw...
Страница 41: ...G0641 Double Miter Saw 39 SECTION 8 PARTS Cabinet Breakdown...
Страница 43: ...G0641 Double Miter Saw 41 Drive System Breakdown table inserts...
Страница 47: ...G0641 Double Miter Saw 45 Electrical Lubrication Systems Breakdown...
Страница 49: ...G0641 Double Miter Saw 47 Pneumatic System Breakdown pneumatic system breakdown...
Страница 52: ...50 G0641 Double Miter Saw...
Страница 53: ......
Страница 54: ......
Страница 55: ...WARRANTY AND RETURNS WARRANTY AND RETURNS...
Страница 56: ......