background image

WARNING:

ALWAYS ENSURE THE AXLE BUTTON IS POPPED OUT AND THE

COUPLING REACHES THE FREEWHEEL. Riding the GRIT Junior without the wheels fully

attached could cause a wheel to fall o  the chair, causing a crash and fall and may result in serious injury
or death.

Note:

If the push-button is depressed and the coupling does not reach the freewheel, the chair is not

safe to ride.

Note:

By design, the spacing

will be slightly di erent

between the coupling and the

freewheel on the right and left sides of the chair. This is okay! If unsure about the connection,

try pulling the wheel o  to check whether it is correctly locked in place.

15

Содержание GRITJunior

Страница 1: ...GRIT Junior Assembly Guide User Manual GRIT Freedom Chair Support 617 356 8106 support gogrit us ...

Страница 2: ... 3 Attaching the Seatback 16 3 4 Adjusting the Seatback 17 3 5 Attaching the Footrest 18 3 6 Fit and Seating 19 3 7 Attaching the Trail Handles 20 4 Disassembly 22 4 1 Removing the Rear Wheels 23 4 2 Removing the Seatback 24 4 3 Transporting the GRIT Junior 25 5 Riding 26 5 1 Safety 27 5 2 Pre Ride Safety Checks 27 5 3 Safety When Riding 28 6 Using the Levers 30 6 1 Inserting Removing the Levers 3...

Страница 3: ...ng Hills 46 8 2 Descending Slopes 46 8 3 Curbs 47 9 Maintenance 48 9 1 Caring For Your GRIT Junior 49 9 2 Handy Tools 49 10 Common Adjustments 51 10 1 Inflating the Wheels 52 10 2 Chain Tension Adjustment 52 10 3 Parking Brake Adjustment 52 10 4 Changing the Gear Ratio 52 11 Warranty Information 53 11 1 Design Support 54 11 2 GRIT limited warranty 54 2 ...

Страница 4: ...3 ...

Страница 5: ...ST 1 2 Safety First Riding the GRIT Junior requires some practice It will likely take a few rides before young riders feel comfortable with the motions After that they ll be able to work on more technical terrains and maneuvers build up their strength and incrementally increase their distance We hope that from day one onward your young rider and family can have a great time with your new chair Thi...

Страница 6: ...accept all risks associated with using the GRIT Junior 1 3 Intended Operator In order to safely operate the GRIT Junior independently certain levels of upper body strength and control are required Grip strength is required for braking and turning but adaptations can be made such as using Active Hands gloves to pull the levers back for braking and turning It is your responsibility to determine if t...

Страница 7: ...6 ...

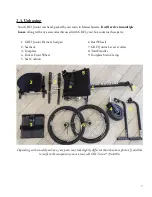
Страница 8: ...box contains these parts 1 GRIT Junior Frame Seatpan 2 Seatback 3 Footplate 4 Fork Front Wheel 5 Seat Cushion 6 Rear Wheels 7 GRIT Junior Levers Axles 8 Trail Handles 9 Footplate Stem Clamp Depending on the model you have your parts may look slightly different than the above photo If you d like to confirm the components you received call GRIT at 617 356 8106 7 ...

Страница 9: ...otplate clamp which will be securing one of the cardboard inserts Remove the clamp by loosening the clamp and pulling it away from the chair try twisting it to free it Remove the cardboard insert and reattach the clamp Note The clamp has a lip on it so it can only be put on the tube in one orientation Please use the following images to complete these first 2 steps a The frame is attached to the bo...

Страница 10: ... the fork curved chamfer side up 3 Insert the fork through the headset tube at the front of the chair 4 Slide the second bearing curved chamfer side down over the fork tube 5 Slide the compression ring cone side down over the fork tube and push it down until it contacts the bearing 6 Slide the bearing cover flat side down over the fork tube 7 Separately on a flat surface put the top cap cone side ...

Страница 11: ...Note Components of the fork assembly shown individually for identification purpose 10 ...

Страница 12: ...11 ...

Страница 13: ...12 ...

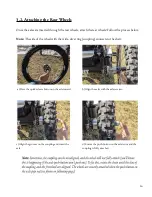
Страница 14: ...s show proper black caps The coupling can be seen in the lower images Once you confirm the black caps are secure insert the axles into the rear wheels First slide the axle into the hub from the side opposite the stainless steel coupling the coupling is the wide silver ring You ll have to press the button at the end of the axle to push it through the hub Make sure that the black hub caps do not fal...

Страница 15: ...ss below Note The side of the wheel with the wide silver ring coupling connects to the chair a Press the quick release button on the axle inward b Align the axles with the axle receiver c Align the grooves on the coupling and insert the axle d Ensure the push button on the axle is out and the coupling is fully attached 14 ...

Страница 16: ...all and may result in serious injury or death Note If the push button is depressed and the coupling does not reach the freewheel the chair is not safe to ride Note By design the spacing will be slightly differentbetween the coupling and the freewheel on the right and left sides of the chair This is okay If unsure about the connection try pulling the wheel off to check whether it is correctly locke...

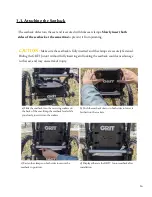
Страница 17: ...the GRIT Junior without fully inserting and locking the seatback could cause damage to the seat and may cause risk of injury a Slide the seatback into the receiving sockets on the back of the seat Keep the seatback level while you slowly insert it into the sockets c Fasten the clamps on both sides to secure the seatback in position b Push the seatback down on both sides to lower it farther into th...

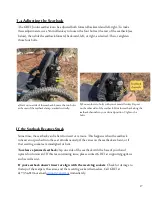
Страница 18: ...he seatback channels to your desired position Tighten the bolts If the Seatback Becomes Stuck Sometimes the seatback can be hard to insert or remove This happens when the seatback tubes are not pushed into the seat simultaneously if the canes on the seatback are bent or if the receiving sockets are misaligned or bent To release a jammed seatback Tap one side of the seatback with the base of your h...

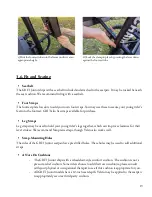
Страница 19: ...ollowing page for photos that will help with attaching the footrest CAUTION If the footrest is loose or sways side to side the clamp is not tight enough The adjustment nut controls the tightness of the clamp Pull the lever outward to open the clamp so the footrest can be inserted and removed Push the lever inward to close the clamp so the footrest is held in place a Ensure the footrest clamp is op...

Страница 20: ...g Straps Leg straps may be used to hold your young rider s legs together which can improve clearance for their lever strokes We recommend Neoprene straps though Velcro also works well Strap Mounting Holes The sides of the GRIT Junior seatpan have pre drilled holes These holes may be used to add additional straps A Note On Cushions The GRIT Junior ships with a wheelchair style comfort cushion The c...

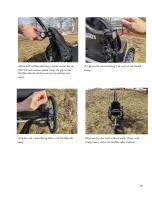
Страница 21: ...ed injuries Consult with your occupational therapist to make sure your GRIT Junior cushion is right for you Always wear closed toed shoes when riding the GRIT Junior 3 7 Attaching the Trail Handles The GRIT Junior comes with Trail Handles or push bars for the rear of the chair Follow these steps to securely attach them to your young rider s chair a Release the seatback pins by pushing down on the ...

Страница 22: ...e grips of the Trail Handles should face outward away from each other e Tighten the inward facing bolt on the Trail Handle clamp d Tighten the outward facing bolt on the Trail Handle clamp f Repeat steps b e for the other handle Above is the final product with both Trail Handles installed 21 ...

Страница 23: ...22 ...

Страница 24: ...wheels of the GRIT Junior can be easily removed with their quick release push button axles a Grab the wheel near the hub and push the axle button inward b Pull the wheel straight away from the chair while keeping the axle button pressed 23 ...

Страница 25: ...tons while lifting upward on the seatback Be sure to pull both sides of the seatback at the same timeto prevent the seatback from getting stuck a Loosen the bike clamps on both sides of the seatback b Pull upward on both sides of the seatback until it is released 24 ...

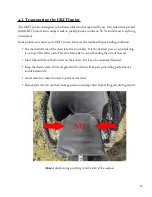
Страница 26: ...air into the trunk first It is the heaviest part so avoid placing it on top of the other parts Place the frame flat to avoid bending the side of the seat Most folks will leave the footrest on their chair but it can be removed if desired Keep the chains clean Dirt and gravel in the chain will impact your riding performance and drivetrain life Avoid metal on metal contact to prevent scratches Remove...

Страница 27: ...26 ...

Страница 28: ... control injury and even death Make sure the rider can use the brakes before going downhill CAUTION YOU CANNOT MOVE BACKWARD WITH THE LEVERS INSERTED The GRIT Junior is designed to prevent your young rider from rolling backward during inclines To move backward remove one or both of the levers and pivot reverse as desired You can store the levers in the storage slots located at the rear sides of th...

Страница 29: ...ng way Practice riding the GRIT Junior in a safe area Be careful when descending hills and when riding in wet weather If pulling back on the levers doesn t provide the necessary braking power have your young rider hug the levers in the crooks of their arms and then pull them towardtheir body Ensure the young rider does not tip backward when ascending hills We recommend a spotter behind the chair w...

Страница 30: ... night riding Riding in Wet Conditions Riding in wet weather impacts the braking performance The stopping distance is increased in wet conditions so use extreme caution on wet hills Trail Riding Bring plenty of water some snacks and make sure someone is assisting the rider at all times Tell others where you are going and when to expect your return Bring your cell phone Do not encourage young rider...

Страница 31: ...30 ...

Страница 32: ...ift the levers from the front and the back If both hands cannot be used lift the lever from the center Then insert the end of the lever into the hole in the lever coupling Note you may need to rotate the lever coupling so that the hole is accessible see photos on following page Rotate the lever so that the brake bar is over the wheel Some riders prefer to insert the levers with the parking brake e...

Страница 33: ...the brake is over the wheel and that it doesn t rotate when the lever is pulled back WARNING TEST THE BRAKES BEFORE RIDING Make sure the levers are fully inserted and the brakes engage the wheels before every use Failure to check the brakes can result in an inability to safely slow down and can create a dangerous scenario Make sure the levers are fully inserted into the lever couplings before proc...

Страница 34: ... hands so the brakes move toward the center of the chair Then pull them out of the couplings Store the levers on the side of the chair a Push the lever away from the wheel b Rotate the brake bar toward the rider c Pull the lever out of the coupling d If desired store lever in the holding sleeve 33 ...

Страница 35: ...nt this is to ALTERNATE lever strokes left right left etc during ascents rather than engaging both levers simultaneously On severe inclines lean forward if possible to adjust your center of gravity Always wear a helmet Always ride with an adult who can help if exploring new or unfamiliar terrain Anti Tip Bars are available upon request CAUTION Use short smooth strokes on the levers Keep your back ...

Страница 36: ...sed on where they grab the lever Grabbing the top of the lever provides more torque for climbing hills and rough terrain think of this as low gear Grabbing the bottom of the lever enables easy propulsion over smooth ground think of this as high gear Shift gears by having your young rider adjust their hand position on the levers Slide their hands to match the riding conditions see the following pho...

Страница 37: ...ike low gear and is good for hills and tough terrains Use many small alternating lever strokes to climb hills b Grabbing the bottom of the levers is like high gear and is good for smooth ground Push through long strokes to move quickly 36 ...

Страница 38: ...RIT Junior a Use a 5mm Allen key to begin loosening the brake bar bolt b Once the brake bar is loose finish removing it by hand loosening the brake bar c Fully remove the brake bar d Insert the brake bar into the new position Use the Allen key to fully tighten the brake bar bolt Note Move the brake bar higher on the lever to delay brake engagement This is best for smaller riders Move the brake bar...

Страница 39: ...38 ...

Страница 40: ...e They can also hug the levers by putting them in the crooks of their arms and pulling them toward their body WARNING WET CONDITIONS DECREASE BRAKING PERFORMANCE Use caution when riding in wet conditions Wet tires require more braking force for stopping Riding in wet conditions without the ability to apply the braking force required for stopping could result in a loss of control which could result...

Страница 41: ...Note The brakes engage by coming into contact with the tire Note Holding the tops of the levers provides more braking force which is especially useful when the wheels are wet 40 ...

Страница 42: ...her lever Example To turn right have them apply the right brake and push on the left lever To turn left have them apply the left brake and push on the right lever The harder the rider pulls against either lever the sharper they will turn a To turn right apply the brake with the right lever and push the left lever forward b To turn left apply the brake with the left lever and push the right lever f...

Страница 43: ...ropel forward again When the levers are removed your young rider can put their hands on the wheels and use the GRIT Junior just as they would a regular wheelchair 7 4 Parking Brakes CAUTION If you swap your tires or wheels you ll have to adjust the parking brakes These can also be adjusted for easier engagement or firmer braking pressure The GRIT Junior features unique parking brakes designed to b...

Страница 44: ...ove and store the levers before transferring When transferring into the chair many prefer to transfer into the seat before swinging one leg over the main tube of the GRIT Junior When transferring out of the chair many prefer to swing both legs over to the transfer side of the chair before making the transfer Have the young rider grab the seat or the wheels after the parking brakes have been engage...

Страница 45: ...44 ...

Страница 46: ...thout risk of rolling backward down a hill WARNING THE GRIT JUNIOR CAN TIP BACKWARD ESPECIALLY ON STEEP HILLS AND WITH HARD PUSH STROKES Be careful to monitor the front wheel when climbing hills If the front wheel lifts off of the ground the GRIT Junior is beginning to tip Always ride with a helmet and with a spotter behind the chair 8 2 Descending Slopes Riders should pull backward on the brake l...

Страница 47: ...ff of the curb not at an angle Young riders should always ride with an adult supervising and supporting them from behind Make sure your young rider has enough space in front of the curb to safely ride off of it Watch out for traffic pedestrians and obstacles If possible have your young rider engage both levers to lift the front wheel up just before dropping off of the curb This more evenly distrib...

Страница 48: ...47 ...

Страница 49: ... tire Every Month Make sure the chains are greased tighten them if necessary Engage the wheels and drivetrain to confirm everything is moving smoothly After a Beach Trip Remove the seat cushion and hose the chair down with fresh water to clean off the salt and sand from the frame chain and wheels Grease the chain after hosing it down Dry your chair with a clean towel Submersing or pressure washing...

Страница 50: ...ot lever sleeves a strip of electrical tape at the end of the levers will keep them from unraveling Lubricants These keep your chain and other parts moving extra smoothly GRIT commonly uses Tri Flow brand PTFE lubricant on the chain and seatback Water snacks Using the GRIT Junior is a workout Make sure your young rider stays hydrated and energized Carry water snacks in a small bag on you with your...

Страница 51: ...50 ...

Страница 52: ...is page shows you the full chain tensioning process https www gogrit us freedom chair support 10 3 Parking Brake Adjustment The parking brakes can be adjusted to make them tighter more braking power or looser easier to engage the brakes This is especially important if you ve swapped your stock tires with a new set A video tutorial of this process is located here https www gogrit us freedom chair s...

Страница 53: ...52 ...

Страница 54: ...things right In short our two year warranty covers repairs or replacements of all non wear components of the GRIT Junior manufactured by GRIT subject to the terms below Wear parts such as tires tubes brakes and bearings are not covered 11 2 GRIT Limited Warranty Every component has been extensively prototyped and refined based on our combined 30 years of experience designing mobility aids for some...

Отзывы: