background image

Page 16

Crathco

®

5000 Series Manual

Cleaning Following Complete Disassembly of Unit (cont.)

IMPORTANT:  After disassembly, thoroughly scour each part of the freezer in a warm mild detergent
solution including the inside of the freezing cylinder and the mix storage hopper.  Rinse each part with
clear water.  Prepare a minimum of 3-1/2 gallons (13 liters) of sanitizing solution  (Divorsol CX or equiva-
lent) following the manufacturer's instructions.  

Note:  Add 3 ounces (85.4 mg) of Divorsol CX to 3-1/2 gallons (13
liters) of 120° Fahrenheit (50° Centigrade) water to achieve a 
concentration of 200 parts per million.  Dip or wipe each part 
in sanitizing solution and allow them to dry on clean paper toweling.

Reassembly

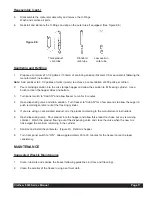
1.

Wet the inner rubber lip of the rotary portion of the seal and the
back end of the auger shaft with water.  Slide rotary portion of 
assembly onto the auger shaft, RUBBER FIRST, with the smooth
sealing surface toward the back of the auger.  (See Figure Z)

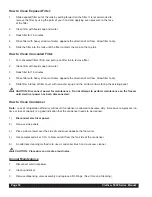
2.

Insert the stationary portion of the seal into the grooved rubber boot with 
the polished surface facing out (forward).  Lubricate the grooved exterior 
portion of the boot and insert it straight back into recess at the 
back of the freezing cylinder, RUBBER FIRST. 
(See Figure AA & BB)

Note:  

If the circular portion of the seal is white, make sure that the 

groove is toward the rubber (back of freezer).

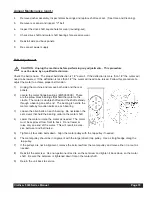
3.

Reassemble the dasher assembly, as shown in Figure CC.  Insert 
the larger front and smaller rear white plastic bearings into 
dasher, then slip in the stator rod. Attach scraper blades.  

Carefully and slowly guide the auger into the freezing cylinder 
taking care not to damage the seal assembly.

Turn auger shaft 

until it engages the square drive coupling.

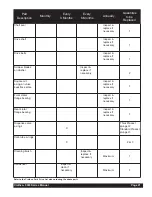
4.

Reassemble the dispensing valve assembly as shown in Figure DD.  
Thoroughly wash and sanitize all components, lubricate the inside 
bore of valve body with a thin film of food grade sanitary lubricant. 
Reinstall the O-Rings on the plunger assembly and lubricate the
entire plunger. Reassemble the valve and replace the retainer pin. 
Inspect and lubricate the large O-Ring and refit it into the rear of

the valve assembly.  Install the valve assembly on the front studs 

and tighten knobs until they are finger tight. 

Do not use tools to tighten knobs

.

Figure Z

Reassemble rotary 

portion of seal as shown

Figure AA

Installing the stationary
portion seal

Figure CC

Figure DD

Figure BB

Seal Assembly installed correctly

Содержание Crathco 5311

Страница 1: ...reezers Operation and Instruction Manual for Models 5311 5511 5941 5711 TABLE OF CONTENTS Warnings and Safety Precautions 3 Installation 4 6 Operating and Adjustments 6 11 Care and Cleaning 12 17 Maintenance Service 17 21 Troubleshooting 22 23 Exploded Views 24 40 Electrical Diagrams 41 52 Wiring Diagrams 53 67 Refrigeration Diagrams 68 69 Prior authorization must be obtained from Grindmaster Corp...

Страница 2: ......

Страница 3: ... The freezer has been operated and tested at the factory Upon arrival the complete freezer must be thoroughly checked for any damage which may have occurred in transit Note A tip N Tell warning device is placed on each shipping carton at the factory If the arrow tip is blue the carton has been tipped in transit See Figure A 2 THE CARRIER IS RESPONSIBLE FOR ALL DAMAGE IN TRANSIT WHETHER VISIBLE OR ...

Страница 4: ...OFF position 4 Install header by removing two screws from the electrical box cover Carefully remove electrical box cover Place the header transparency between the clear and opaque plates plastic lens Slip the electrical box cover back on to machine and reinsert the four screws See Figure C 5 Install the standard one piece carb tube by placing it in the hole in the hopper If your unit is equipped w...

Страница 5: ... a bead of the silicone adhesive at the inside back of the bottom filter channel 2 4 Install the channel over the end of the side panel so the adhesive in the channel contacts the bottom edge of the side panel 5 Put the panel with the channel added back in place on the machine and reinstall the two lower panel screws 6 Apply silicone adhesive to the length of the top edge of the upper filter chann...

Страница 6: ...at has been thoroughly blended before it is frozen Always allow frozen mix to thaw thoroughly before taking a reading Alcohol content also affects product freezing characteristics and may prevent the freezer from serving a product at proper thickness For maximum output capacity always pre chill mix before adding it to the freezer Pre chilled mix gives the freezer a head start on the freezing proce...

Страница 7: ...eeds into the freezing cylinder install the carburetor tube in the Off position outer sleeve set between any two holes and turn the freezer ON to freeze down to proper consistency Overrun Overrun is the increase in product volume expressed as a percentage resulting from the entrapment of air in liquid mix as it is frozen The rotating dasher blends air into the mix as it is frozen resulting in incr...

Страница 8: ...ach mix Some products such as Cappuccino taste better with low overrun Experiment with different carburetor settings to find the ideal combination for each product Use of Stand By Switch The STAND BY switch allows the operator to retain optimum product quality and conserve energy during extended non draw periods The Stand by mode keeps the mix in the hopper at a safe storage temperature and allows...

Страница 9: ...horizontal outlet slot The other plunger part W048 0463 is used to serve thicker product such as shakes and smoothies and has two horizontal outlet slots These plungers are interchangeable Over an extended period of time some products such as frozen cocktails that contain alcohol have a tendency to separate or stratify Separation of product in the mix storage hopper can result in frozen product qu...

Страница 10: ...eeze mode consistency setting adjusts the frozen product thickness In the freeze mode as the liquid mix in the cylinder freezes it becomes harder for the motor to turn the dasher assembly The control board senses the amount of energy that the drive motor consumes as it rotates the dasher assembly through the product in the cylin der The control board will turn the compressor and barrel solenoid va...

Страница 11: ... for emptying out product for cleaning purposes There are eleven 11 lights on the circuit board that indicate the following See Figure I BARREL D1 Illuminated when the freezing cylinder barrel has achieved the pre set temperature in the Standby mode HOPPER D2 Illuminated when the hopper has achieved the pre set temperature in the Standby mode WASH D3 Illuminated when the mode switch is in the wash...

Страница 12: ...ional Remote Fill Control and Proportioning Pump turn off the water valve on the Proportioning pump using the valve next to the inlet pressure regulator 4 Open the front dispensing valve and drain all product from the freezer Close the dispensing valve and turn freezer to OFF Note Use approximately 2 1 2 gallons 10 liters of cool water to rinse product out of the freezer 5 Remove the carburetor tu...

Страница 13: ...ining lubricant figure N Sanitizing Carburetor and Valve Components 1 Re assemble carburetor assembly installing the two O Rings at the bottom of the carb tube 2 Place the carburetor assembly in the bottom of the hopper 3 Replace O Rings on valve plunger and lay plunger assembly on a clean piece of paper towel 4 Prepare a minimum of 4 gallons 15 liters of sanitizing solution Stera Sheen Green Labe...

Страница 14: ...ion Allow the auger to push remaining sanitizer out of the freezing cylinder 4 Place a small amount of sanitary lubricant onto another piece of clean paper toweling figure U 5 Use a clean piece of paper toweling to pick up the large end of the carburetor from the bottom of the hopper taking care not to touch the sanitized carburetor with your bare hands 6 Apply the lubricant on the other piece of ...

Страница 15: ... Note The best way to remove an O Ring is to first wipe off all of the lubri cant using a clean paper towel Pinch the O Ring upward with a dry towel between your index finger and thumb When a loop is formed in the O Ring roll it out of the groove with your other thumb Always remove the O Ring far thest from the end of the plunger first See Figure X Note Carefully inspect the O Rings and replace if...

Страница 16: ...portion of the boot and insert it straight back into recess at the back of the freezing cylinder RUBBER FIRST See Figure AA BB Note If the circular portion of the seal is white make sure that the groove is toward the rubber back of freezer 3 Reassemble the dasher assembly as shown in Figure CC Insert the larger front and smaller rear white plastic bearings into dasher then slip in the stator rod A...

Страница 17: ...valve and drain solution Turn freezer to CLEAN for a few seconds to allow the auger to push remaining sanitizer out of the freezing cylinder 5 If you are using a concentrated product mix the product according to the manufacturer s instructions 6 Open dispensing valve Pour product into the hopper and allow this product to chase out any remaining sanitizer Watch the product flowing out of the dispen...

Страница 18: ...w Allow filter to dry 5 Slide filter into top of filter cover with removal clip up and the air flow arrows facing the existing panel CAUTION Disconnect power for maintenance Do not attempt to perform maintenance on the freezer until electrical power has been disconnected How to Clean Condenser Note Loss of refrigeration efficiency will result if condenser is allowed to become dirty Excessive compr...

Страница 19: ...e shaft extends through a bearing on each end The bearing is held to the motor cradle by two allen bolts on each bearing 3 Loosen the allen bolts on each bearing Do not loosen the set screws that hold the bearing collar to the motor shaft 4 Lower the motor or raise the motor as needed The motor must be kept level from front to back Do not lower or raise only one end of the motor This will result i...

Страница 20: ...8 9 liters 5 gallons 18 9 liters 5 gallons 18 9 liters 5 gallons 18 9 liters Freezing Cylinder Capacity 1 1 2 gallons 5 7 liters 1 1 2 gallons 5 7 liters 1 1 2 gallons 5 7 liters 1 1 2 gallons 5 7 liters Refrigerant See Serial Number Plate See Serial Number Plate See Serial Number Plate See Serial Number Plate Refrigerant Charge See Serial Number Plate See Serial Number Plate See Serial Number Pla...

Страница 21: ...ary 1 Inspect replace if necessary 1 Inspect replace if necessary 1 X Thick Product plunger 2 Standard Product plunger 3 X 2 or 3 Inspect replace if necessary Maximum 1 Inspect clean if necessary Maximum 1 Drive shaft Drive belts Scraper blades on dasher Square cut o ring on valve body face plate Front stator flange bearing Rear stator flange bearing Dispense valve o rings Carb tube o rings Cleani...

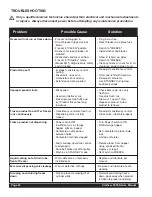
Страница 22: ...zen product too fluffy and icy Product frozen too long low draw Check date code use only fresh mix Use only fresh mix Draw out 1 quart 1 liter dispose of product Allow product to refreeze Frozen product too stiff or freezer runs continuously Consistency control set too firm Dispensing valve not fully closed Re adjust consistency control Close valve lubricate properly Frozen product not dispensing ...

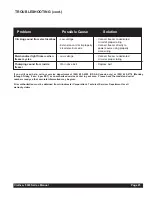
Страница 23: ...hen freezer cycles Low voltage Connect freezer to dedicated circuit or proper rating Thumping sound from inside freezer Worn drive belt Replace belt If you still need help call our service department at 800 695 4500 USA Canada only or 502 425 4776 Monday through Friday 8 am 6 pm EST or an authorized service center in your area Please have the model and serial numbers ready so that accurate informa...

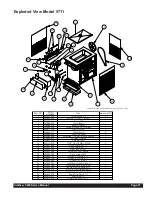
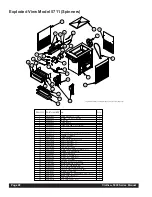
Страница 24: ...711 W0650913 W0212081 W1431084 W0472064 W0472063 W0472062 W0631631 W0631632 W0670007 Valve Stud Frame Assembly Stainless Steel Rear Panel Stainless Steel Side Panel Left Stainless Steel Side panel Right 213 O Ring Barrel Gasket Seal Set Standard Modified Flange Bearing Blind Flange Bearing Stator Rod Weldment Stator Flange Bearing Scraper Dasher Pulley 10 inch Drive V Belt Drive Shaft Hopper Cover...

Страница 25: ...00 W1431084 W0201335 W0570617 W0570619 Valve Stud Frame Assembly Stainless Steel Rear Panel Stainless Steel Side Panel Left Stainless Steel Side Panel Right Barrel Gasket Shaft Seal Set Flange Bearing Blind Flange Bearing Stator Weldment Stator Flange Bearing Scraper Dasher Pulley 10 inch V Belt Slush Drive Shaft Hopper Cover Black Drip Pan Bkt For X LG Drip Pan Insert Plastic Drip Pan Black Valve...

Страница 26: ...45 VALVE HANDLE 19 1 W0340058 Barrell Gasket 20 1 W0520097 Panel Rear 5941 21 1 W0520107 Left Side Panel 22 1 W0520065 Right Side Panel 23 1 W0430089 Dasher Scraper 24 2 W1431084 Scraper Blade New Style 25 1 W0430028 STATOR WELDMENT PICKLED 26 1 W0430032 STATOR FLANGE BEARING 27 1 W0430024 REAR STATOR BEARING 28 3 W0340022 Plunger O Rings 29 1 W0472062 Pan Drip Form X LG 30 1 W0631632 Drip Tray 31...

Страница 27: ...UH XW 2 5LQJ DV3LQ 9DOYH 9DOYH QRE 9DOYH DQGOH 3 81 5 67 352 6 5 6 3OXQJHU 2 5LQJV 9DOYH 6SULQJ 678 9 9 1 67 URQW LVSOD URQW LVSOD OHF R RYHU RSSHU RYHU 6LQJOH 5HDU 3DQHO 3DQHO 6LGH 3DQHO 5 6LGH DVKHU 6FUDSHU 6KDIW 6HDO 6HW XQD 6FUDSHU ODGH 1HZ 6W OH 5 5 67 725 5 1 67 725 1 5 1 67 725 0 17 3 QVHUW ULS 7UD ULS 3DQ 3DQ ULS RUP 1 0 6 5 6 SORGHG 9LHZ ...

Страница 28: ... 9DOYH 9DOYH QRE 9DOYH DQGOH 3 81 5 67 352 6 5 6 3OXQJHU 2 5LQJV 9DOYH 6SULQJ 678 9 9 1 67 URQW LVSOD URQW LVSOD URQW LVSOD OHF R RYHU 5HPRYDEOH HDGHU IUDPH RSSHU RYHU 6LQJOH 5HDU 3DQHO 3DQHO 6LGH 3DQHO 5 6LGH DVKHU 6FUDSHU 6KDIW 6HDO 6HW XQD 6FUDSHU ODGH 1HZ 6W OH 5 5 67 725 5 1 67 725 1 5 1 67 725 0 17 3 6SLQQHU 0 63 11 5 5 7 66 0 7 QVHUW ULS 7UD ULS 3DQ 3DQ ULS RUP 1 0 6 5 6 SOG 9LHZ 6SLQQHUV ...

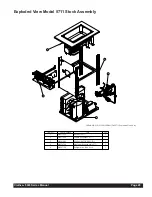
Страница 29: ...Crathco 5000 Series Manual Page 29 Exploded View Model 5711 Stock Assembly 7 0 12 3 57 180 5 7LWOH 4W DVH VV 5 0 66 0 9 3 25 725 66 OHFWULFDO R VVHPEO 5HIULJHUDWLRQ 7XEH VV 1 0 6 5 6 SORGHG 6WRFN VV ...

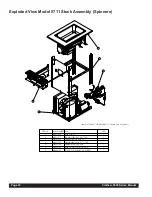
Страница 30: ...0 Series Manual Exploded View Model 5711 Stock Assembly Spinners 7 0 12 3 57 180 5 7LWOH 4W DVH VV 5 0 66 0 7 9 3 25 725 66 OHFWULFDO R VV 7 5HIULJHUDWLRQ 7XEH VV XVKLQJ 2 6OHHYH 77 1 2 8 675 7 1 0 6 5 6 SOG 6WFN V 6SLQQU ...

Страница 31: ...r Spacer Compressor Grommet Fan Shroud Frame Bottom Plate Drive Motor Fan Motor Fan Blade Motor Adj Nut Flange Bearing Item Part Number Description 15 16 17 18 19 20 21 22 23 24 25 26 30 W0450016 W0610110 W0610264 W0321025 W0611055 W0611074 W0611082 W0611235 W0611246 W0610657 W0611255 W1611005 W0340111 Pulley 8 X 3 8 Pan Hd 10 24 X 1 4 Truss Hd Motor Stop Bracket 10 24 Hex Nut 1 4 20 Hex Nut 5 16 ...

Страница 32: ...7 W0671018 W0671021 W0671022 W0340111 W0630421 W0610559 W0611248 Motor Cradle Compressor Condenser Fan Mount Bracket Compressor Spacer Compressor Grommet Fan Shroud Frame Bottom Plate Drive Motor Fan Motor Fan Blade Motor Adj Nut Sound Insulation Fan Flange Bearing Pulley Motor Stop Bracket 1 4 20 Hex Nut 5 16 18 Flange Nut 1 4 Lock Washer 5 16 18 x 1 2 Cap Sound Insulation Cond Sound Insulation S...

Страница 33: ...E MOTOR 3312 5311 3 1 W0320019 MOTOR DRIVE DUAL CYCLE 1 2 HP 4 1 W0321025 Motor Stop Brkt Assy 5 2 W0321013 NUT MOTOR ADJUSTMENT 6 2 W0380009 BEARING 1 BORE FLANGE 7 1 W0450016 PULLEY 0K7 X 1 2 BROWNING 8 1 W0340111 BUMPER ZB 1214 MINOR RUBBER 9 2 W0611044 8 32 Hex Nut Z P 10 4 W0610559 11 4 W0611249 Washer Split Lock Z P 12 1 W0611082 NUT 5 16 18 FLANGE LARGE 13 2 61250 Washer 8 Split Lock ...

Страница 34: ...ssembly 1 0 6 5 6 SORGHG DVH VV 7 0 12 3 57 180 5 7LWOH 4W 6 3 7 66 0 2035665 3 9 RQGHQVHU UNW DQ 0RWRU 0QW 0RWRU DQ 63 0 DQ ODGH 5 02725 02725 5 9 8 3 5 1 25 1 0RWRU 6WRS UNW VV 6 528 21 16 5 6 528 187 02725 8670 17 803 5 0 125 58 5 38 52 1 1 1 0 6 5 6 SORGHG DVH VV ...

Страница 35: ...1326 W1650002 W0620103 W0201039 Access Valve Capillary Tube 042 x 12 Ft Filter Drier Compressor Condenser Automatic Expansion Valve Hopper Coolant Lines Suction Line 3 8 x 3 8 x 1 4 Tee Evaporator Line Suction Line Exp Valve Solenoid Coolant Line 1 4 x 1 4 x 1 4 Tee 1 4 Copper Elbow Filter Condenser Coolant Line Coolant Line Solenoid Cap Tube Line Solenoid Valves 3 8 Straight Couple Compressor Con...

Страница 36: ... Tube Filter Drier Compressor Condenser Automatic Expansion Valve Hopper Coolant Lines Evaporator Line Suction Line Exp Valve Solenoid Liquid Line 1 4 x 1 4 x 1 4 Tee 1 4 Copper Elbow Filter Condenser Coolant Line Condenser To Tee Liquid Line Solenoid Cap Tube Liquid Line Solenoid Valves 1 2 Straight Coupling Barrel Warmer Compress Condenser Hot Gas Line 1 2 180 Deg Copper Fitting Suction Line Sho...

Страница 37: ...T MOUNTING QD 5931 2 1 W0620118 male Quick Disconnect Male Portion 3 1 W0620117 male Quick Disconnect Male Portion 7 1 W0650125 VALVE THERM EXP 3 8 X 1 2 ODF 30 CAP 8 1 W0200312 DRIER FILTER SPORLAN C 033 S 9 1 W0200318 Tube Capillary 072 OD x 026 ID x 132 10 1 W1650002 SOLENOID COMP E5S120S 24 50 11 1 W1650005 SOLENOID COMP E5S130S 24 50 ...

Страница 38: ... Series Manual Model 5711 Refrigeration Tube Assembly 7 0 12 3 57 180 5 6 5 37 21 4W Z 9 9 7 50 3 2 3 62 12 203 6 6 6ZLWFK 3UHVVXUH 62 12 203 6 6 DS 7XEH 2 6LJKW ODVV 5HIULJ ULHU LOWHU 7XEH DSLOODU 2 2 1 0 6 5 6 5 5 78 66 ...

Страница 39: ...obe Assembly S S PROBE W0572362 ACETAL DELRIN SLEEVE W0572361 ADD SILICON SEALANT TO BACK OF SLEEVE ONLY MACHINE SCREW W0610299 INTERNAL TOOTH LOCKWASHER W0611224 RING EYE TERMINAL FLAT WASHER W0611241 PLASTIC SPACER W0572360 HOLE IN REAR OF HOPPER PAN ...

Страница 40: ...es Manual 1 2 Rough Side of Ceramic Smooth Shiny Side CRATHCO MACHINE ASSEMBLY CHECK LIST Slush Cocktail Carb Tube Assy W0471075 5000 Series Standard Product Plunger W0480462 5000 Series Thick Product Plunger W0480463 W0631230 ...

Страница 41: ...7 W0570693 W0570934 W0570823 W0650913 W0570842 W0570045 W0570043 W0570044 W0570235 W1570010 W1570011 W1570012 HOPPER SOLENOID BARREL SOLENOID FUSE HOLDER FAN MOTOR DRIVE MOTOR POWER CORD SERVE SWITCH DRIVE MOTOR CONTACTOR COMPRESSOR CONTACTOR TRANSFORMER MODE SWITCH START CAPACITOR RUN CAPACITOR COMPRESSOR RELAY ON OFF SWITCH 3 2 AMP FUSE CIRCUIT BOARD 5 0 AMP FUSE BALLAST FLUORESCENT BULB LIGHT S...

Страница 42: ...Page 42 Crathco 5000 Series Manual 5511 Electrical Components 5511 0102 057 3 20 00 ...

Страница 43: ...5 62 12 9 9 55 62 12 9 9 1 1 02725 5 67 1 0 287 5 1 5 25 1 7 8 6 5 2035 6625 75 22 83 5 2 3853 7 2 3853 2 2 27 6 62 12 9 9 35 6685 6 7 36 36 1 0 6 5 6 20321 1 7 6 5 5 352 200 7 0 12 47 3 57 180 5 6 5 37 21 02725 5 9 8 3 0RWRU DQ 63 0 DQ ODGH 62 12 203 6 6 62 12 203 6 6 0L RZ 3UREH 7 1 725 51 9 7 1 725 0 5 9 7 1 725 7 5 9 6ZLWFK 3UHVVXUH 1 0 6 5 6 20321 176 ...

Страница 44: ...Page 44 Crathco 5000 Series Manual 5311 Front Electrical Box CR CR CR CR ...

Страница 45: ...Crathco 5000 Series Manual Page 45 5511 Front Electrical Box 5511 0101 057 3 20 00 ...

Страница 46: ... 03 86 21752 2 5 02 6 7 5 1 8 7 5 25 1 5 5 8 21752 2 5 5281 5 3853 5 5 3853 3853 2 52 1 5 5 5 7 5 7 6 59 6 7 3853 7 25 1 5 5 5 52 1 8 8 7 8 7 75 16 250 5 URQW OHFWULFDO R 8 5 5 7 7 0 12 47 3 57 180 5 6 5 37 21 62 7 3 1 825 6 17 Z RQWURO RDUG 7UDQVIRUPHU 5HHG 6ZLWFK 1 2 RQWDFWRU 9 RLO 0RGH 6ZLWFK Z XVH ORFN Z PS XVH Z PS XVH Z 2Q 2II 6ZLWFK 5 7 6 59 6 7 8 3 1 825 6 17 1 0 6 5 6 5217 2 ...

Страница 47: ... 86 03 86 21752 2 5 02 6 7 5 1 8 7 5 25 1 5 5 5 5 5 7 8 5 8 7 7 7 21752 2 5 5281 5 3853 5 5 5 8 7 7 7 3853 3853 2 52 1 5 5 5 7 5 7 6 59 6 7 3853 7 25 1 5 5 5 52 1 8 8 7 8 7 75 16 250 5 8 5 5 7 0 12 47 3 57 180 5 6 5 37 21 8 3 1 825 6 17 62 7 3 1 825 6 17 Z RQWURO RDUG 7UDQVIRUPHU 7LPHU 9 VHF RQ 6KRW 5HHG 6ZLWFK 1 2 RQWDFWRU 9 RLO 0RGH 6ZLWFK Z XVH ORFN Z PS XVH Z PS XVH Z 2Q 2II 6ZLWFK 5 7 6 59 6 ...

Страница 48: ...rical Box Lens Fuse Block 3 2 Amp Fuse 5 0 Amp Fuse Edgemount Standoff Serve Switch Bracket Light Riser Item Part Number Description 1 2 3 4 5 6 7 8 9 10 11 W0570659 W0572705 W0570655 W0570916 W0570618 W0570912 W0572464 W1570901 W1570213 W0572342 W0650913 Transformer Light Riser Contactor Reed Switch Compressor Relay On Off Switch Electrical Box Mode Switch Terminal Strip Circuit Board Support Cir...

Страница 49: ...d 9 3 W0570214 Terminal Strip 8 Position 10 1 W0600201 Decal 3 2 Amp Fuse 11 2 83248 6 32 x 1 4 Screw 12 1 W0600202 Decal 5 0 Amp Fuse 13 1 w0570842 5 0 Amp Fuse 14 1 w0570823 3 2 Amp Fuse 15 2 w1570616 Fuse Block 1 4 16 1 0076 8 32 x 3 8 Hex Head Ground Screw 17 1 83151 Washer Lock 8 Ext Tooth 18 2 86827 6 32 Hex Nut 19 2 w0610015 6 32 x 1 4 Screw 20 2 W0610264 SCREW 10 24 X 1 4 TRUSS HD S S 21 8...

Страница 50: ... Z PS XVH 7HUPLQDO 6WULS 3RVLWLRQ 62 7 3 1 825 6 17 Z XVH ORFN Z LJKW UNW Z 5 LJKW UNW H FR 6QDS XVKLQJ OHFWULFDO R HQV Z RQWURO RDUG HFDO PS XVH HFDO PS XVH 3UREH 7KHUPLVWHU 0RGH 6ZLWFK Z 2Q 2II 6ZLWFK RYHU DS 5HOD R R DS 5HOD 5HOD RPSUHVVRU H FR 6QDS XVKLQJ 51 66 66 DSDFLWRU 5XQ Z 6WDUW DSDFLWRU 5 7 6 59 6 7 67 9 7 50 16 4 5LQJ H 5HG 8 3 1 825 6 17 1 0 6 5 6 3 75 2 ...

Страница 51: ...PLQDO 6WULS 3RVLWLRQ 62 7 3 1 825 6 17 Z XVH ORFN Z LJKW UNW Z 5 LJKW UNW H FR 6QDS XVKLQJ OHFWULFDO R HQV Z RQWURO RDUG HFDO PS XVH HFDO PS XVH 3UREH 7KHUPLVWHU 8 3 1 825 6 17 7LPHU 9 VHF RQ 6KRW 0RGH 6ZLWFK Z 2Q 2II 6ZLWFK RYHU DS 5HOD R R DS 5HOD 5HOD RPSUHVVRU H FR 6QDS XVKLQJ 51 66 66 DSDFLWRU 5XQ Z 6WDUW DSDFLWRU 5 7 6 59 6 7 67 9 7 50 16 4 5LQJ H 5HG 1 0 6 5 6 3 2 63 11 56 ...

Страница 52: ...ge 52 Crathco 5000 Series Manual 5711 Side Electrical Box 5 67 581 3 725 67 57 3 725 203 67 57 5 5 2 7 51 8 5 7 0 12 47 3 57 180 5 6 5 37 21 DSDFLWRU 5XQ Z 6WDUW DSDFLWRU 67 9 5HOD RPSUHVVRU 1 0 6 5 6 6 2 ...

Страница 53: ...Crathco 5000 Series Manual Page 53 5311 Spinner Hook Up with Timer Wiring Diagram ...

Страница 54: ...Page 54 Crathco 5000 Series Manual 5511 Spinner without Timer Hook Up Wiring Diagram 5511 0100 057 9 14 00 ...

Страница 55: ...h Timer Hook Up Wiring Diagram 7 63 11 5 5 7 63 11 5 32 5 6 7 7 63 11 5 7 0 5 5 7 63 11 5 7 0 5 5 51 7 8 5 7 51 8 5 12 20 5 20 12 5281 5281 7 0 12 47 3 57 180 5 6 5 37 21 7LPHU 9 VHF RQ 6KRW Z 2Q 2II 6ZLWFK 6SLQQHU 0 6FUHZ H G UQ 1 0 6 5 6 63115 22 83 5 ...

Страница 56: ...Page 56 Crathco 5000 Series Manual 5311 Compressor Wiring Diagram 5511 Compressor Wiring Diagram 5511 0106 057 3 20 00 ...

Страница 57: ...ge 57 5711 Compressor Wiring Diagram 2 5 5 581 3 725 67 57 3 725 217 725 203 67 57 5 6 5 2035 6625 75 22 83 5 2 S J J 1 0 6 5 6 203 5 1 5 0 7 0 12 47 3 57 180 5 6 5 37 21 DSDFLWRU 5XQ Z 6WDUW DSDFLWRU 5HOD RPSUHVVRU RQWDFWRU 9 RLO ...

Страница 58: ...Page 58 Crathco 5000 Series Manual 5311 Ladder Diagram 115V 60 Hz ...

Страница 59: ...Crathco 5000 Series Manual Page 59 5511 Ladder Diagram 208 230V 50 Hz 5511 0103 057 3 20 00 ...

Страница 60: ... BALLAST FLORECENT LAMP 1 2 3 4 5 6 7 8 1 2 3 4 5 6 7 8 4 3 2 1 8 7 6 5 GND CB1 S HS MIX LOW PROBE HOPPER THERMISTOR BARREL THERMISTOR RED MIX LOW YELLOW STANDBY GREEN FREEZE R1 1 CURRENT SENSOR ON CB1 FU1 5 0 AMP FU2 3 2 AMP R1 B SENSOR 24V AC VOLTAGE SENSOR 12V 24V TRANSFORMER ON OFF SWITCH CURRENT DM 12V AC 24V AC ...

Страница 61: ... 5 75 16 250 5 855 17 6 1625 9 8 03 8 03 9 5 6 6 5 92 7 6 1625 9 32 5 6833 9 25 5 23 5 7 21 5 1 5 2 67 1 5 0 2 21 67 1 1 6 7 6 59 6 7 0 2 352 233 5 7 50 6725 55 7 50 6725 1 21 2 6 7 9 0 855 17 6 1625 21 825 6 17 03 1 02725 2035 6625 5 02725 5 9 02725 1 0 35 6685 6 7 1 0 6 5 6 5 5 0 ...

Страница 62: ...25 9 8 03 8 03 9 5 6 6 5 92 7 6 1625 9 32 5 6833 9 25 5 23 5 7 21 5 1 5 2 67 1 5 0 2 21 67 1 1 6 7 6 59 6 7 0 2 352 233 5 7 50 6725 55 7 50 6725 1 21 2 6 7 9 0 855 17 6 1625 21 825 6 17 03 7 0 5 7 7 0 5 63 11 5 02725 7 63 11 5 02725 60 60 7 5 7 1 02725 2035 6625 5 02725 5 9 1 02725 0 35 6685 6 7 1 0 6 5 6 5 63 11 56 ...

Страница 63: ...W0650913 W0570044 W0570823 W1570616 W0570659 W0570045 W0570934 W1570901 W1572132 W0570842 W0570935 W0572704 Start Capacitor Run Capacitor Contactor 8 Pin Terminal Strip Bulb Compressor Relay Solenoid Coil Circuit Board Light Socket 3 2 Amp Fuse Fuse Holder Transformer Ballast On Off Switch Stand By Switch 6 Wire Cable Sub Assy Fuse 5 Amp Switch Serve Bracket Serve Switch 5311 0212 057 02 06 01 ...

Страница 64: ...842 W0570916 W0572704 W0570043 W0570044 W0570047 W0572500 W0572501 W0572502 W0572503 W0572504 83106 Start Capacitor Run Capacitor Contactor 8 Pin Terminal Strip Compressor Relay Solenoid Complete 3 2 Amp Fuse Fuse Holder Transformer On Off Switch Toggle Mode Switch 6 Wire Cable Sub As Fuse 5 Amp Switch Serve Bracket Serve Switch Bulb Light Socket Ballast Right Side Harness Right Elec Box Harness L...

Страница 65: ...3 2 AMP FUSE LIGHT SOCKET W0570842 W0570823 19 2 17 18 2 2 15 SEC TIMER SPINNER FUSE 5 AMP W0470015 W0570676 FRAME GROUND CONNECTION BARREL THERMISTER 25 22 21 20 17 17 TERMINAL BLOCK 5 WHT 28 BLACK 27 WHT WHT WHT WHT 26 WHT WHT 31 BLACK 29 24 23 6 4 WHT BLACK BLACK 12 BLACK 12 RED 30 RED 30 1 1 1 1 TRANSFORMER 1 W1570011 1 23 W0320019 POWER CORD 24 22 FREEZE LIGHT 21 20 MIX LOW PROBE 25 W0570659 ...

Страница 66: ...6 250 5 02725 203 67 57 5 02 6 7 5 67 1 0 287 5 1 8 7 5 25 1 5 1 5 25 1 7 8 5281 5281 5 1 5 5 1 6 5217 1 6 5 5 2 3853 35 6685 6 7 27 6 62 12 9 9 2 2 2 5 1 5 2 62 25 5 5 8 8 8 8 5 5 5 1 51 7 7 1 0 6 5 6 5 1 5 5 7 0 12 47 3 57 180 5 6 5 37 21 Z RQWURO RDUG 7UDQVIRUPHU 5HHG 6ZLWFK 1 2 RQWDFWRU 9 RLO Z XVH ORFN Z PS XVH Z PS XVH 7 1 725 51 9 7 1 725 0 5 9 7 1 725 7 5 9 DSDFLWRU 5XQ Z 6WDUW DSDFLWRU 5H...

Страница 67: ...6 7 5 67 1 0 287 5 1 8 7 5 25 1 5 1 5 25 1 7 8 5 5 1 7 8 5 7 5 5 5281 5281 5281 8 5 1 5 1 5 5 35 6685 6 7 5217 1 6 5 5 1 6 5 2 2 27 6 62 12 9 9 3853 2 02725 55 62 12 9 9 233 5 62 12 9 9 2 5 3853 7 2 1 0 6 5 6 5 1 63 11 56 7 51 7 5 5 8 8 5 8 8 5 5 1 7 0 12 47 3 57 180 5 6 5 37 21 Z RQWURO RDUG 7UDQVIRUPHU 7LPHU 9 VHF RQ 6KRW 5HHG 6ZLWFK 1 2 RQWDFWRU 9 RLO Z XVH ORFN Z PS XVH Z PS XVH 7 1 725 51 9 7...

Страница 68: ...Refrigeration Circuit Page 68 Crathco 5000 Series Manual ...

Страница 69: ...ERVICE VALVE SERVICE DRIER ACCUMULATOR HOPPER EVAPORATOR VALVE FILTER BARREL EVAPORATOR EXPANSION VALVE SOLENOID VALVE SOLENOID VALVE BARREL WARMER CAPILARY TUBE LOW SIDE SIDE TUBING HIGH 1 2 TUBING 1 4 TUBING 1 4 TUBING 3 8 TUBING 3 8 TUBING 3 8 TUBING 1 2 TUBING 3 8 ...

Страница 70: ......

Страница 71: ......

Страница 72: ...ssimo Espresso Machines Crathco Hot Beverage Dispensers Crathco Cold and Frozen Beverage Dispensers AMW Coffee and Tea Systems Tel 502 425 4776 Fax 502 425 4664 1 800 695 4500 USA Canada only P O Box 35020 Louisville KY 40232 USA www grindmaster com email info grindmaster com ...

Отзывы: