background image

American Metal Ware  Liquid Coffee Dispenser

Page 8

Figure C

Figure D

Service and Cleaning (cont.)

Changing the Lightbulb on Stainless Steel Models with a Backlit Merchandiser
(Refer to Figures C and D)

(Refer to serial tag to verify model number of your machine)
WARNING:  Disconnect machine from branch electrical supply before changing the lightbulb

Note:  The machine uses a F8T5 12" (30cm) 8 watt replacement bulb.

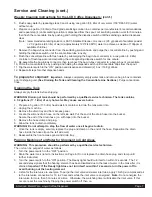
1. Open the merchandiser door.
2. Remove the (2) screws at each end of the lightbulb panel inside the door.
3. The panel will come down to allow the bulb to be changed.
4. Remove the old lightbulb by gently turning the lightbulb 1/4 turn to the left and pulling the bulb from the socket.
5. Install the new bulb by lining the pins on either end of the bulb parallel with the socket opening.
6. Gently insert both ends of the bulb into the socket and turn the bulb 1/4 turn to the right until the bulb locks into

place.

7. Replace the lightbulb panel.  Reinstall the screws.

Changing the Lightbulb on Models With a Backlit Merchandiser (Refer to Figure E)

(Refer to serial tag to verify model number of your machine)

WARNING:  Disconnect machine from branch electrical supply before changing the lightbulb.

Note: The machine uses a F8T5 12" (30cm) 8 watt replacement bulb.

1. Remove the front merchandiser photo and cover by grasping

the edges of the merchandiser.

2. Remove the old lightbulb by gently turning the lightbulb 

1/4 turn to the left and pulling the bulb from the socket.

3. Install the new bulb by lining up the pins on either 

end of the bulb parallel with the socket opening.

4. Gently insert both ends of the bulb into the socket 

and turn the bulb 1/4 turn to the right until the bulb 
locks into place.

5. Replace the merchandiser photo and cover.

Figure E

Содержание American Metal Ware LCD2-1

Страница 1: ...ter Corporation for all warranty claims Warning Labels 2 Installation 3 4 How to Dispense a Cup of Coffee 4 5 Adjustments 5 6 Drink Strength Adjustment 5 6 Service and Cleaning 6 9 Troubleshooting Guide 10 11 Exploded Views 12 17 Wiring Diagrams 18 23 Grindmaster Corporation 4003 Collins Lane Louisville Kentucky 40245 502 425 4776 800 695 4500 800 568 5715 technical service only FAX 502 425 4664 w...

Страница 2: ...the outside on the left of the dispenser Part 61325 Located on the drain hose inside the dispenser ADVERTENCIA AUGU MUY CALIENTE PUEDE CAUSAR QUEMADURAS IMPORTANTE UD DEBE TENER UN RECIPIENTE RESISTENTE AL CALOR DE CINCO 5 GALONES PARA QUARDAR AGUA CALIENTE PARA VACIAR EL AGUA CATIENTE DEL DEPOSITO QUITE LA ABRAZADERA APRETE EL TUBBO Y DESCONECTE LA MANGUERA NO TRATE DE DETENER EL AGUA UNA VEZ QUE...

Страница 3: ...racket should self locate with screw heads on the bottom of the machine Tighten the front 4 legs to secure the drain tray bracket 3 Install the 2 back 4 legs and tighten 4 Install the plastic drain tray onto the drain tray bracket Note The drain tray is provided with a removable plug to allow for plumbing the drain tray to a drain 5 Connect the metal swivel fitting provided to a flexible water sup...

Страница 4: ...w the water tank to fill The machine will make a subtle hissing sound while filling Allow 3 4 minutes for fill time depending on water pressure 9 After the water tank has completed the fill cycle the green Ready light located on the front of the dispenser should extinguish signifying that the heating element has been activated Allow 10 60 minutes for the Ready light to illuminate signifying the wa...

Страница 5: ...ch The machine will dispense the preprogrammed portion size 6 If the portion size is incorrect repeat steps 1 2 3 4 5 until the desired portion size is achieved Thermostat Adjustment Refer to Figure A Note The thermostat range is approximately 160 to 200 F 71 11 C to 93 33 C The tank temperature is factory set at 190 F 87 78 C making beverage temperature slightly lower than 190 F 87 78 C The facto...

Страница 6: ... with fresh water and allow to air dry 3 Remove drain tray and wash in a three compartment sink with warm soapy water per above concentration until all signs of product residue are removed rinse thoroughly with fresh water and air dry Weekly Cleaning Instructions for the LCD Coffee Dispensers 1 Flip water switch a to OFF position 2 Remove fitting cap a from bag in box quick disconnect fitting then...

Страница 7: ...ping WARNING Draining of tank should be performed by a qualified service technician The tank contains 4 1 2 gallons 17 1 litre of very hot water May cause severe burns 1 Prepare a 5 gallon 17 5 litre heat resistant container to drain the tank water into 2 Unplug the machine 3 Remove the drain tray and front access panel 4 Locate the silicone drain hose on the left side wall Put the end of the drai...

Страница 8: ...e socket opening 6 Gently insert both ends of the bulb into the socket and turn the bulb 1 4 turn to the right until the bulb locks into place 7 Replace the lightbulb panel Reinstall the screws Changing the Lightbulb on Models With a Backlit Merchandiser Refer to Figure E Refer to serial tag to verify model number of your machine WARNING Disconnect machine from branch electrical supply before chan...

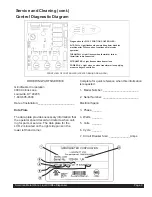
Страница 9: ...sted 1 Model Number _______________________ 2 Serial Number ________________________ Electrical Specs 3 Phase ______ 4 Watts ______ 5 Volts ______ 6 Cycle ______ 7 Circuit Breaker Size ______________Amps Service and Cleaning cont Control Diagnostic Diagram GRINDMASTER CORPORATION Diagnostics for PIC3 3 PORTION CONTROLLER WTR FAIL Light flashes when watchdog timer disables machine after 300 seconds...

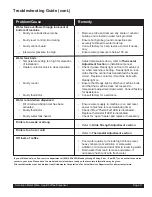
Страница 10: ...ed and tank is heating Ensure switch is in ON position Ensure water supply is on then reset power to the machine to reset the fill circuit watchdog timer See Control Diagnostic Diagram for explanation of lights No concentrate is dispensed Concentrate switch is in OFF position Bag in box is empty Bag in box connector is pointing up This position can create a partial vacuum in the concentrate tube w...

Страница 11: ...d to temperature adjustment downward Consult factory for assistance Consult factory for assistance Water is cold when dispensed Fill circuit watchdog timer has been activated Faulty thermistor Faulty water tank heater Ensure water supply to machine is on and reset power to machine to reset watchdog timer Check if Red Therm Fail LED is illuminated Replace thermistor if LED is illuminated Check for ...

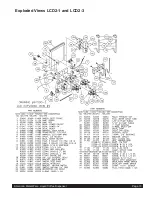
Страница 12: ...Exploded Views LCD2 1 and LCD2 3 American Metal Ware Liquid Coffee Dispenser Page 12 ...

Страница 13: ...American Metal Ware Liquid Coffee Dispenser Page 13 Exploded Views LCD2 1 and LCD2 3 ...

Страница 14: ...American Metal Ware Liquid Coffee Dispenser Page 14 Exploded Views LCD2 1 and LCD2 3 ...

Страница 15: ...American Metal Ware Liquid Coffee Dispenser Page 15 Exploded Views LCD2 1 and LCD2 3 ...

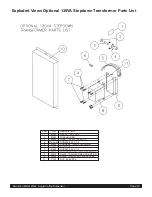
Страница 16: ... P N DESCRIPTION 1 62392 DECAL 1 5A FUSE 2 62332 FUSEHOLDER 3 62386 FUSE 1 5 AMP CLASS CC 4 07026 02 SCREW 8 32 X 1 2 5 62402 HARNESS 130VA STEPDOWN 6 62289 WIRE NUT 7 61353 SCREW 8 32 X 1 4 8 62364 TRANSFORMER 130VA STEPDOWN 9 62401 PLATE TRANSFORMER MOUNTING 10 62355 PLATE OFFSET SS SIDE ACCESS 11 71129 NUT 8 32 KEPS ...

Страница 17: ...15 07026 07 SCREW 8 32 X 3 8 SS 16 62371 BRACKET PUMP 17 62356 PUMP 90VDC PERISTALTIC 18 07023 04 SCREW 6 32 X 1 4 20 62386 FUSE 1 1 2 AMP CLASS CC ITEM P N DESCRIPTION 21 62332 FUSEHOLDER 22 62368 DECAL FLUSH 24 62372 SWITCH SPST 25 61820 HARNESS DOOR INTERCONNECT 26 62357 HARNESS HOPPER BRACKET 27 61133 SWITCH 3PST 28 62367 GRAPHIC CHOCOLATE 29 62369 DECAL PULL SWITCH W O P O 30 62370 BRACKET 90...

Страница 18: ...American Metal Ware Liquid Coffee Dispenser Page 18 Wiring Diagram 120 240V ...

Страница 19: ...American Metal Ware Liquid Coffee Dispenser Page 19 Wiring Diagram 120 240V ...

Страница 20: ...American Metal Ware Liquid Coffee Dispenser Page 20 Wiring Diagram Rev Release ...

Страница 21: ...American Metal Ware Liquid Coffee Dispenser Page 21 Wiring Diagram ...

Страница 22: ...American Metal Ware Liquid Coffee Dispenser Page 22 Wiring Diagram for High Volume Remote BIB Applications ...

Страница 23: ...American Metal Ware Liquid Coffee Dispenser Page 23 Wiring Diagram for High Volume Remote BIB Applications ...

Страница 24: ...ing These are subject to NORMAL wear or everyday usage and are a responsibility of the user Accident Improper installation Neglect or abuse Excessive lime mineral content of water used Cleaning of any category Cleaning is a user s responsibility Incorrect voltage NOTE THIS WARRANTY SUPERSEDES ANY OTHER WARRANTY ALL OTHER WARRANTIES EXPRESSED OR IMPLIED INCLUDING THE WARRANTIES OR MERCHANTABILITY A...

Отзывы: