


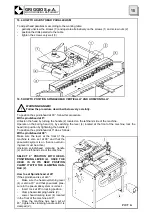
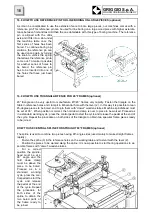
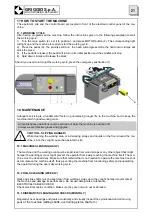


16.3 BORING DEPTH
To carry out the required boring, follow these procedures:
A) Insert suitable drills in the desired position on the spindlehead.
B) Turn the handle (1) to adjust the desired distance between drills and working table with spindlehead
at a 90° angle from table surface. Drill distance is indicated in mm. on the mechanical counter (2). Turn
the handle so that the screw is stretched in the required position at the required height, so that greater
boring precision is obtained. Drill height chosen depends on wood thickness, on the position of the hole
and on the diameter of the hole itself.
C) To set boring depth follow this procedure. Once the overall length value of the drill being used has
been found on the depth selection screw (3), it is possible to set (no calculation is needed) the actual
boring depth value. By unclamping the handle (4) and by turning the depth selection screw (3) until the
desired value, the pointer (5), which is also a magnifier, will indicate the chosen depth value. Tighten the
handle before starting boring operations.
D) Usually use a scrap wood piece to test the machine settings before boring a good piece of wood.
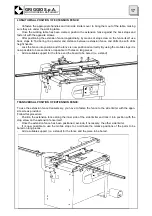
16.2 PREVENTION CHECKS
Make sure the area surrounding the machine is neat and clean and that no working scraps are left
around, such as saw dust and wood pieces.
MAKE SURE ALL SAFETY AND PROTECTION DEVICES ARE IN PLACE, IN GOOD WORKING OR-
DER AND READY FOR THE OPERATIONS THAT HAVE TO BE CARRIED OUT.
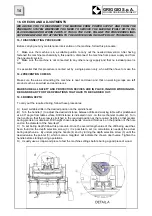
16.1 DISCONNECTING PROCEDURE
Before carrying out any maintenance intervention on the machine, follow this procedure:
1. Make sure the machine is in a suitable position to carry out the needed intervention. After having
fastened the machine mechanically in this position, disconnect the machine from power supply and from
the pneumatic system.
2. Make sure the machine is not connected to any other energy supply and that no residual power is
left.
It is essential that this procedure is carried out by a single person only, who will then have to make the
GRIGGIO S.p.A.
WOODWORKING MACHINERY
14
WE ADVISE YOU TO DISCONNECT THE MACHINE FROM POWER SUPPLY AND FROM THE
PNEUMATIC SYSTEM WHENEVER YOU NEED TO SERVICE THE MACHINE ITSELF OR TO RE-
PLACE DAMAGED OR WORN PARTS. IF THIS IS THE CASE, FOLLOW THE PROCEDURES INDI-
CATED BELOW AND PAY ATTENTION TO THE ADVICE GIVEN IN CHAPTER 6 OF THIS MANUAL.
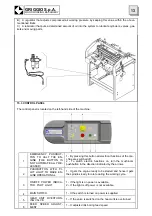
16. CHECKS AND ADJUSTMENTS
Содержание GF 21
Страница 2: ......
Страница 4: ......
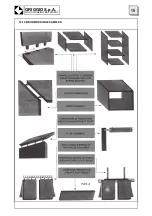
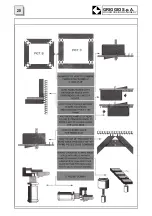
Страница 23: ...16 10 WOODWORKING EXAMPLES 19 GRIGGIO S p A WOODWORKING MACHINERY ...
Страница 24: ...GRIGGIO S p A WOODWORKING MACHINERY 20 ...
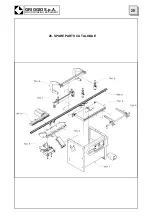
Страница 33: ...29 GRIGGIO S p A WOODWORKING MACHINERY 26 SPARE PARTS CATALOGUE ...
Страница 35: ...TABLE 1 FRAME 31 GRIGGIO S p A WOODWORKING MACHINERY ...
Страница 37: ...TABLE 2 MACHINE TABLE 33 GRIGGIO S p A WOODWORKING MACHINERY ...
Страница 39: ...TABLE 3 RACK 35 GRIGGIO S p A WOODWORKING MACHINERY ...
Страница 41: ...TABLE 4 LIMITERS 37 GRIGGIO S p A WOODWORKING MACHINERY ...
Страница 43: ...TABLE 5 SPINDLES UNIT 39 GRIGGIO S p A WOODWORKING MACHINERY ...
Страница 45: ...TABLE 6 HOLD DOWN CLAMPS FRAME 41 GRIGGIO S p A WOODWORKING MACHINERY ...
Страница 47: ...TABLE 7 BACK STOP 43 GRIGGIO S p A WOODWORKING MACHINERY ...
Страница 49: ...TABLE 8 HOLD DOWN CLAMPS 45 GRIGGIO S p A WOODWORKING MACHINERY ...
Страница 51: ...TABLE 9 SPINDLEHEAD 47 GRIGGIO S p A WOODWORKING MACHINERY ...
Страница 53: ...TABLE 10 EXTENSION FENCE 49 GRIGGIO S p A WOODWORKING MACHINERY ...
Страница 55: ......


