Page 1
INTRODUCTION
The Ultra Low Pressure Transducer is used to measure
differential pressure up to 1"wc or 250 Pa. It combines
precision high sensitivity silicon sensing capabilities and
the latest ASIC technology to substantially reduce offset
errors due to changes in temperature, stability to warm-
up, long term instability and position sensitivity. It is ideal
for monitoring pressure for air or other clean inert gas.
It features bi-directional pressure measurement, an on-
board auto-zero function, a backlight LCD to display the
pressure value and an alarm relay with variable trip points.
The device is field-configurable via the local menu.
BEFORE INSTALLATION
Read these instructions carefully before installing and commissioning the UP Pressure Transducer. Failure
to follow these instructions may result in product damage. Do not use in an explosive or hazardous
environment, with combustible or flammable gases, as a safety or emergency stop device or in any other
application where failure of the product could result in personal injury.
Take electrostatic discharge
precautions during installation and do not exceed the device ratings.
MOUNTING
The Ultra Low Pressure Transducer mounts using the two holes on the base of the unit. See Figure 1. Leave
enough space around the unit to connect the pressure tubing and avoid locations with severe vibrations,
excessive moisture or rapid temperature changes. It should be mounted on a vertical surface with the
pressure ports on the bottom and the cable entrance on the left.
The enclosure has a standard ½” conduit opening and may be installed with either conduit and a conduit
coupler or a cable gland type fitting.
The enclosure has a hinged cover with a latch. Open the cover by pulling slightly on the latch on the
bottom of the enclosure. At the same time pulling on the cover, as illustrated in Figure 2.
A 1/2" NPT threaded connection hole is provided in the bottom of the enclosure. Screw the EMT connector
or cable gland connector in until tight. See Figure 3. It is recommended that weatherproof conduit or
cable gland fittings be used. The F style enclosure includes 1/2" NPT
to M16 thread adapter and cable gland fitting.
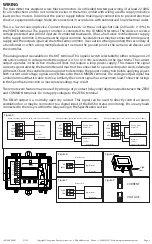
Make wiring connections as per the “Wiring” illustrations on Page 2.
Swing door closed until securely latched. For added security, 2
screws are provided that may be installed in the integrated screw
tabs. See Figure 4.
Figure 1
Figure 3
Figure 2
EMT Connector
Thread adapter and
cable gland fitting
Figure 4
IN-GE-UPXXX-01 07/20
Copyright © Greystone Energy Systems, Inc. All Rights Reserved Phone: +1 506 853 3057 Web: www.greystoneenergy.com
Ultra Low Pressure Transducer
UP Series - Installation Instructions


