background image

8

INSTALLATION

8.1

UNPACK THE MACHINE


WARNING

Make sure that you correctly assemble the machine before

use.


WARNING

• If parts of the machine are damaged, do not use the

machine.

• If you do not have all the parts, do not operate the

machine.

• If the parts are damaged or missing, contact the service

center.

1. Open the package.
2. Read the documentation in the box.
3. Remove all the unassembled parts from the box.
4. Remove the machine from the box.
5. Discard the box and package in compliance with local

regulations.

8.2

ATTACH THE GUARD


WARNING

Do not touch the cut-off blade.

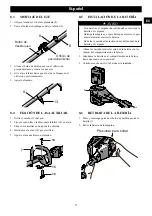
1. Remove the screws from the trimmer head with a Phillips

head screwdriver (not included).

2. Put the guard onto the trimmer head.
3. Align the screw holes on the guard with the screw holes

on the trimmer head.

4. Tighten the screws.

8.3

ASSEMBLE THE SHAFT

1. Loosen the knob (13) on the coupler (8).
2. Push in the release button on the lower shaft (9).

6

8

Positioning hole

Release button

3. Align the release button with the positioning hole and

move the two shafts.

4. Turn the lower shaft until the button locks into the

positioning hole.

5. Tighten the knob.

9

13

8.4

ATTACH THE AUXILIARY

HANDLE

1. Remove the knob (16) from the handle.
2. Attach the auxiliary handle and lower clamp (15) on the

shaft.

3. Set the auxiliary handle in the comfortable position.
4. Put the bolt (14) through the holes.
5. Tighten the auxiliary handle with the knob.

7

English

EN

Содержание ST60L03

Страница 1: ...ST60L03 ST60L413 STC456 www greenworktools com EN OPERATOR MANUAL STRING TRIMMER ES MANUAL DEL OPERADOR CORTABORDES ...

Страница 2: ......

Страница 3: ... machine 8 9 2 Stop the machine 8 9 3 Adjust the length of the cutting line 8 9 4 Adjust the cutting diameter 9 9 5 Line cut off blade 9 9 6 Attach machine to shoulder strap 9 9 7 Operation tips 9 9 8 Cutting tips 10 10 Maintenance 10 10 1 General information 10 10 2 Clean the machine 10 10 3 Replace excess line 10 10 4 Install the cutting line 11 10 5 Replace the spool 12 10 6 Remove the trimmer ...

Страница 4: ... Use face mask if operating in dusty work spaces Avoid Dangerous Environment Don t expose power tools to damp or wet conditions Water entering a power tool will increase the risk of electric shock Don t use in rain Keep all bystanders children and pets at least 50 ft away Dress Properly Do not wear loose clothing or jewelry They can be caught in moving parts Use of rubber gloves and substantial fo...

Страница 5: ...xhibit unpredictable behavior resulting in fire explosion or risk of injury Do not expose a battery pack or appliance to fire or excessive temperature Exposure to fire or temperature above 265 F 130 C may cause an explosion Do not dispose of the batteries in a fire The cells may explode Check with local codes for possible special disposal instructions Do not open or mutilate the batteries Released...

Страница 6: ... a local recycling and or disposal center certified for lithium ion disposal WARNING If the battery pack cracks or breaks with or without leaks do not recharge it and do not use Discard it and replace with a new battery pack DO NOT TRY TO REPAIR IT To prevent injury and risk of fire explosion or electric shock and to avoid damage to the environment Cover the terminals of the battery with heavy dut...

Страница 7: ...immer head with a Phillips head screwdriver not included 2 Put the guard onto the trimmer head 3 Align the screw holes on the guard with the screw holes on the trimmer head 4 Tighten the screws 8 3 ASSEMBLE THE SHAFT 1 Loosen the knob 13 on the coupler 8 2 Push in the release button on the lower shaft 9 6 8 Positioning hole Release button 3 Align the release button with the positioning hole and mo...

Страница 8: ...move the battery pack from the machine 9 OPERATION IMPORTANT Before you operate the machine read and understand the safety regulations and the operation instructions WARNING Be careful when you operate the machine 9 1 START THE MACHINE 1 Push the lock out button 3 and pull the trigger 4 3 4 5 2 Push the speed switch 5 to the desired operating speed Push the speed switch to position 1 for low speed...

Страница 9: ...t cut diameter Advance line whenever you hear the motor running faster than normal or when trimming efficiency diminishes This will maintain best performance and keep line long enough to advance properly 9 6 ATTACH MACHINE TO SHOULDER STRAP 1 Attach the carabiner to the carrying ring on the drive tube 2 Put on the shoulder strap 3 Adjust the length of the strap so that the carabiner is about a han...

Страница 10: ...IMPORTANT Use only the replacement parts and accessories of the initial manufacturer 10 1 GENERAL INFORMATION IMPORTANT Only your dealer or approved service center can perform maintenance that is not given in this manual Before the maintenance operations Stop the machine Remove the battery pack Cool the motor Store the machine in cool and dry place Use correct clothing protective gloves and safety...

Страница 11: ...the spool 2 Line up the slots on the spool cover with the slots a on the trimmer head a b 3 Insert the line into the mounting hole which is located inside the eyelet b Push the cutting line until it exits the opposite hole Mounting Hole inside the Eyelet 4 Pull the cutting line through until there is an equal quantity of cutting line on each side 5 Rotate the spool cover clock wise in the arrow di...

Страница 12: ...ce with a new spool 5 Insert the location housing and slot cover onto the spool cover b and then put the spool onto the slot cover to the desired position 6 Tigthen with the screws e d f b g 10 6 REMOVE THE TRIMMER HEAD 1 Put the metal rod a in the specified angle transmission hole b to fix the trimmer head a b 2 Turn the trimmer head clockwise to loosen it Do not remove the spacer from the shaft ...

Страница 13: ...ight without battery pack 9 15Ibs 4 15kg Battery model LB602 LB6025 LB603 LB604 LB605 LB606 and other BAC series Charger model CAC801 CH60DP01 60DPC10A CH60R00 and other CAC series The recommended ambient temperature range Item Temperature String trimmer storage tem perature range 32 F 0 C 113 F 45 C String trimmer operation temperature range 32 F 0 C 113 F 45 C Battery charging temperature range ...

Страница 14: ...e avoid stones walls and other hard objects 2 Advance the cutting line regularly to keep full cutting width The grass winds around the trimmer head and motor hous ing Cut tall grass at ground level 1 Cut tall grass from the top down 2 Remove no more than 8 in each pass to prevent wrapping The line does not cut well The cut off blade becomes dull Sharpen the cut off blade with a file or replace it ...

Страница 15: ...ubmitted for replacement under this warranty unless such return is requested in writing by Greenworks USA address Greenworks Tools P O Box 1238 Mooresville NC 28115 15 REPLACEMENT PARTS 2 3 4 5 6 1 1 1 1 2 1 3 1 4 No Part No Qt y Description No Part No Qty Description 1 R0201836 00 1 Auxiliary handle assembly 2 R0201784 00 1 Coupler knob 1 1 R0201826 00 1 Bolt 3 R0201770 00 1 Allen key 1 2 R020182...

Страница 16: ... 2 Detención de la máquina 22 9 3 Ajuste de la longitud del hilo de corte 22 9 4 Ajuste del diámetro de corte 22 9 5 Cuchilla de corte de hilo 22 9 6 Fijación de la máquina a la correa de hombro 23 9 7 Consejos de funcionamiento 23 9 8 Consejos de corte 23 10 Mantenimiento 24 10 1 Información general 24 10 2 Limpieza de la máquina 24 10 3 Sustitución del exceso de hilo 24 10 4 Instalación del hilo...

Страница 17: ...otectores laterales marcadas para cumplir la ANSI Z87 1 Las gafas normales solo tienen lentes resistentes a impactos NO son gafas de seguridad Si sigue esta regla reducirá el riesgo de lesiones oculares Utilice máscara facial si trabaja en espacios de trabajo con polvo Evite los entornos peligrosos No exponga las herramientas eléctricas a condiciones de humedad Si penetra agua en una herramienta e...

Страница 18: ...ería puede provocar un incendio Bajo condiciones abusivas es posible que salga líquido despedido de la batería evite el contacto Si se produce un contacto accidental aclare con agua Si el líquido entra en contacto con los ojos acuda también al médico El líquido despedido de la batería puede provocar irritación o quemaduras No utilice una batería o un aparato que haya sufrido daños o modificaciones...

Страница 19: ...nes graves o incluso la muerte PRECAUCIÓN Indica una situación de peli gro potencial que de no evita rse puede provocar lesiones leves o moderadas PRECAUCIÓN Sin símbolo de alerta sobre seguridad Indica una situa ción que puede provocar da ños materiales 5 SERVICIO Las tareas de servicio exigen un cuidado extremo así como conocimientos y deben ser realizadas únicamente por un técnico de servicio c...

Страница 20: ...ductivos Algunos ejemplos de estas sustancias químicas son Plomo de pinturas con base de plomo Sílice cristalina de ladrillos y cemento y otros productos de albañilería Arsénico y cromo de la madera tratada químicamente El riesgo de exposición a estas sustancias químicas varía según la frecuencia con la que realice este tipo de trabajo Para reducir su exposición a estas sustancias químicas trabaje...

Страница 21: ...r el orificio 5 Apriete el asa auxiliar con el mando 7 14 15 16 8 5 INSTALACIÓN DE LA BATERÍA AVISO Si la batería o el cargador ha sufrido daños sustituya la batería o el cargador Detenga la máquina y espere hasta que el motor se pare antes de instalar o retirar la batería Debe leer y entender las instrucciones del manual de la batería y el cargador 1 Alinee las nervaduras de elevación de la bater...

Страница 22: ...te y la cuchilla de corte corta la longitud sobrante 9 4 AJUSTE DEL DIÁMETRO DE CORTE NOTA La máquina está ajustada a un diámetro de corte de 14 in 35 6 cm Puede ajustarla a un diámetro de corte de 16 in 40 6 cm Ajuste el diámetro de corte a 14 in 35 6 cm para un tiempo de funcionamiento mayor y a 16 in 40 6 cm para una zona de corte más extensa 1 Retire la batería 2 Retire los tornillos de la cuc...

Страница 23: ... mientras cabezal de hilo está girando Corte la hierba alta de arriba a abajo Si se enrolla hierba alrededor del cabezal de corte Retire la batería Quite la hierba 9 8 CONSEJOS DE CORTE Incline la máquina hacia la zona que va a cortar Utilice la punta del hilo de corte para cortar hierba Mueva la máquina de derecha a izquierda para evitar que los residuos despedidos golpeen al operario No corte en...

Страница 24: ...tes protectores y gafas de seguridad 10 2 LIMPIEZA DE LA MÁQUINA Limpie la máquina después de utilizarla con un paño húmedo humedecido en detergente neutro No utilice detergentes o disolventes agresivos para limpiar las piezas de plástico o las asas Mantenga el cabezal de corte libre de hierba hojas o grasa excesiva Mantenga los respiraderos limpios y libres de residuos para evitar el sobrecalenta...

Страница 25: ...ntidad igual de hilo de corte a cada lado 5 Gire la cubierta del carrete en sentido horario en la dirección de la flecha para enrollar el hilo de corte en el cabezal de corte Mantenga aproximadamente 5 in 12 5 cm de hilo de corte por encima de cada lado del cabezal de corte 10 5 SUSTITUCIÓN DEL CARRETE NOTA Si alguna pieza del conjunto del retenedor del carrete está dañada o desgastada sustituya l...

Страница 26: ...a fijar el cabezal de corte a b 2 Gire el cabezal de corte en sentido horario para aflojarlo No retire el espaciador del eje 10 7 MONTAJE DEL CABEZAL DE CORTE 1 Coloque la varilla metálica en el orificio de transmisión del ángulo especificado para fijar el cabezal de corte 2 Monte el nuevo cabezal de corte 3 Gire el cabezal de corte en sentido antihorario para apretarlo 4 Retire la varilla metálic...

Страница 27: ...es CAC El intervalo de temperatura ambiente recomendado Elemento Temperatura Intervalo de temperatura de almacenamiento del corta bordes 32 F 0 C 113 F 45 C Intervalo de temperatura de funcionamiento del corta bordes 32 F 0 C 113 F 45 C Intervalo de temperatura de carga de la batería 39 F 4 C 104 F 40 C Intervalo de temperatura de funcionamiento del cargador 39 F 4 C 104 F 40 C Intervalo de temper...

Страница 28: ...zando incor rectamente 1 Corte con la punta del hilo evite piedras par edes y otros objetos duros 2 Avance el hilo de corte periódicamente para mantener el ancho de corte completo La hierba se enrolla alre dedor del cabezal de corte y de la carcasa del motor Corte la hierba alta al nivel del suelo 1 Corte la hierba alta de arriba a abajo 2 No quite más de 8 20 cm en cada pasada para evitar que se ...

Страница 29: ...ilidad del comprador pagar los costes de transporte de cualquier pieza enviada para su sustitución bajo esta garantía a menos que dicha devolución sea solicitada por escrito por Greenworks Dirección en EE UU Greenworks Tools P O Box 1238 Mooresville NC 28115 15 PIEZAS DE REPUESTO 2 3 4 5 6 1 1 1 1 2 1 3 1 4 Nº Nº pieza Ca nt Descripción Nº Nº pieza Ca nt Descripción 1 R0201836 00 1 Conjunto de asa...

Страница 30: ......

Страница 31: ......

Страница 32: ......

Отзывы: