background image

11

INSTALL THE RADIO SYSTEM

Install the Elevator Servo

❏ 

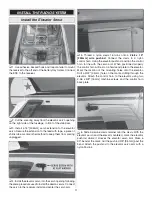
1. Use adhesive-backed hook and loop material to mount 

the receiver to the aft end of the battery tray former. Connect 
the ESC to the receiver.

❏ 

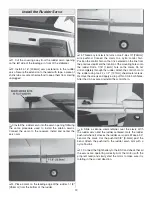
2. Cut the covering away from the elevator servo opening 

on the right side of the fuselage, in front of the stabilizer. 

❏ 

3. Install a 16" [406mm] servo extension to the elevator 

servo. Secure the extension to the lead with tape, a piece of 
shrink tube or some other method to keep them from coming 
unplugged.

❏ 

4. Install the elevator servo into the servo opening following 

the same procedure used to install the aileron servos. Connect 
the servo to the receiver, install and center the servo arm.

❏ 

5. Thread a nylon clevis 16 turns onto a 

2-56 x 10" 

[254mm] wire pushrod

. Connect the clevis to a nylon 

control horn. Using the elevator pushrod, position the control 
horn in line with the servo arm. When positioned properly 
the control horn will rest on a hardwood plate in the elevator. 
Mark the location of the mounting holes onto the elevator. 
Drill a 3/32" [2.4mm] hole on the marks, drilling through the 
elevator. Attach the control horn to the elevator using two 
2-56 x 5/8" [16mm] machine screws and the control horn 
back plate. 

❏ 

6. Slide a silicone clevis retainer over the clevis. With the 

elevator servo and the elevator centered, mark the elevator 
pushrod where it crosses the elevator servo arm. Make a 
90° bend at the mark. Cut the pushrod 3/8" [9.5mm] past the 
bend. Attach the pushrod to the elevator servo arm with a 
nylon Faslink. 

Содержание YAK-55M Yakovlev

Страница 1: ...package the problem will be evaluated as quickly as possible Length 47 in 1195mm Radio 4 Channel minimum or 5 Channel with mixing for separate ailerons Motor ESC Prop RimFire 32 42 50 800 Wingspan 51...

Страница 2: ...eat Planes web site at www greatplanes com Open the Airplanes link then select the Yak 55M EP ARF If there is new technical information or changes to this model a tech notice box will appear in the up...

Страница 3: ...05mm servo extensions are required for the rudder and elevator servos If you are using a radio system that does not support mixing functions a Y harness will also be required to connect the aileron se...

Страница 4: ...ly upon your experience to decide what type of glue to use When a specific type of adhesive works best for that step the instructions will make a recommendation We recommend 30 minute epoxy to install...

Страница 5: ...rs and payments by personal check to Hobby Services 3002 N Apollo Drive Suite 1 Champaign IL 61822 Be certain to specify the order number exactly as listed in the Replacement Parts List Payment by cre...

Страница 6: ...ger than the S3115 servo If the S3150 servo is installed both ends of the aileron servo opening will need to be trimmed approximately 1 32 1mm 3 Install the servo into the servo opening Drill through...

Страница 7: ...silicone clevis retainer over the clevis With the aileron servo and the aileron centered mark the aileron pushrod where it crosses the aileron servo arm Make a 90 bend at the mark Cut the pushrod 3 8...

Страница 8: ...bottom of the stabilizer just outside the cut covering Insert the stabilizer in the fuse so that part of the bare wood is showing Apply 30 minute epoxy to the wood top and bottom Slide the stabilizer...

Страница 9: ...line 2 Install the three CA hinges into the rudder Insert the tail gear wire in the rudder and check the fit of the rudder on the fin Use pins to hold the CA hinges in position 3 Coat the inside of t...

Страница 10: ...he threads of the SHC screws 5 Repeat steps 1 4 for the left main landing gear Install the Motor The Yak 55M EP has been designed to use the Great Planes RimFire 32 Outrunner Brushless motor If you wi...

Страница 11: ...tall and center the servo arm 5 Thread a nylon clevis 16 turns onto a 2 56 x 10 254mm wire pushrod Connect the clevis to a nylon control horn Using the elevator pushrod position the control horn in li...

Страница 12: ...ition the control horn so that it is centered on the line from the previous step Mark the location of the mounting holes onto the rudder Drill a 1 16 1 6mm hole on the marks Do not drill completely th...

Страница 13: ...loop material around the battery Trim off the excess material Install the Cowl 1 If you have installed the recommended RimFire 32 brushless motor the cowl louvers will need a 1 3 4 38mm to 1 7 8 48mm...

Страница 14: ...4 CHANNEL RADIO SET UP STANDARD MODE 2 3 Make certain that the control surfaces and the throttle respond in the correct direction as shown in the diagram If any of the controls respond in the wrong d...

Страница 15: ...ate to fit your motor s prop adapter Install the spinner back plate propeller with washer and prop nut and the spinner cone Secure the spinner cone to the back plate with two 3 x 12mm sheet metal scre...

Страница 16: ...ed to support weight Begin by placing incrementally increasing amounts of weight on the fuse over the motor box until the model balances Once you have determined the amount of weight required it can b...

Страница 17: ...sand the propeller may throw such material in your face or eyes Keep your face and body as well as all spectators away from the plane of rotation of the propeller as you run the motor Keep these items...

Страница 18: ...ment listed in the complete AMA Safety Code 9 Under no circumstances may a pilot or other person touch a powered model in flight nor should any part of the model other than the landing gear intentiona...

Страница 19: ...it will probably flutter again unless the problem is fixed Some things which can cause flutter are Excessive hinge gap Not mounting control horns solidly Poor fit of clevis pin in horn Side play of w...

Страница 20: ......

Отзывы: