background image

14

❏ 

6. Thread a nylon clevis onto a 27" [685 mm] pushrod. 

Attach the clevis to a control horn and slide the pushrod into 

the outer pushrod tube on the right side of the fuse. As you 
did with the ailerons, align the control horn over the elevator 
hinge line and mark the location of the screw holes. Drill 
5/64" [2mm] holes at your marks and install the horn using 
two 2-56 x 3/8" [ 9.8 mm] machine screws and the control 
horn backplate.

❏ 

7. Install the rudder control horn in the same manner as 

you did the elevator control horn.

❏ 

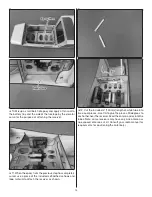
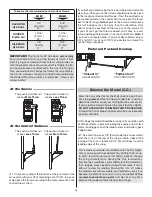
8. Install the rudder and elevator servos onto the tail servo 

tray using the hardware included with the servos. Use the 
position of the tail pushrods as they exit the pushrod tubes 
to determine the location of the servos on the tray. The 
servos should be aligned so that the pushrods overlap the 
enlarged holes in the servo arms. Be sure to harden the wood 
surrounding the mounting screw holes with thin CA. Center 
the servos with the radio.

❏ 

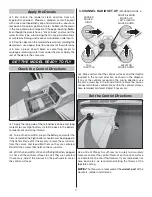
9. Use tape or clamps to temporarily hold the elevator and 

rudder in the neutral position. Mark the pushrods where they 
cross the enlarged holes in the servo arms. Make a 90º bend 
at the marks. As you did with the ailerons, cut the pushrods 
and connect them to the servos using two FasLinks. Cut 
off the threaded portion from the remaining 18" [457mm] 
pushrod. Slide it through the two screw lock connectors for 
the nose gear steering arm and rudder servo. Align the nose 

wheel so it’s pointing straight, then tighten the set screws 

in the screw lock connectors. You may need to adjust the 
pushrod once you taxi the plane.

Содержание TWINSTAR EP

Страница 1: ...using the user assembled product the user accepts all resulting liability If the buyer is not prepared to accept the liability associated with the use of this product the buyer is advised to return th...

Страница 2: ...he address or toll free phone number below Academy of Model Aeronautics 5151 East Memorial Drive Muncie IN 47302 9252 Tele 800 435 9262 Fax 765 741 0057 Or via the Internet at http www modelaircraft o...

Страница 3: ...red to finish the Twinstar EP that may require planning or decision making before starting to build Order numbers are provided in parentheses Radio Equipment The Twinstar EP requires a minimum 4 chann...

Страница 4: ...perience to decide what type of glue to use When a specific type of adhesive works best for that step the instructions will make a recommendation Whenever just epoxy is specified you may use either 30...

Страница 5: ...Payment by credit card or personal check only no C O D If additional assistance is required for any reason contact Product Support by e mail at productsupport greatplanes com or by telephone at 217 3...

Страница 6: ...part of your pre flight check each and every time you fly 1 Grasp each control surface at one end taking care not to dent or puncture the covering or the wood structure beneath Pull the control surfa...

Страница 7: ...the servo extension connectors 3 Pull the strings through the root ribs Be careful not to damage the wing ribs as you pull the servo leads through them 4 Fit the servos into the servo openings and dri...

Страница 8: ...secure the control horns into place with the control horn back plates 8 With the ailerons in the neutral position use tape or small clamps to hold them in place mark the pushrod wires where they cros...

Страница 9: ...side wall in the location shown on each frame This will provide a smooth surface to mount the ESC 11 Install the aluminum X mount onto the motors using the screws included with the motors and thread l...

Страница 10: ...end you inserted through the wing Use one of the included tie straps to secure the connectors together as shown Use a piece of the included double sided foam tape to stick the ESC to the inside of th...

Страница 11: ...ON Before installing the nacelle covers in the next step we recommend temporarily connecting the ESCs to your receiver and power up the system Use the transmitter to operate the motors Check to ensure...

Страница 12: ...onto the axle Grind a flat spot onto the axle for each wheel collar set screw look at the flat spots on the nose gear for an example Install the wheel collars and wheels back onto the axles and secur...

Страница 13: ...place stand behind the model approximately 10 feet 3m and confirm that the stab sits parallel with the wing If not weight can be added to the high side while gluing the stab in place or the stab pocke...

Страница 14: ...hrod tubes to determine the location of the servos on the tray The servos should be aligned so that the pushrods overlap the enlarged holes in the servo arms Be sure to harden the wood surrounding the...

Страница 15: ...ured use a piece of the included self adhesive hook and loop material to attach the receiver as shown 12 Cut the included 4 100mm length of white tube into two equal pieces Use CA to glue the pieces 9...

Страница 16: ...14 Cut a length of non adhesive hook and loop material 5 127mm Overlap the mating ends approximately 1 25mm to make a strap Put a piece of hook material from the self ahesive hook and loop material an...

Страница 17: ...hould never be plugged in if the transmitter is off If necessary remove the servo arms from the servos and reposition them so they are centered Reinstall the screws that hold on the servo arms 3 With...

Страница 18: ...an t get the throw required you ll have to resort to moving the pushrod closer in on the control horn Note If you have a computer radio it is always desirable to set your ATVs to 100 or as near 100 as...

Страница 19: ...t to the other wing tip An airplane that has been laterally balanced will track better in loops and other maneuvers PREFLIGHT Identify Your Model No matter if you fly at an AMA sanctioned R C club sit...

Страница 20: ...eless reckless and or dangerous manner 5 I will not fly my model unless it is identified with my name and address or AMA number on or in the model Note This does not apply to models while being flown...

Страница 21: ...play If it fluttered once under similar circumstances it will probably flutter again unless the problem is fixed Some things which can cause flutter are Excessive hinge gap Not mounting control horns...

Страница 22: ...the ground regaining nose wheel control Remember to mind your battery charge Do not wait until the battery is depleted to begin your landing approach You will need some charge left if you need to aba...

Страница 23: ...23...

Страница 24: ...GPMA1609 v1 1 Entire Contents 2015 Great Planes Model Mfg A subsidiary of Hobbico Inc...

Отзывы: